Introduction
Welcome to Systematic Mode!
While writing the previous lesson on Windows Disk Quotas, I had to go through Disk Management several times to create and manage the different partitions needed for the practicals. During one of those moments, a nostalgic thought crossed my mind.
I’ve been a Windows user since the XP era. At that time, the rules were strict — you had to carefully choose between Primary and Logical partitions, and going beyond the limit could unexpectedly turn the disk into a Dynamic Disk. That experience stayed with me, and it’s what sparked today’s lesson.
Today, we’re diving into Windows Disk Management — but since it’s a genuinely broad subject, this lesson focuses specifically on Basic Disk Management: creating partitions, deleting them, and understanding the options available along the way.
One thing I want to be upfront about: although I mentioned the XP era, this lesson is not a historical comparison of how Disk Management has changed over the years. The focus here is on Basic Disk Management in modern Windows — understanding the fundamentals and the practical operations you can perform with it.
Throughout the lesson, I will occasionally mention older Windows behaviour — but only briefly, and only when it helps explain something you see on the screen today.
What You’ll Learn
- How to read and navigate the Disk Management window
- The basics of a Basic Disk, plus a brief look at MBR vs. GPT
- How to create a new partition/volume from unallocated space
- Renaming a volume, changing drive letters, and deleting a volume safely
- How to shrink a volume — and why it won’t always let you shrink as much as you’d expect
- How to extend a volume — and why that option is sometimes greyed out
- Clearing up the confusing terminology around Disk, Drive, Partition, Volume, and Storage
Coming from the XP era myself, I’ve watched Disk Management go through some real changes — not just in what it lets you do, but in the words it uses to describe what you’re doing. Terms like disk, drive, volume, and partition can easily start to sound like different names for the same thing.
Throughout this lesson, I’ll use these terms in the same everyday way that most Windows users commonly do. But don’t worry: at the end of the lesson, we’ll dedicate a full section to properly untangling what each of these terms actually means.
With that out of the way, it’s time to open Disk Management and see what we’re actually looking at.
Part 1: Getting to know Disk Management
Instead of opening Disk Management right away, let’s first look at the options available when you right-click a drive. Some of these options are also available inside Disk Management, so this gives us a useful starting point.
1.1 Right-Click Options on a Drive in File Explorer
We’ll use Windows 11 as our main practical version throughout this lesson. In Windows 11, right-clicking a drive shows only a handful of options at first — to see the full list, you’ll need to click “Show more options.”
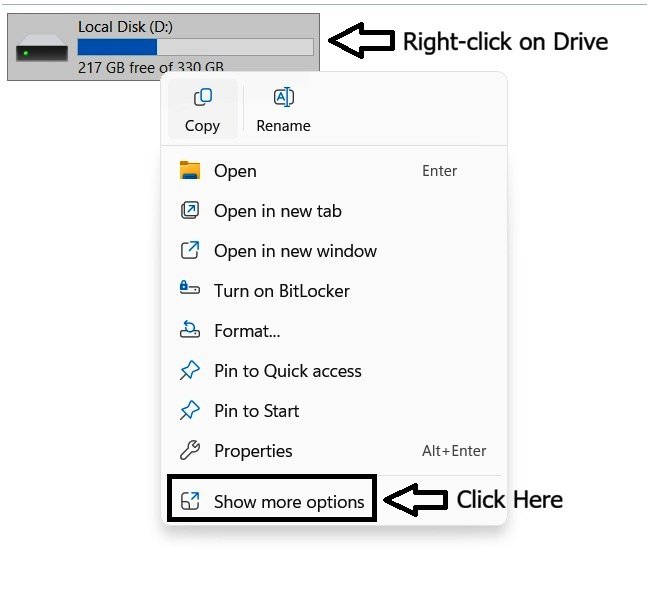
As soon as you click “Show more options,” a longer list appears. Keep in mind these options aren’t fixed — they can shift over time, and third-party software often adds its own entries to this list too. But a few options stay consistent across most drives, and those are the ones worth paying attention to here.
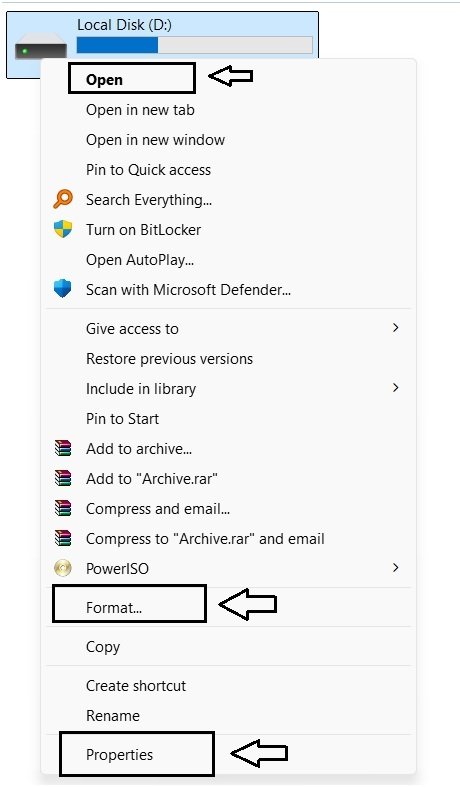
These options — Open, Format, and Properties — are also found inside Disk Management. This is just an introduction; we’ll get to what each of them actually does in the sections ahead.
1.2 Opening Disk Management
There are a few ways to reach Disk Management. You can right-click the Start menu button (or press Win + X) and select Disk Management. You can also search “Disk Management” in the Start menu. But the method I’d recommend, and the one we’ll use going forward, is the Run command:
- Press Win + R to open the Run dialog box.
- Type
diskmgmt.mscand press Enter.
This opens Disk Management directly.
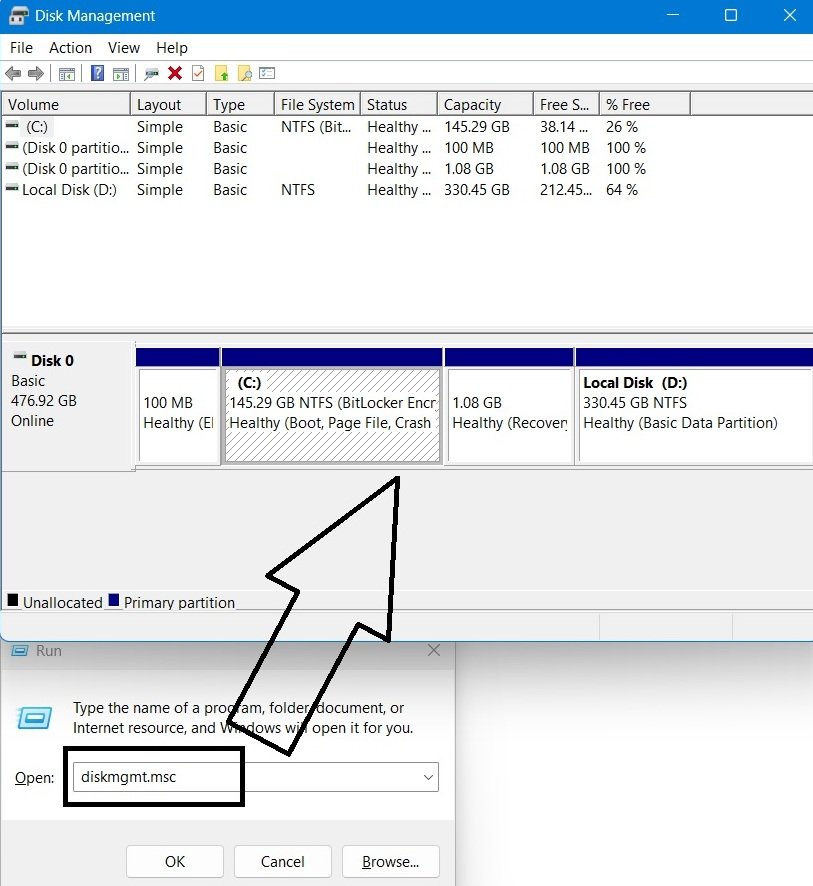
This command has worked the same way across most previous versions of Windows too.
As you can see in the screenshot, Disk Management is split into two views — the List View at the top, and the Graphical View at the bottom. We’ll start with the Graphical View first.
1.3 Understanding the Graphical View
The Graphical View sits at the bottom of the Disk Management window.
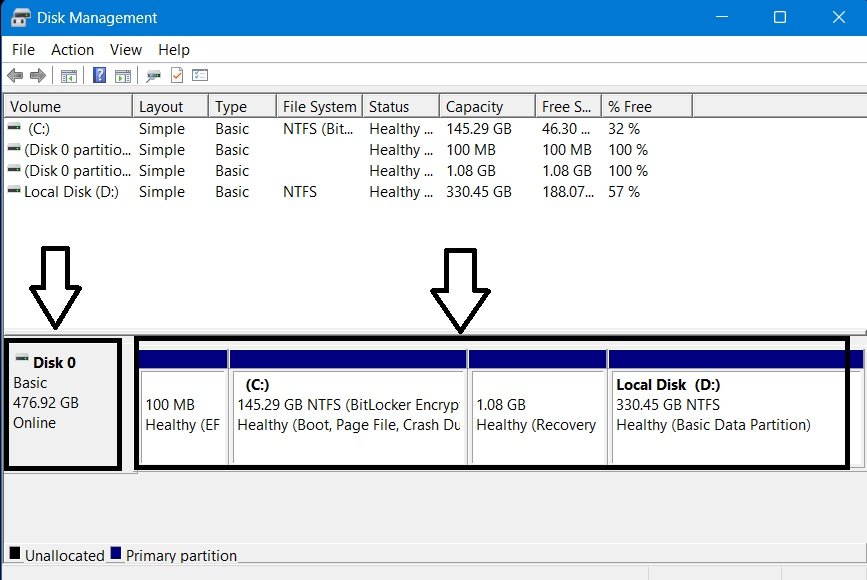
On the left side, you’ll see a small summary box — in this case:
Disk 0
Basic
476.92 GB
Online
Let’s break this down piece by piece.
- Disk 0 — Windows numbers physical disks starting from 0, not 1. If you only have one disk, as we do here, it will simply be Disk 0.
- Basic — this tells you the disk type. Windows uses two disk types, Basic and Dynamic — this is a Basic disk, which is what the vast majority of ordinary Windows users have.
- 476.92 GB — and here’s a question almost everyone asks at some point: this is a 512 GB SSD, so why does Windows show less than that? The answer is that manufacturers and Windows count a “gigabyte” differently.
- Storage manufacturers advertise capacity using decimal math, where 1 GB = 1,000,000,000 bytes.
- Windows, on the other hand, calculates and displays size using binary math, where 1 GB actually equals 1,073,741,824 bytes — but Windows still labels it “GB” instead of the more technically correct “GiB” (gibibyte). Because Windows’ “GB” represents a larger chunk of bytes than the manufacturer’s “GB,” the same physical drive shows a smaller number once Windows reports it. No space is missing or lost — it’s purely a difference in how the two sides are counting.
- Online — this simply means the disk is active and accessible to Windows right now.
To the right of that summary box, you’ll see the disk’s partitions laid out side by side. In our case, that’s the EFI System Partition, then C:, then Recovery Partition, then the D:. Each block shows details like size, file system, and status.
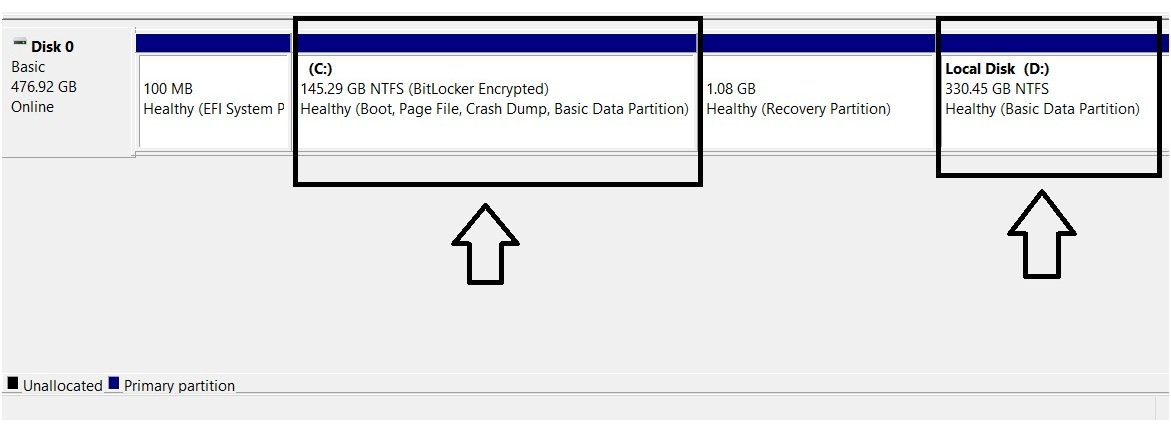
- C: shows as 145.29 GB, NTFS, Healthy, with several role labels attached. This is the partition where Windows is installed, and Windows uses it to start the operating system and store various Windows-related data. Because BitLocker encryption is enabled on this partition, it is also marked as BitLocker-encrypted here.
- D: is simpler — 330.45 GB, NTFS, Healthy, and just Basic Data Partition, meaning it’s an ordinary data partition with no special system role attached.
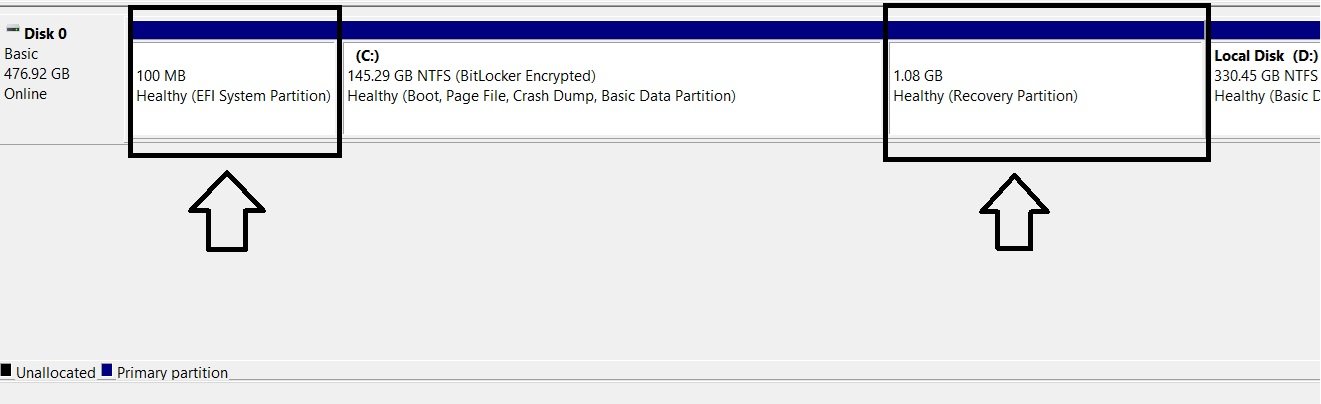
Then there’s the EFI System Partition and the Recovery Partition. You’ll notice that neither has a drive letter, and that is intentional. Windows keeps these partitions hidden from File Explorer to prevent them from being accidentally opened, modified, or deleted. These partitions contain files needed to start Windows or recover the system when something goes wrong.
One more thing: if you right-click on the C or D partition directly in the Graphical View, you’ll see a set of options for managing that partition.
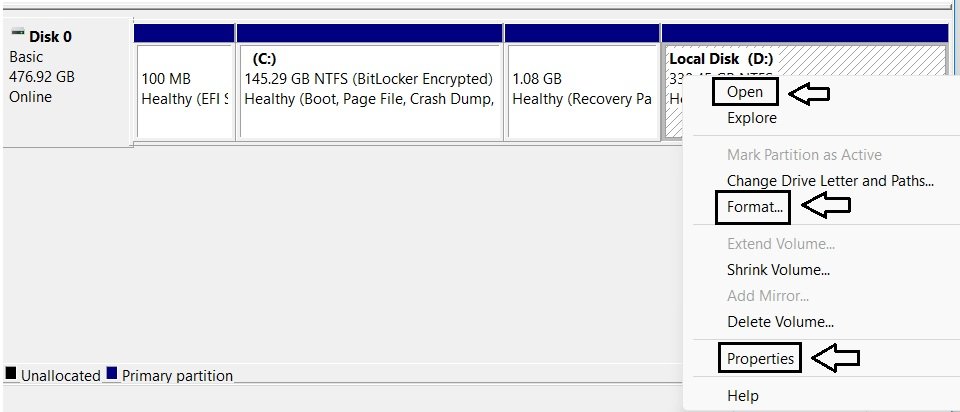
You’ll notice some of these options are the same ones we saw earlier when right-clicking a drive in File Explorer — Open, Format, and Properties among them.
If you right-click on Disk 0 itself, you’ll see a different set of options — these relate to the disk as a whole, not to any single partition.
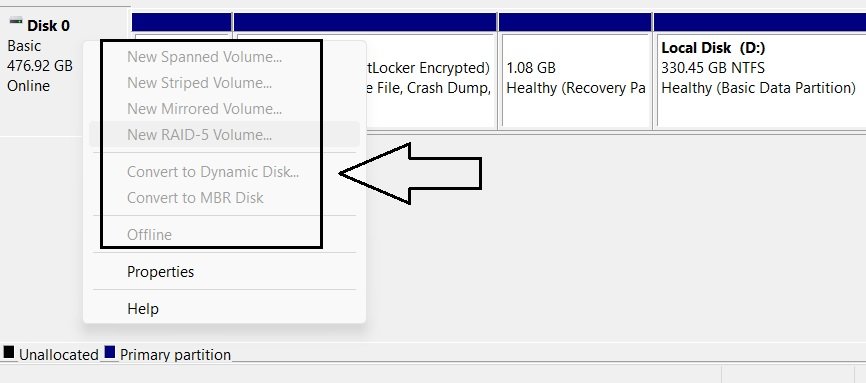
Notice that almost everything here is greyed out — only Properties and Help actually clickable. Some of these options only become available in different scenarios, and others are tied to concepts we haven’t covered yet.
Now that we understand what the Graphical View is telling us, let’s look at the List View above it.
1.4 Understanding the List View
The List View sits at the top of the Disk Management window, and it describes the exact same disk we just looked at — just organized as a table instead of a visual layout. Each row is one partition, and each column tells you something specific about it.
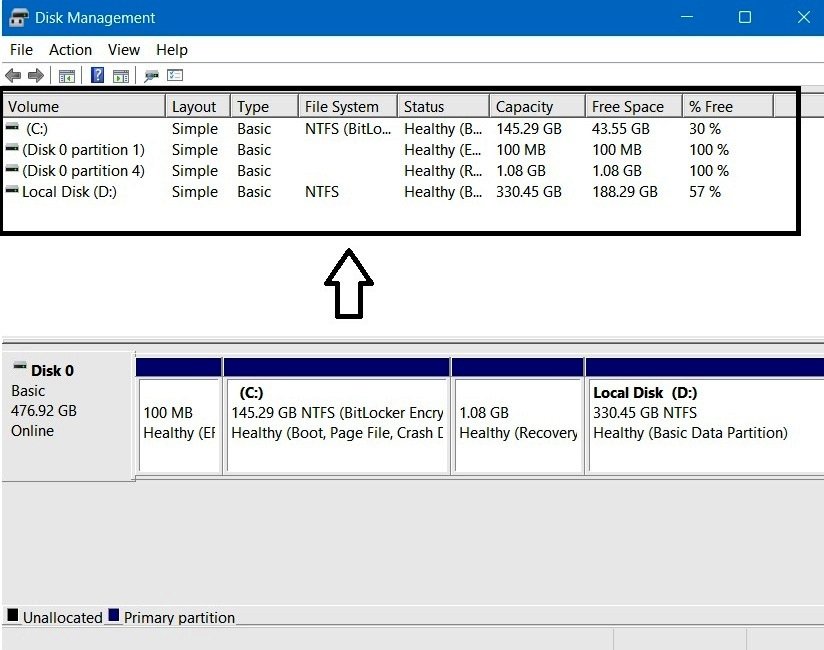
Terminology Note: the very first column here is literally labeled “Volume.” This is a good example of what we talked about earlier — Windows itself uses “volume” as the column header, even though everyday users (and this lesson) would just call these “drives.”
Let’s walk through what each column means, using our own disk as the example:
- Volume — the name of the partition as Windows displays it. Notice that C: and D: show up by their drive letters, but the EFI and Recovery partitions — which don’t have drive letters, — instead show up as “(Disk 0 Partition 1)” and “(Disk 0 Partition 4).” Windows falls back to this disk-and-position naming whenever there’s no letter to display.
- Layout — how the partition is structured. All four of ours say “Simple,” which just means a single, straightforward partition — not spanning or combining multiple pieces of disk in any special way.
- Type — the disk type it belongs to. All four say “Basic,” matching what we already saw in the Graphical View.
- File System — C: and D: both show NTFS. The EFI and Recovery partitions show this column blank — not because they have no file system at all, but because Windows doesn’t report it here in the same way for these protected partitions.
- Status — Healthy across the board, along with the same role labels we saw earlier.
- Capacity, Free Space, % Free — straightforward numbers: C: has 145.29 GB total with 43.55 GB free (30%), D: has 330.45 GB total with 188.29 GB free (57%). The EFI and Recovery partitions, however, both show as 100% free — Microsoft documents this behavior directly: “Disk Management might show the EFI System and Recovery partitions as 100 percent free.” Both partitions do contain data — the 100% figure is simply not an accurate representation of their actual free space because of how these partition types are handled by Disk Management.
Source: Microsoft Learn — Overview of Disk Management
One more thing: right-click on D: in the List View, and you’ll see the same set of management options we already saw in the Graphical View.
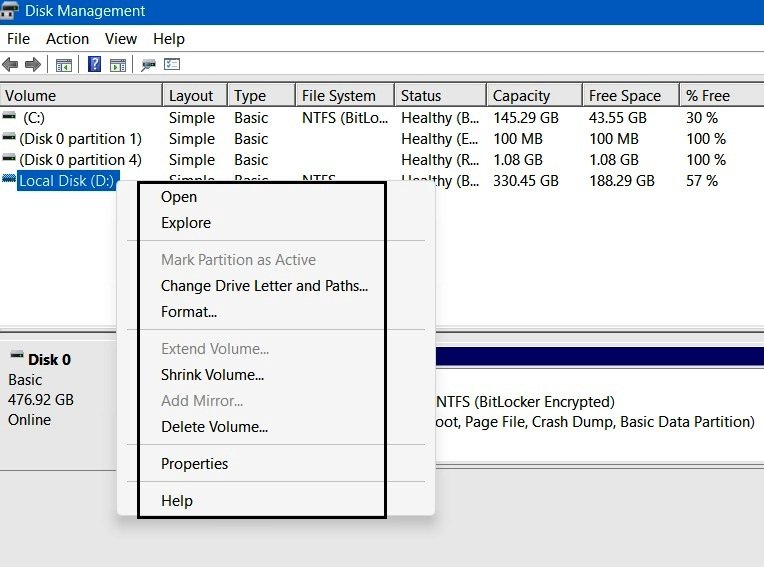
But right-click on the EFI System Partition instead, and you’ll notice almost every option is greyed out and unclickable.
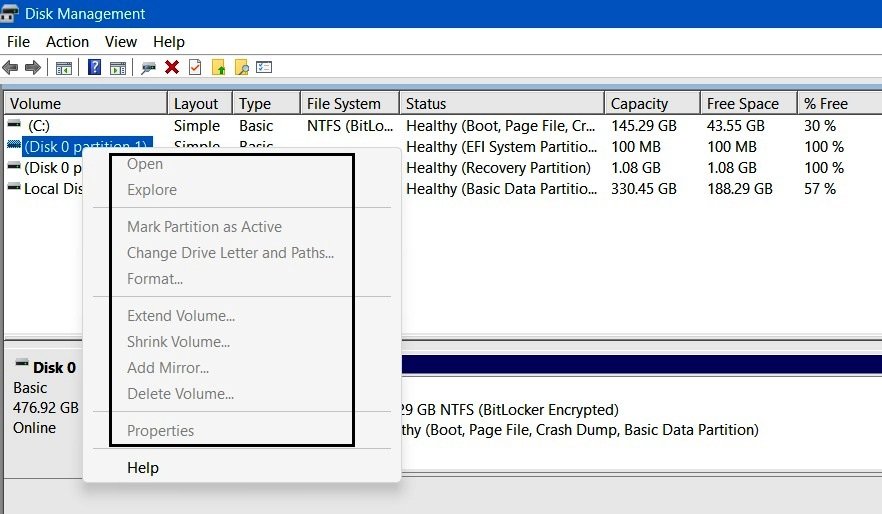
This isn’t a bug — it’s the same protection we talked about earlier. Windows deliberately locks down what you’re allowed to do to the EFI and Recovery partitions.
1.5 Customizing Disk Management
When you first open Disk Management, you’ll see the List View at the top and the Graphical View at the bottom, along with a few other default settings. But you can customize the look and behavior of Disk Management using the menu options at the top of the window. I won’t go through every option here, just one or two as examples to show how you can customize Disk Management.
How to Change the Top & Bottom Views
By default, the List View sits on top and the Graphical View sits at the bottom — but this can be changed. Click View, and you’ll see two options: Top and Bottom. Clicking Top gives you three choices: Disk List, Volume List (currently selected), and Graphical View.
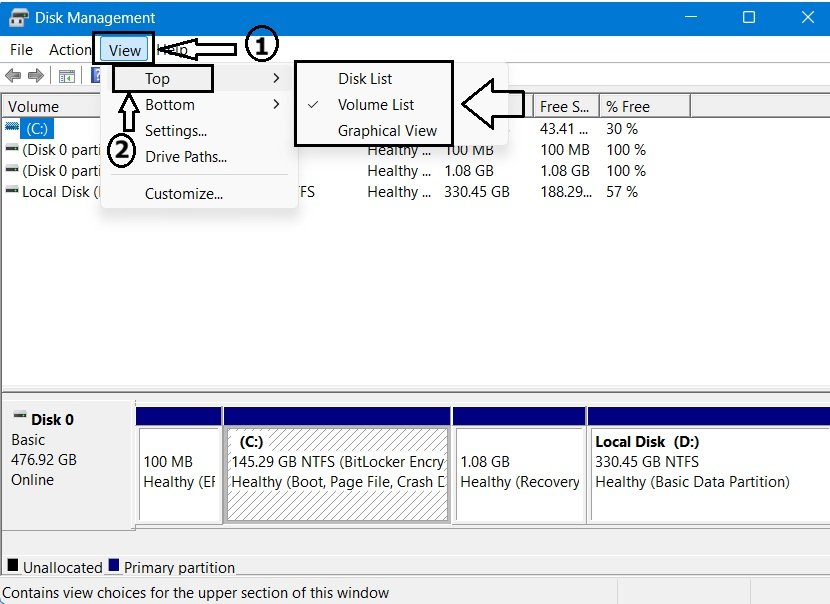
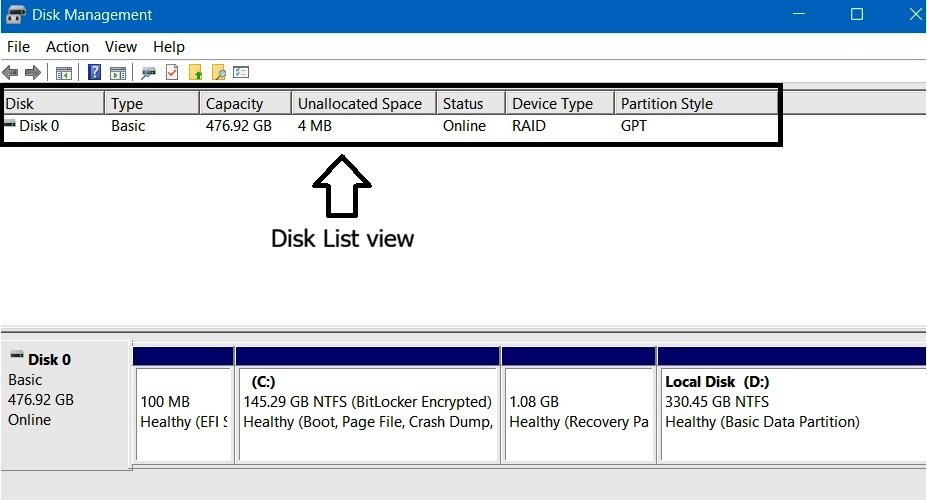
Since Volume List is currently selected, that’s why the top pane shows all your partitions/volumes. If you select Disk List instead, you’ll see details about your physical disk itself — Disk 0, its type (Basic), capacity, partition style, and a few other properties.
If you select Graphical View instead, the same graphical layout will now appear in both places — top and bottom.
The Bottom option works the same way, except it has a fourth choice: Hidden.
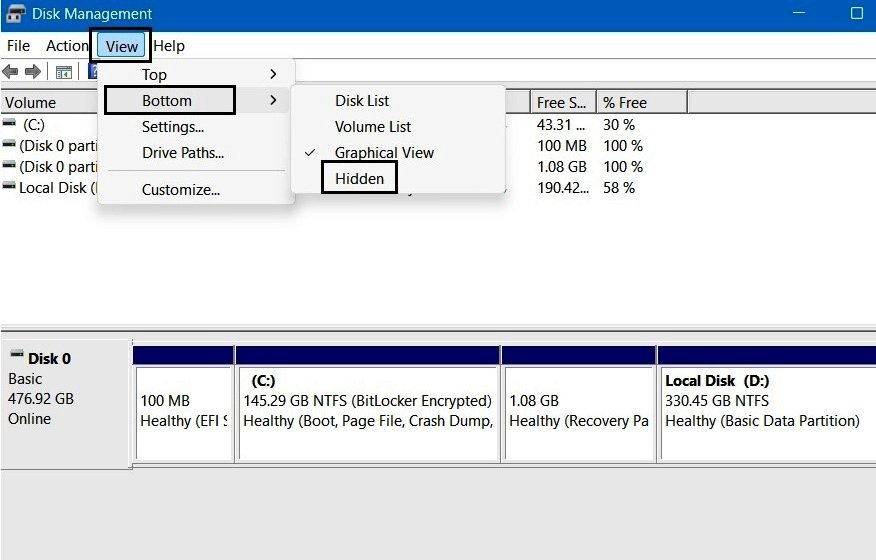
Selecting Hidden simply hides the bottom pane entirely.
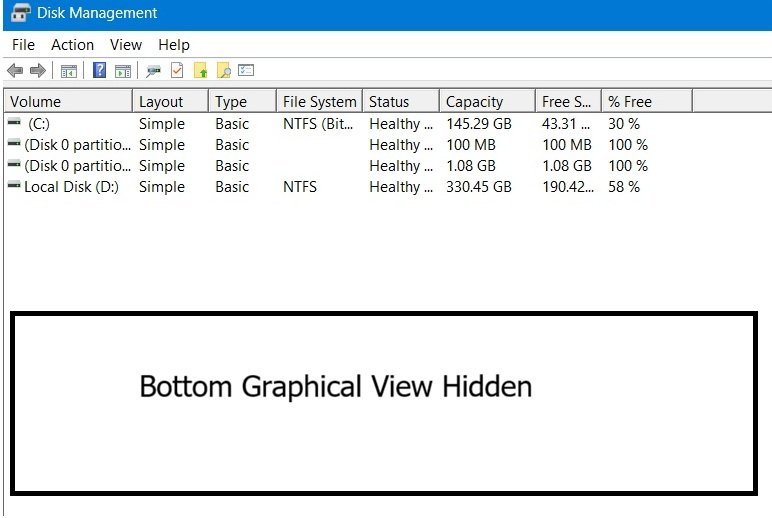
Now only the top view is visible.
How to Change the Color and Pattern
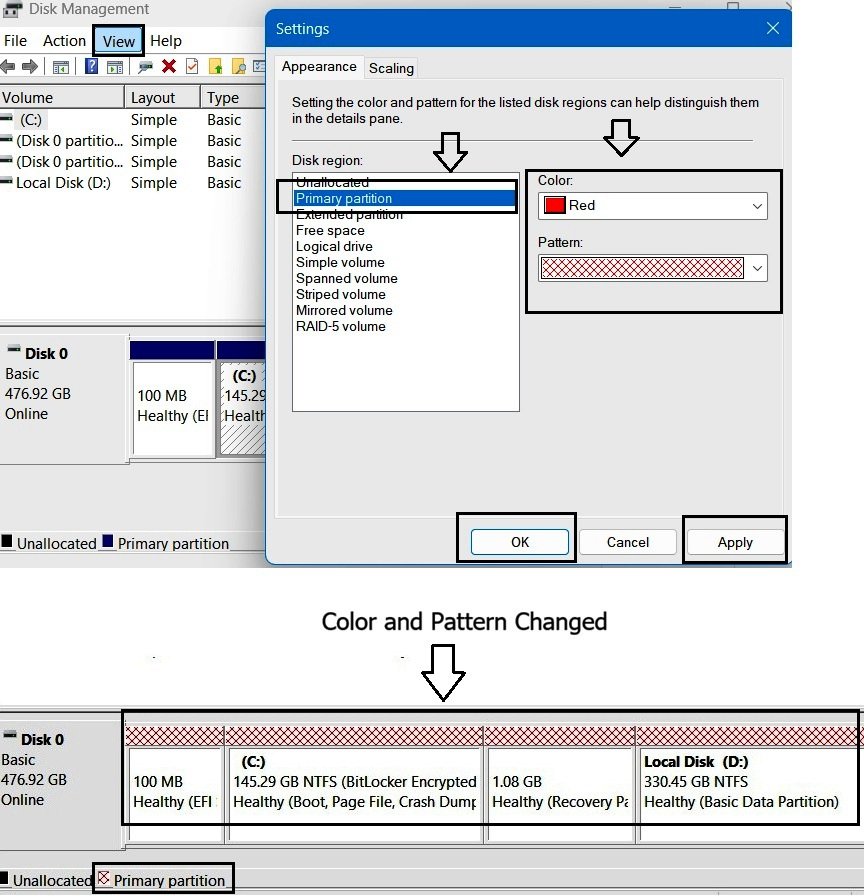
You may have noticed the blue color highlighting the primary partitions in the Graphical View, along with the vertical bar pattern used to represent each one. Both of these can be changed.
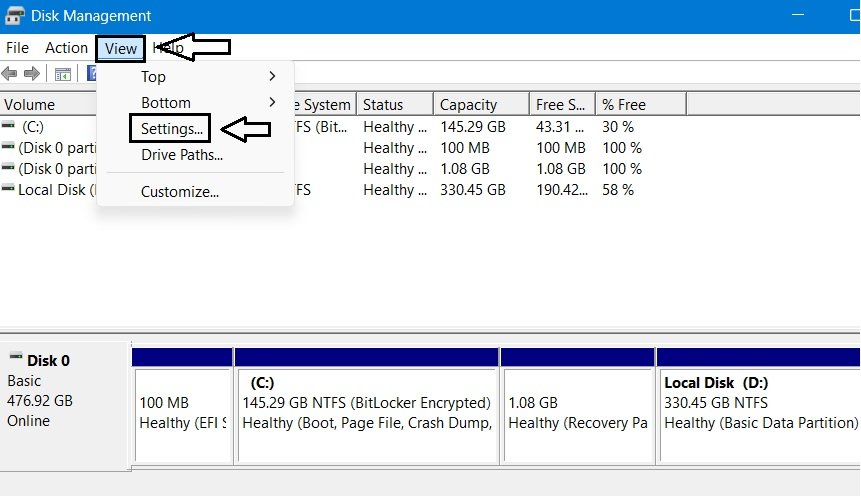
Click View, then Settings.
By default, the Appearance tab is selected. On the left, you’ll see a dropdown listing every region type Disk Management can display — regardless of which ones are actually present on your disk. Since our disk only has primary partitions (shown here in blue), that’s the one we’ll select. Choose a color — say, red — and a pattern, then click Apply and OK.
Now, notice how the Graphical View currently lays out all four partitions in a specific order — EFI, then C:, then Recovery, then D:. This ordering follows a particular scaling setting, and it can be changed too — but going through that in full would stretch this section more than it’s worth. For now, let’s move on to a quick look at the Action menu.
A Quick Look at the Action Menu
The Action menu is worth a brief mention. Clicking it shows four main options: Refresh, Rescan Disks, Create VHD, and Attach VHD.
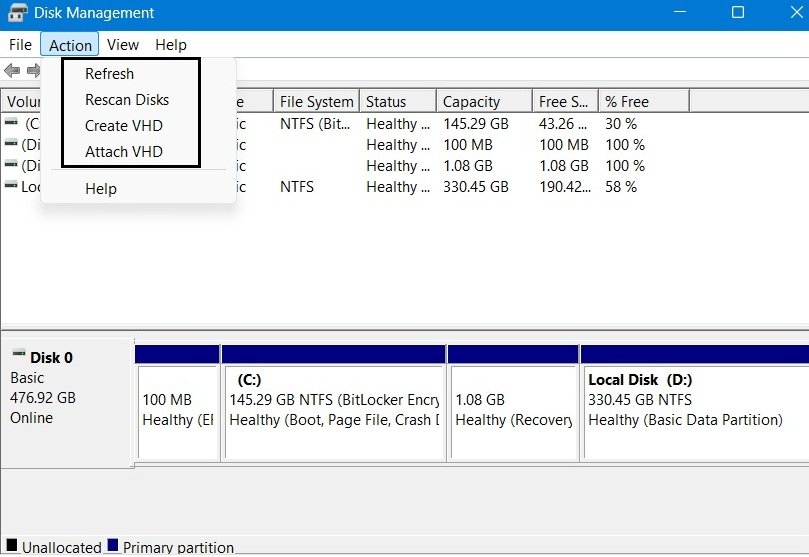
- Refresh — updates the console’s display after you’ve made a change.
- Rescan Disks — re-detects the drives connected to your system, useful after plugging in or removing a drive.
- Create VHD and Attach VHD — both relate to creating and mounting virtual hard disks, which is outside the scope of this lesson.
So these are some customization of Disk Management.
Are These Customization Changes Permanent?
Here’s an important thing to know: none of the customizations in this section — colors, patterns, view layout — are permanent. They only last for as long as this Disk Management window stays open. Close it and reopen it, and everything reverts to default.
To make these changes stick, you need to launch the console in Author Mode and save your own custom Management Console (.msc) file:
- Press
Win + R, typemmc /a, and press Enter. This opens an empty Microsoft Management Console in Author Mode. - Click File → Add/Remove Snap-in…
- Select Disk Management from the list, click Add, choose Local computer, then click Finish, followed by OK.
- Double-click Disk Management (Local) in the console tree, and customize your views, colors, and layout as you like.
- Click File → Save As…, name it something like “Custom Disk Management,” and save it to your Desktop. This creates a standalone
.mscfile on your computer.
From now on, whenever you launch that saved .msc file specifically, your custom colors and layout will load exactly as you left them. Opening Disk Management the normal way — through search or diskmgmt.msc — will still open with default settings every time. Both are the same underlying tool; the only difference is which “entry point” you’re using to reach it.
That completes the introduction and customization of Disk Management. Before we move into any practicals, there are a few basic fundamentals worth understanding about Basic Disks and partitions — let’s move into Part 2.
Part 2: Understanding Basic Disk Concepts
Before we start creating and managing partitions ourselves, there are a few foundational concepts worth understanding first. We won’t go into them in depth, but understanding the basics will make the practical sections ahead easier to follow.
2.1 What Is a Basic Disk?
Basic is the standard disk type in Windows. It’s what almost every home PC uses. A basic disk is divided into partitions (which we’ll get into shortly), and those partitions hold your volumes. Its a default disk type, using either the MBR or GPT partitioning scheme to organize its partitions. It’s simple, predictable, and works with every version of Windows going back decades.
There’s another type called Dynamic Disk. It’s older and more complex, offering features like spanning across multiple disks and mirroring for redundancy. But Microsoft has deprecated it — meaning they no longer recommend it, and it’s not needed for everyday use.
Important Note
Basic disks are not only the most common disk type for everyday Windows users, but they are also Microsoft’s recommended choice for modern Windows systems. Dynamic Disks, while still supported in certain scenarios, are now considered a legacy technology and have been deprecated for new deployments.
2.2 MBR and GPT
In addition to disk types, every disk also uses a partition style. The two partition styles supported by Windows are:
- MBR
- GPT
You can view a disk’s partition style by:
Right-click Disk 0 → Properties → Volumes tab → Partition style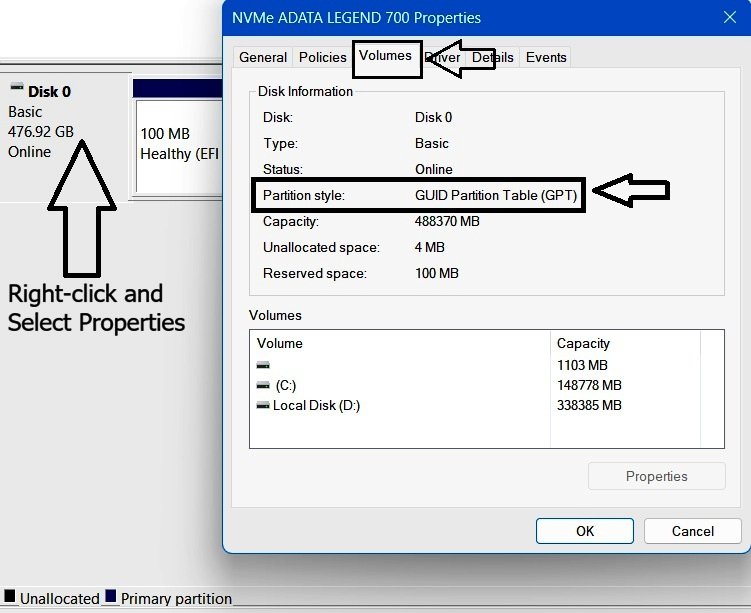
MBR stands for Master Boot Record. It’s the older style, dating back to the early days of PCs. An MBR disk stores its partition information in a small table at the very beginning of the disk. It works, and it’s still found on older systems — but it has real limitations, which we’ll get to in a moment.
GPT stands for GUID Partition Table. It’s the modern style, introduced as part of the UEFI initiative that replaced the old BIOS firmware on newer systems. GPT stores partition information in a more robust, self-identifying structure, with a backup copy at the end of the disk for redundancy.
2.3 The Four-Primary-Partition Limitation
One of the best-known limitations of MBR disks was the four-primary-partition limit. Under the traditional MBR structure, a disk could contain a maximum of four primary partitions. Once that limit was reached, creating additional partitions required a different approach.
This limitation is actually connected to a personal experience that inspired this lesson. Back in the Windows XP era, I ran into it while experimenting with partitions. At the time, creating partitions involved choices that most modern Windows users never see today.
Primary, Extended, and Logical — Why You Don’t See Them Here
To work around the four-primary-partition limit, MBR introduced two additional concepts: Extended Partitions and Logical Drives. Instead of creating another primary partition, users could create an Extended Partition and then create multiple Logical Drives inside it. As a result, older versions of Windows often required users to choose between creating a Primary Partition or an Extended Partition.
Modern Windows no longer asks whether you want to create a Primary or Extended Partition. That’s because modern Windows installations typically use GPT, which uses a different partition structure and does not have the same four-primary-partition limitation as MBR.
Now that we understand the basic disk environment, it’s time to move from theory to practice. Let’s start by creating a new volume (drive) and explore the options Windows provides during the process.
Part 3: Creating and Formatting a New Volume
To actually walk through creating and managing partitions hands-on, I connected a new secondary disk to my system — a 1 TB drive. In Disk Management, this physical drive appears as Disk 1. Due to the binary capacity calculations we explored in Part 1, Windows reports its total usable capacity as 931.50 GB.
This will be our test disk for the rest of this lesson. Let’s start by initializing it.
3.1 When a Disk Needs to Be Initialized
When you attach a brand-new disk, you need to initialize it before you can use it to create partitions. However, initialization may also be required for a previously used disk if Windows can no longer read its partition information correctly.
Disk Management may automatically open the Initialize Disk window when it detects that initialization is required. If it doesn’t, you can right-click the disk and select Initialize Disk.
Here, you’ll see your disk already selected — in our case, Disk 1 — along with a choice between two partition styles: MBR or GPT.
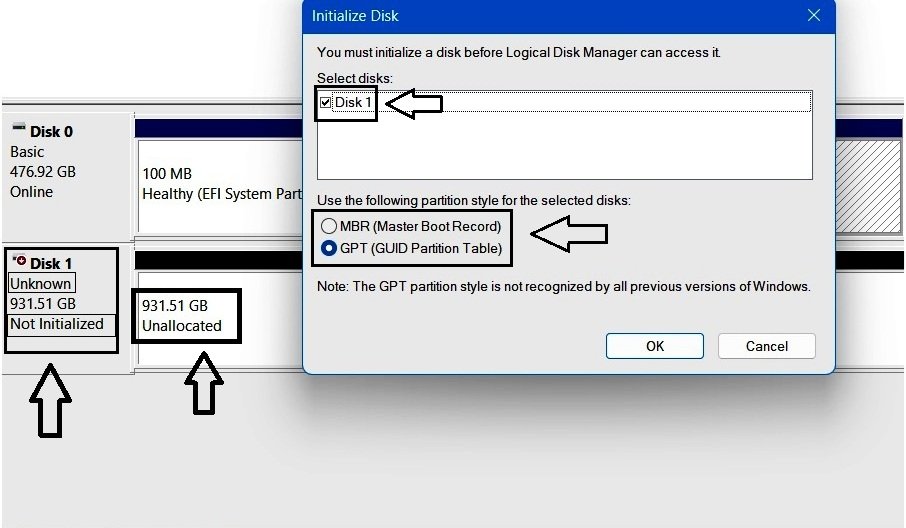
If you close this window without initializing the disk, Disk Management still displays the disk, but its status is different. On the left side, you’ll typically see:
- Disk 1
- Unknown
- Not Initialized
At this stage, Windows knows that a physical disk exists, but it doesn’t yet know how partitions should be organised on that disk. As a result, volume creation options remain unavailable until the disk is initialized.
Since we’re working on a modern Windows 11 system, GPT is the recommended partition style and the one we’ll use throughout this lesson. select GPT — and click OK.
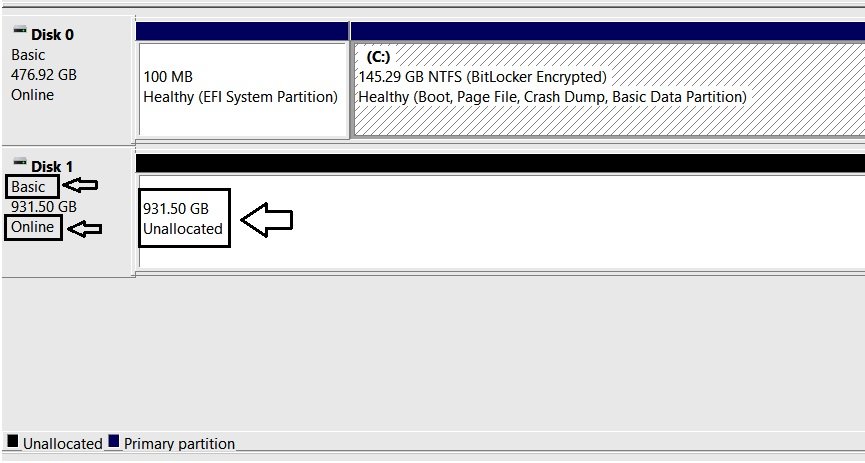
As soon as you click OK, the disk is initialized. Its status now shows Basic and Online — meaning it’s active and ready to use. On the right, you’ll see it displaying 931.50 GB Unallocated.
Unallocated space refers to the portion of a disk’s capacity that hasn’t been assigned to any partition yet — space that physically exists on the disk but isn’t currently set up for Windows to store anything on.
What Does the Warning Note Mean?
If you look back at the Initialize Disk screenshot, you’ll notice a note at the bottom:
“Note: The GPT partition style is not recognized by all previous versions of Windows.”
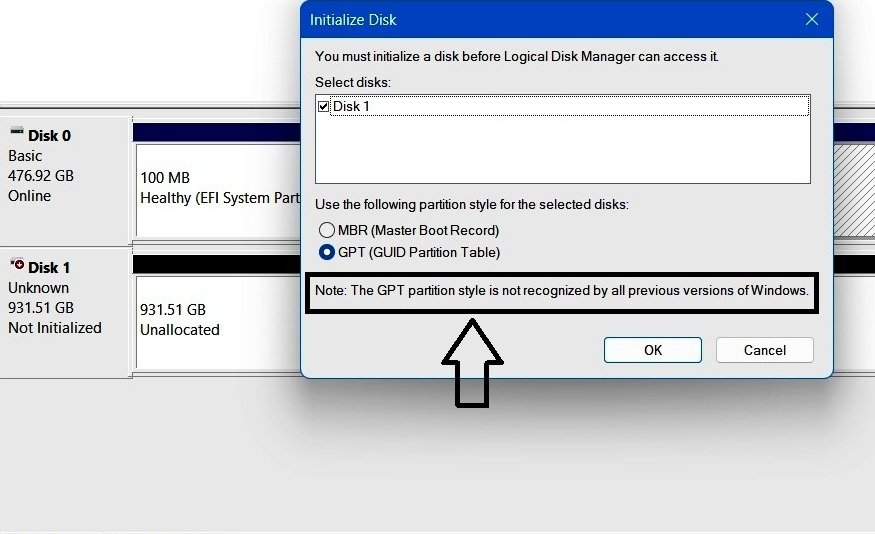
This is a compatibility notice about older Windows versions. Modern Windows fully supports GPT, but some older versions had limited or no support for it — particularly when it came to actually booting from a GPT disk. This is part of why MBR was the common choice on older Windows systems, while GPT has since become the standard for modern PCs.
Now it’s time to create our first volume and walk through the New Simple Volume Wizard step by step.
3.2 Creating a New Simple Volume
For this walkthrough, we’ll create a 50 GB volume for testing purposes.
Right-click the unallocated space, and you’ll notice only one option is available: New Simple Volume.
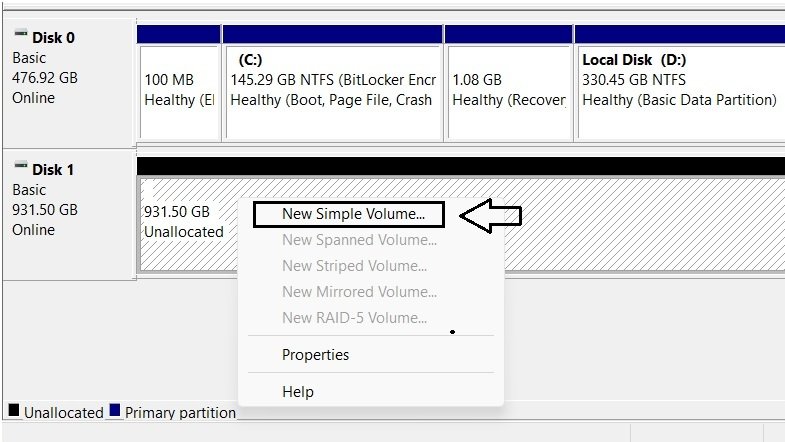
Clicking it opens the New Simple Volume Wizard. Click Next, and you’ll reach the Specify Volume Size screen.
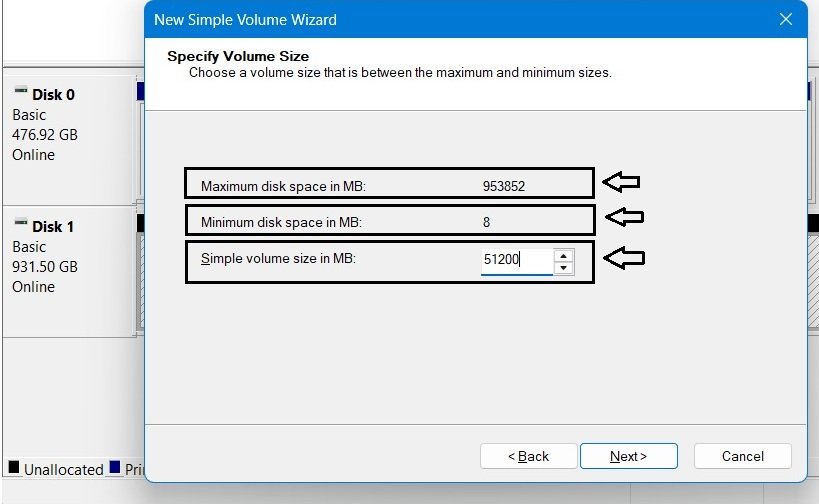
Here you’ll see three values:
- Maximum disk space in MB — the total available unallocated space, shown in MB (953852 MB in our case).
- Minimum disk space in MB — the smallest volume size Windows will allow (8 MB).
- Simple volume size in MB — where you enter your desired size. Since we want 50 GB using binary sizing, that’s 51200 MB. Enter this and click Next.
This brings us to Assign Drive Letter or Path.
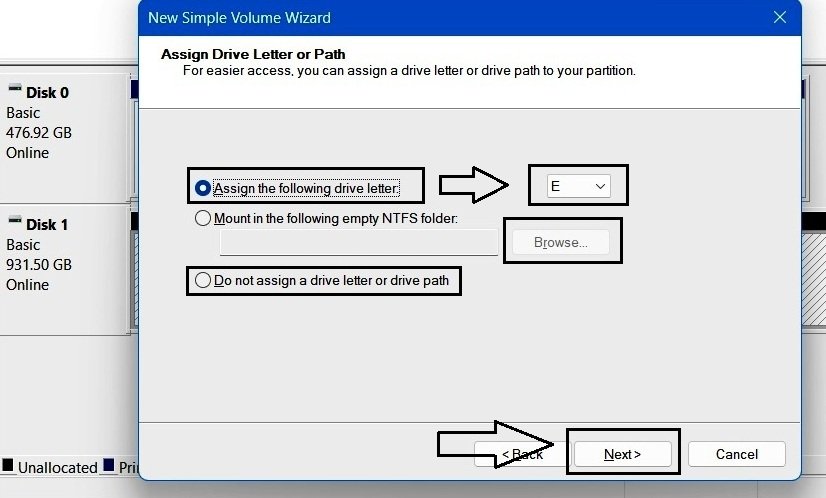
There are three choices here:
- Assign the following drive letter — By default, E is selected, since Disk 0 already uses C and D — Windows automatically suggests the next available letter. You can pick a different one from the dropdown if you prefer.
- Mount in the following empty NTFS folder — Rather than assigning a drive letter, this attaches the new volume to an empty folder on an existing NTFS volume, so the folder itself becomes the doorway into this new volume’s space. The target folder must already exist and be empty, and it needs to sit on an NTFS-formatted volume.
- Do not assign a drive letter or drive path — Choosing this creates the volume with no letter and no folder mount at all, which is exactly why it won’t appear in File Explorer. The volume still exists and can be formatted normally; it simply stays inaccessible until you manually assign it a letter or path later.
For our practical, we’ll go with the first option — assign letter E — and click Next.
This opens the Format Partition screen.
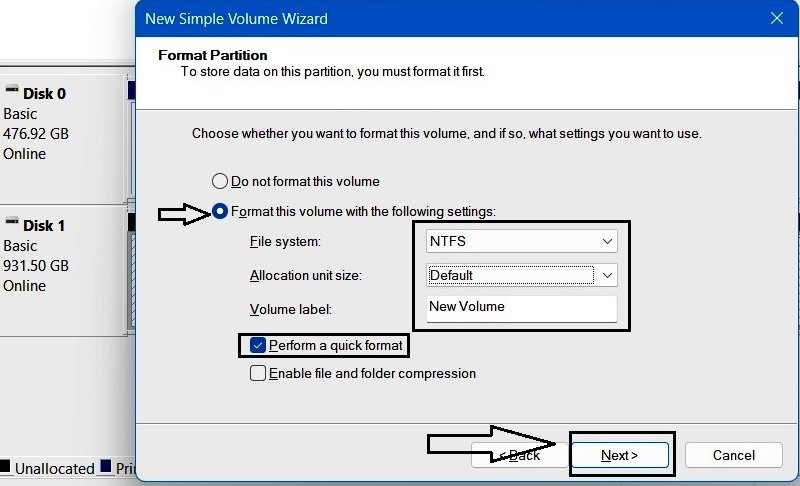
There are two main choices: Do not format this volume, which creates the volume but leaves it unusable until formatted separately, or Format this volume with the following settings — the option we want, since formatting is what actually gives the volume a usable file system. Selecting it activates several additional settings:
- File system — defaults to NTFS, which is also the recommended choice today. Other options are available via the dropdown if needed.
- Allocation unit size — Disk space is managed in small blocks called clusters. A 4 KB cluster size means even a 1 KB file reserves 4 KB of space. Leaving this on Default allows Windows to assign the optimal cluster size (typically 4 KB) based on drive size.
- Volume label — defaults to “New Volume.” This is effectively the volume’s display name, shown alongside its drive letter, and can be changed to anything you like.
- Two checkboxes follow: Perform a quick format (checked by default — we’ll leave this as is) and Enable file and folder compression (unchecked by default — enabling this compresses your files and folders to save additional space).
We won’t change any of these defaults. With “Format this volume with the following settings” selected, click Next.
The final screen, Completing the New Simple Volume Wizard, appears.
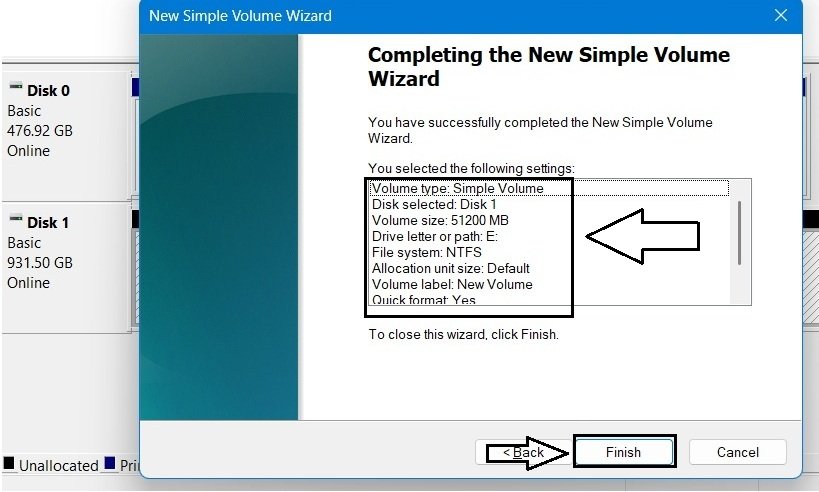
This summarizes everything we’ve configured:
- Volume Type: Simple Volume
- Disk Selected: Disk 1
- Volume Size: 51200 MB
- Drive Letter or Path: E:
- File System: NTFS
- Allocation Unit: Default
- Volume Label: New Volume
- Quick Format: Yes
- Enable File and Folder Compression: No
Before clicking Finish, this is your chance to review everything — clicking Back takes you to any specific screen you’d like to change. Since everything looks correct, click Finish.
The console will take a moment to process — how long depends on the volume’s size and whether Quick Format was used. Once it’s done, the console refreshes automatically, showing the newly created volume on Disk 1.
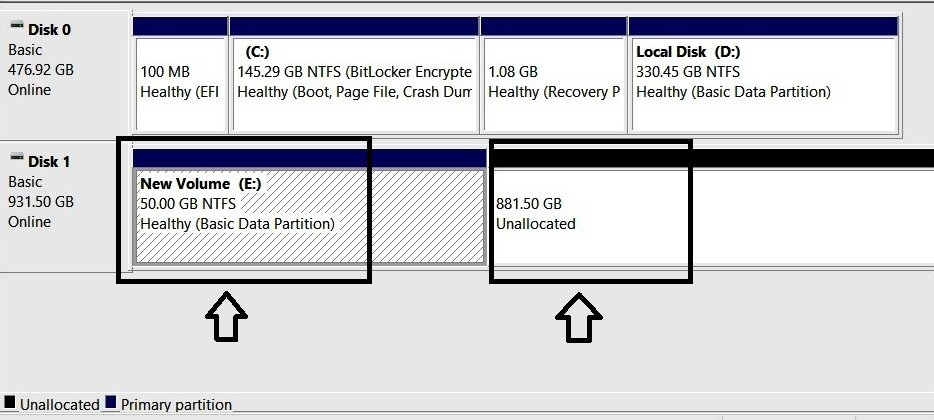
You can now see the new 50 GB Volume E has been created, and the remaining unallocated space has shrunk accordingly — now showing 881.50 GB.
One Thing Worth Noticing:
At no point did this wizard ask us to choose between Primary and Extended partitions. On older versions of Windows, like XP, this entire process looked different from the start — the wizard was called New Partition Wizard, not New Simple Volume, and clicking Next immediately asked you to choose between a Primary Partition or an Extended Partition before any of the other settings appeared.
3.3 Managing Volumes via Disk Management
Now that the new volume exists, let’s look at the options available for managing it. Open Disk Management — remember, this volume appears in two places, the List View above and the Graphical View below — and right-click E: in either location; both show the same set of options.
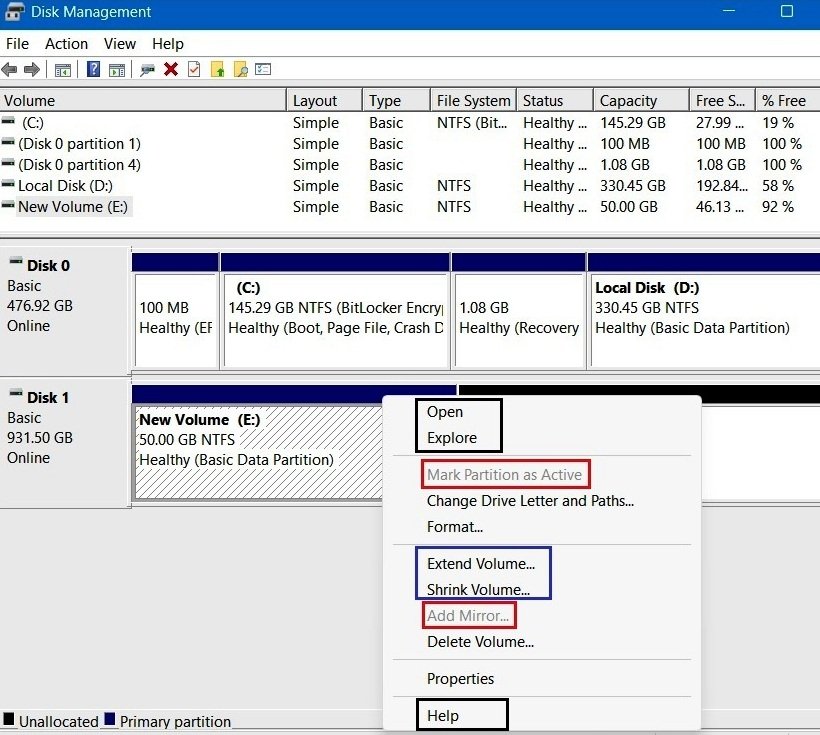
Most of these options don’t need much explanation.
- Two are greyed out: Mark Partition as Active, which relates to how a legacy BIOS selects a boot partition on MBR disks — a mechanism that simply doesn’t apply here, since our disk uses GPT and UEFI boot instead — and Add Mirror, which requires converting to a Dynamic disk first, something we’ve deliberately kept out of scope.
- Extend Volume and Shrink Volume are both important enough to get their own dedicated Parts coming up next.
- Open, Explore, and Help are common enough that they don’t need explanation here.
That leaves four worth walking through: Change Drive Letter and Paths, Format, Delete Volume, and Properties. Let’s look at them one by one.
Change Drive Letter and Paths
Clicking this opens a window with drive letter E: already selected by default.
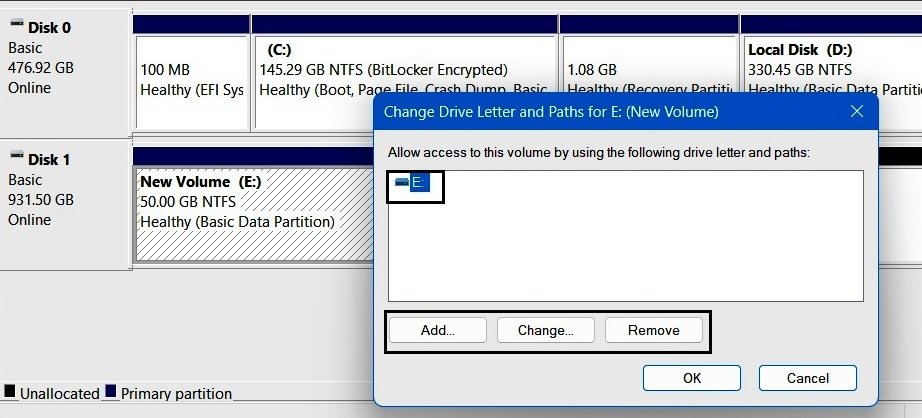
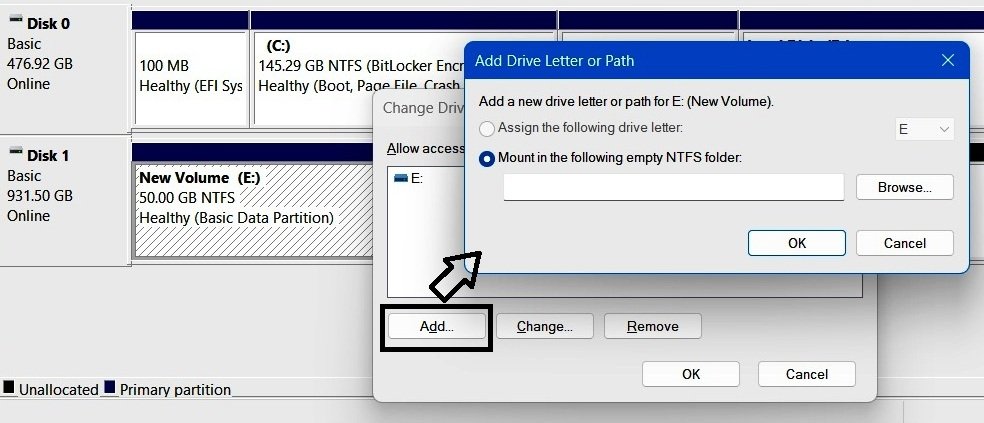
It offers three actions: Add, Change, and Remove. Clicking Add shows two familiar options — assign a drive letter, or mount to an empty NTFS folder — the same choices we saw during volume creation. Since this volume already has letter E:, only the mount option is actually usable here.
Clicking Change opens a dropdown listing available letters to switch to.
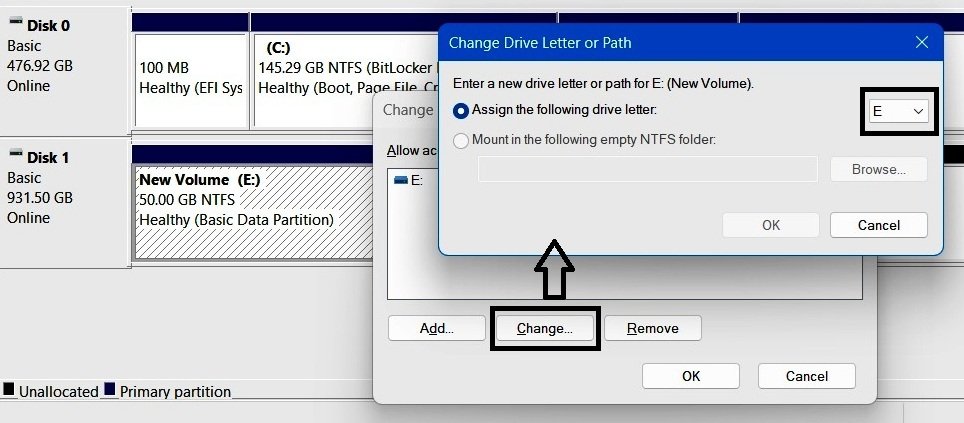
And Remove brings up a warning that “some programs that rely on drive letters might not run correctly.”
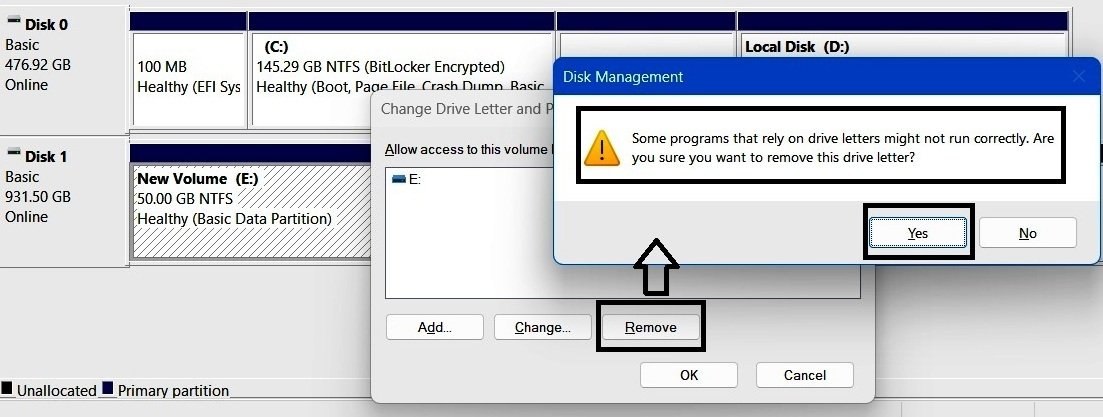
Selecting Yes removes letter E: from the volume. Right-click the volume again afterward, and you’ll notice Open and Explore are now greyed out.
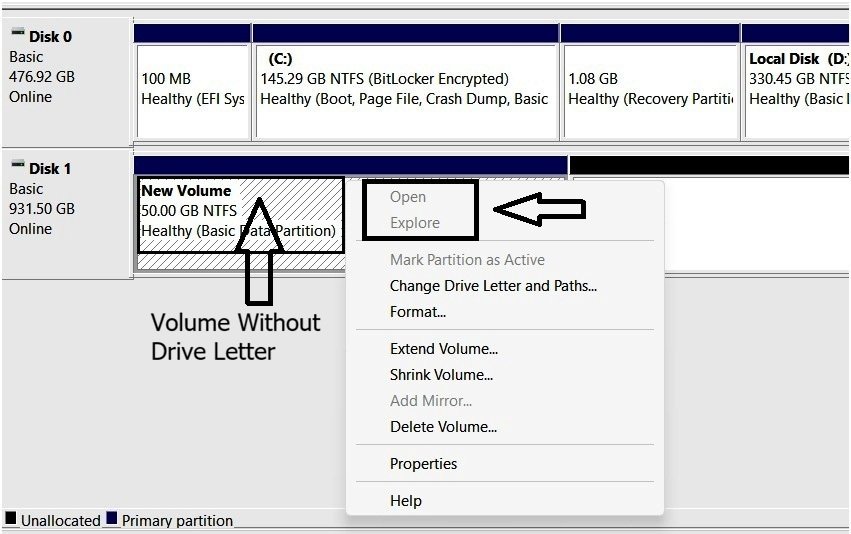
This makes sense — without a drive letter, there’s no path for Windows to open or browse into.
Format
Clicking Format opens the same settings window we already covered during volume creation, so we won’t repeat that here.
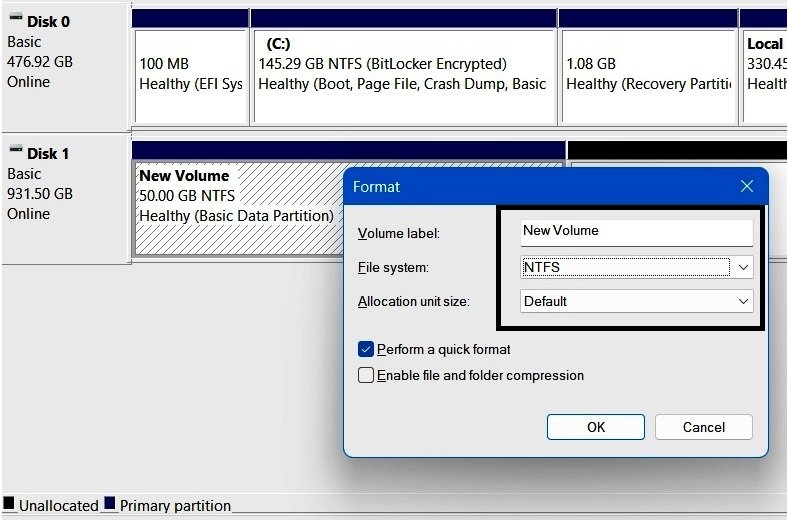
However, there are one common point of confusion worth clearing up.
Format vs. Delete Files vs. Delete Volume — Deleting files removes individual files, which may still be recoverable from the Recycle Bin. Formatting clears the file system and removes everything on the volume at once, while keeping the volume itself intact. Deleting the volume removes the volume entirely and turns its space back into unallocated space. We’ll see this difference next when we use Delete Volume.
Delete Volume
Clicking this opens a warning that deleting will erase all data on the volume and recommends backing up first.
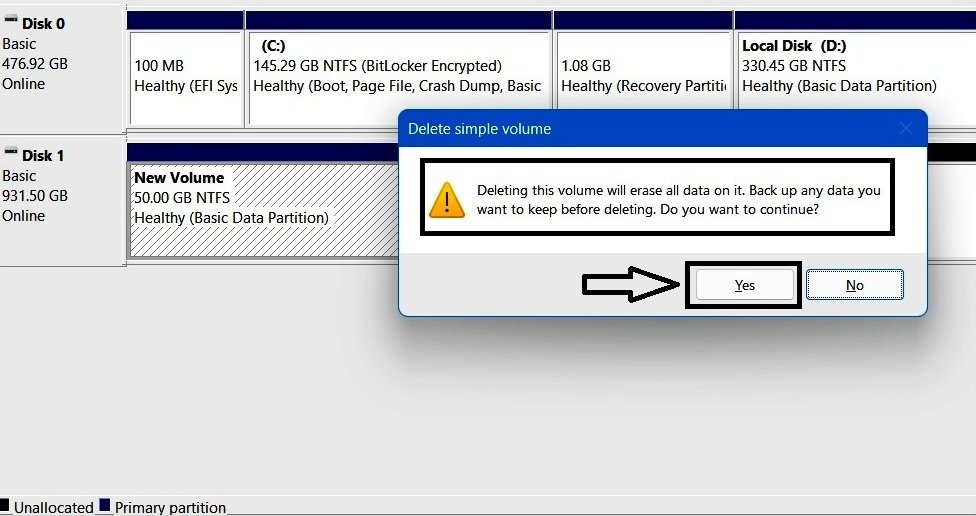
Clicking Yes takes a moment to process, then the console refreshes automatically, showing the volume gone and that space folded back into unallocated space.
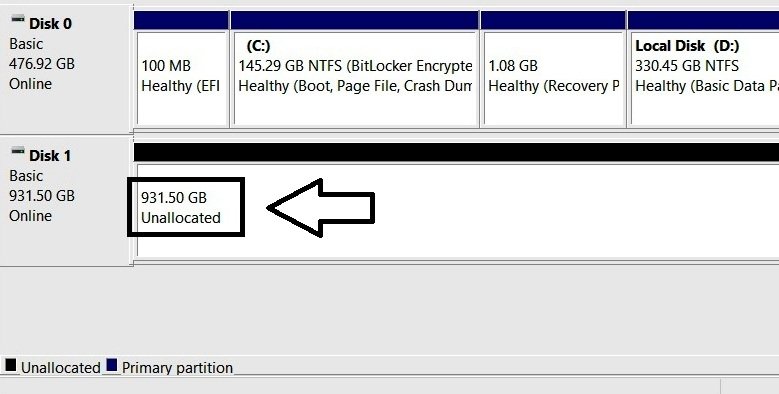
We’re back to 931.50 GB unallocated — and this is the practical proof of the distinction above: deleting a volume returns that space to unallocated entirely.
Properties
Clicking Properties opens the volume’s Properties window, defaulting to the General tab — showing details like volume name, type, file system, used space, and free space. We won’t go into the other tabs here.
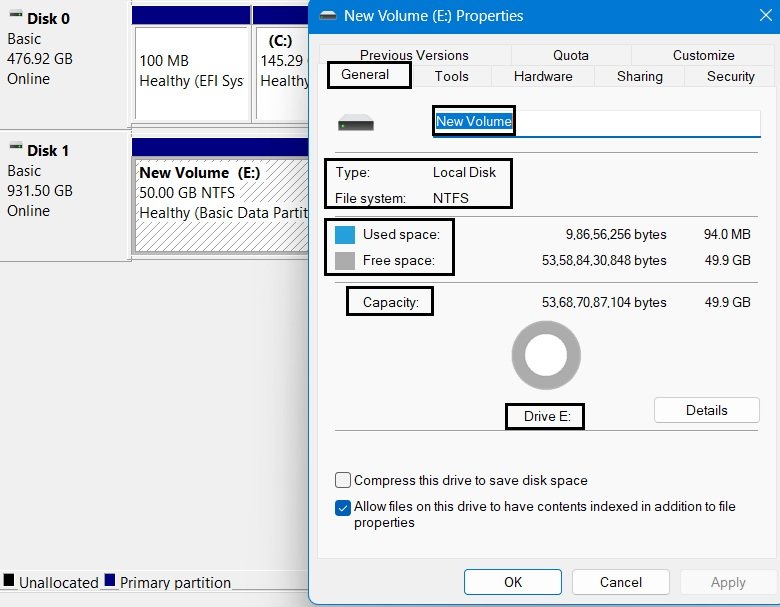
Think of this as a summary page containing the most important information about the volume.
Now we’ve seen how Disk Management can be used to manage a volume after it has been created. But if you remember Part 1.1, File Explorer also provides its own set of management options. Some overlap with Disk Management, while others are unique to File Explorer.
Let’s explore those next.
3.4 Managing Volumes via File Explorer
Right-click E: in File Explorer — only a few options show up at first. Click Show more options, and the full list appears.
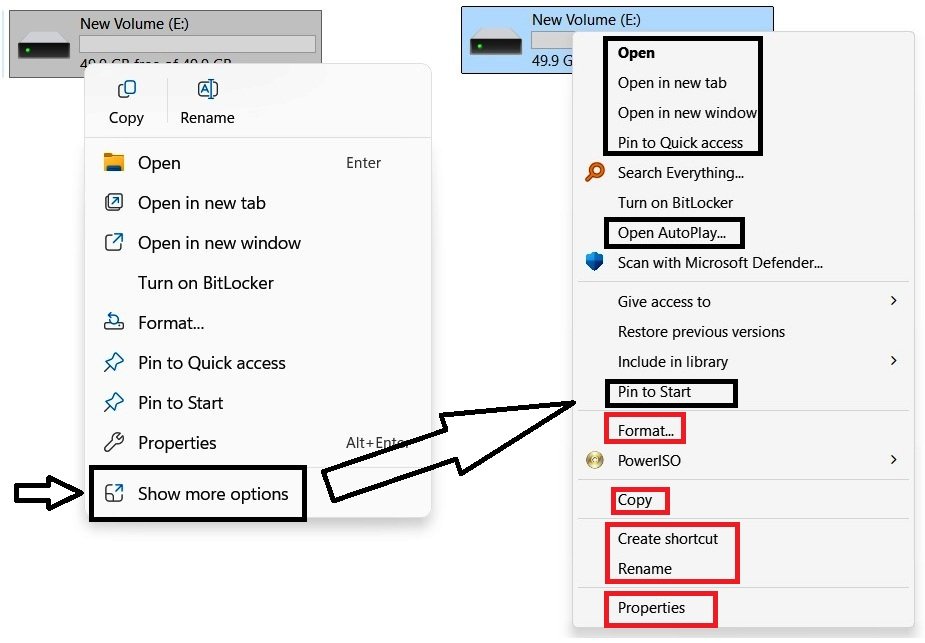
Some of these are self-explanatory and don’t need any real discussion: Open, Open in a New Tab, Open in New Window, Pin to Quick Access, Pin to Start, and Open AutoPlay.
Beyond those, a few deserve a closer look:
- Turn on BitLocker — encrypts the drive using BitLocker’s built-in encryption.
- Copy — The Copy option allows you to copy the drive’s contents to another location.
- Create Shortcut — creates a shortcut pointing to this volume. Keep in mind that if the original volume is later deleted, the shortcut becomes useless — it has nothing left to point to.
- Rename — lets you rename the drive. The letter (E:) stays the same; only the label changes.
- Properties — opens the same Properties window we already covered in Disk Management.
Format — this one deserves some real attention. We already covered formatting through Disk Management, but the layout here is slightly different, and a couple of extra options appear.
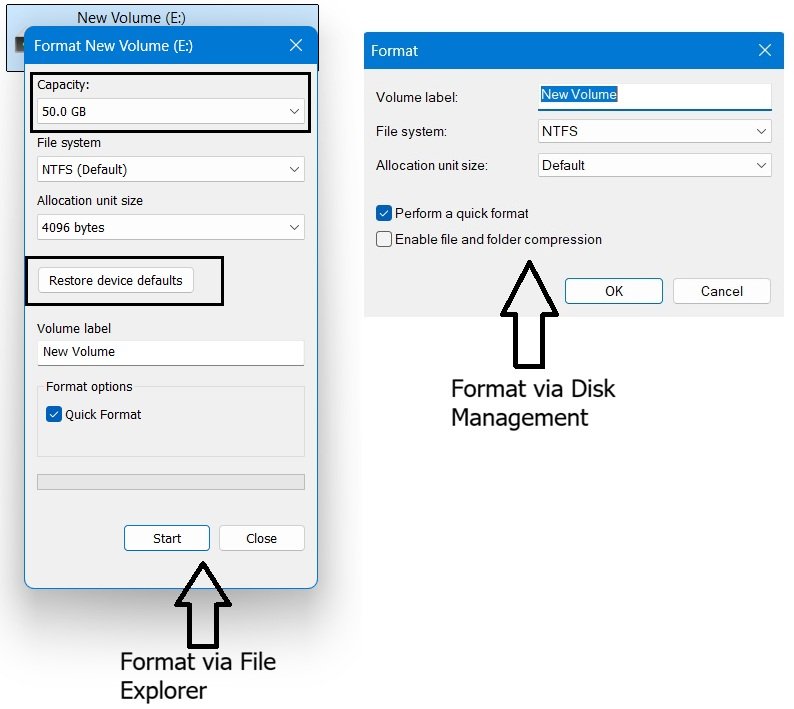
As the comparison shows, every option available in Disk Management’s Format window also appears here — except the compression checkbox — but File Explorer’s version adds two extra options. It displays the volume’s Capacity (50 GB, in our case), and it includes a Restore device defaults button, which resets all the format settings back to that drive’s default configuration. Everything else lines up identically between the two.
The Right-Click Options Aren’t Universal
One more thing worth reinforcing: the options you see when right-clicking a drive in File Explorer aren’t fixed or identical on every system.
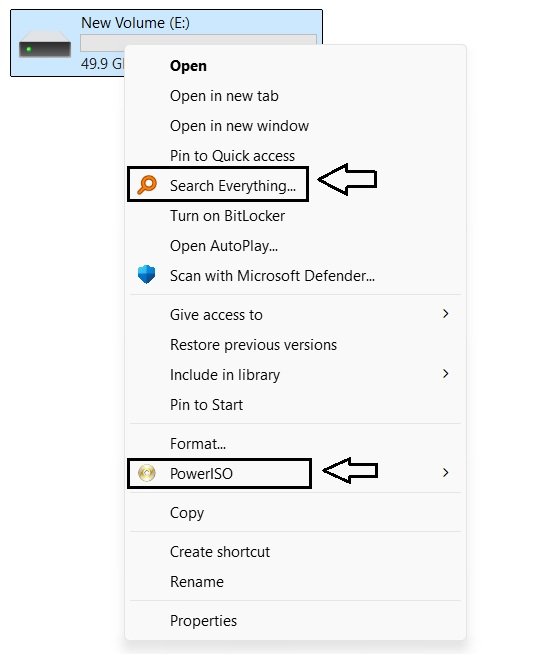
Common options will generally be there, but installed software can add its own entries to this same list. On this particular drive, for example, you’ll notice two extra options — “Search Everything” and “PowerISO” — added by third-party software installed on this system.
With the volume created and both management surfaces explored, it’s time to look at one of the most useful — and most misunderstood — operations in Disk Management: shrinking a volume to free up space.
Part 4: Shrinking a Volume
Shrinking allows us to reduce the size of an existing volume and turn the released space into unallocated space. Before we perform the operation, it’s important to understand what Windows is actually shrinking and why the amount available for shrinking is sometimes much smaller than expected.
4.1 Understanding How Shrink Volume Works
When you shrink a volume, Windows reduces the amount of space assigned to that volume and converts the released space into Unallocated Space.
However, Windows does not simply look at the total free space on a drive and make all of it available for shrinking. Several factors influence how much space can actually be removed.
Total Capacity vs Used Space vs Free Space
Every volume contains three important values:
- Total Capacity – the total amount of storage assigned to the volume.
- Used Space – storage currently occupied by files and system data.
- Free Space – unused storage available within the volume.
For example:
| Volume Size | Used Space | Free Space |
|---|---|---|
| 100 GB | 30 GB | 70 GB |
At first glance, it may seem logical that Windows should allow the volume to be shrunk by the full 70 GB of free space. In practice, however, that is not always possible.
Why Free Space Doesn’t Always Equal Shrinkable Space
The location of free space matters. A volume can have plenty of free space but still have very little space available for shrinking if files are located near the end of the volume.
Windows can only shrink the volume up to the point where it can safely move or work around those files. So, the maximum shrink size depends not only on how much free space is available, but also on where that free space is located.
Files Located Near the End of a Volume
Some files and system structures can prevent Windows from shrinking a volume beyond a certain point.
Examples include:
- System metadata
- Shadow copy data
- Page files
- Hibernation files
- Other filesystem structures that Windows cannot easily relocate while the volume is online
Because of this, a volume may contain hundreds of gigabytes of free space but still allow only a much smaller shrink operation. This behaviour is normal and often surprises users the first time they use the feature.
Important Note
Microsoft’s own documentation describes this plainly: “When you shrink a partition, certain files (for example, the paging file or the shadow copy storage area) cannot be automatically relocated and you cannot decrease the allocated space beyond the point where the unmovable files are located.“
Source: Microsoft Learn — Shrink a Basic Volume
Now that we understand what Windows is actually doing behind the scenes, it’s time to perform a real shrink operation and see how these concepts appear in practice.
4.2 Practical Shrink Operation
Let’s put the theory into practice. First, we’ll test shrinking on Volume E — the one we created earlier. For this test, I’ve filled it with some data, leaving it with 39 GB free out of its 50 GB total. Also worth remembering: after E was created, the remaining unallocated space on Disk 1 stood at 881.50 GB.
Open Disk Management, right-click Volume E:, and select Shrink Volume. When you do this, Windows briefly displays a Querying Shrink Space window. This is Disk Management calculating how much space can safely be removed from the volume. After a few moments, the Shrink E: window appears.
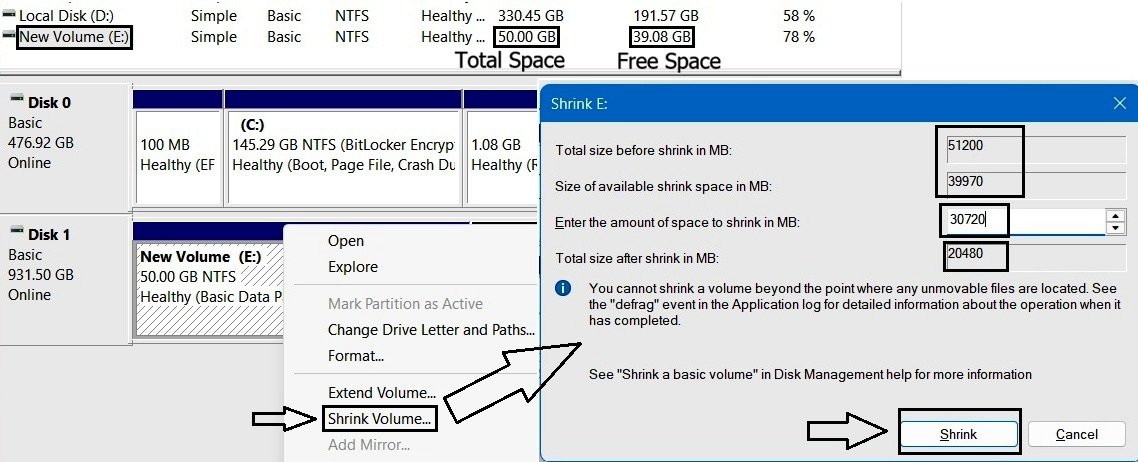
This window shows four values:
- Total size before shrink in MB: 51200 — the volume’s full current size.
- Size of available shrink space in MB: 39970 — this is the maximum Windows will let you shrink by, calculated after the querying step. Don’t confuse this with free space — they happen to be very close here, but free space and available shrink space are not the same thing.
- Enter the amount of space to shrink in MB: By default, Windows automatically enters the maximum available shrink size — 39970. This value can be reduced, but it cannot be increased beyond the available shrink space. For example, if you attempt to enter 39971 MB, even a single megabyte above the limit, the Shrink button becomes unavailable. For this practical example, we’ll enter: 30720. which is approximately 30 GB.
- Total size after shrink in MB: 20480 — simple math: 50 GB minus the 30 GB we’re shrinking leaves 20 GB.
Click Shrink. Disk Management may take a few moments to complete the task and then refresh automatically.
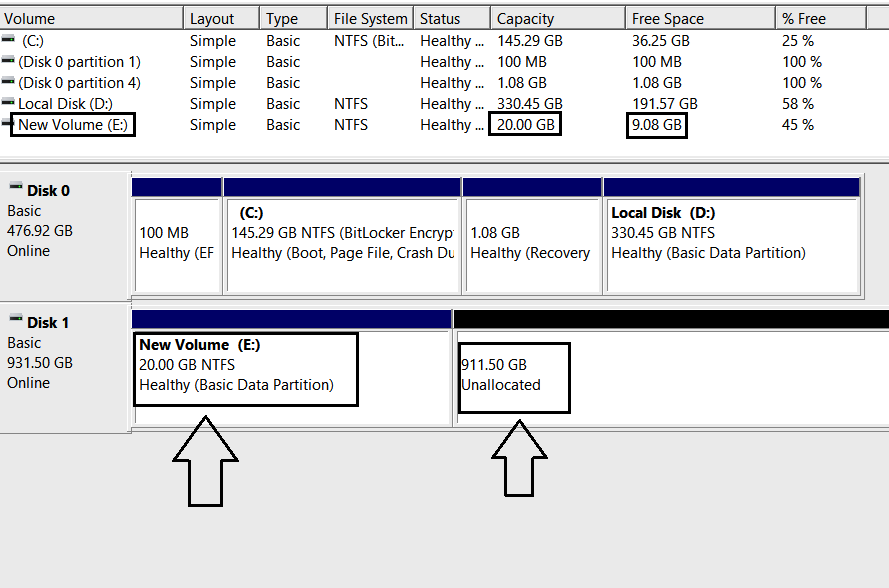
Volume E is now 20 GB, and the 30 GB we shrank has joined the unallocated space, bringing it to 911.50 GB.
You might wonder why that 30 GB simply became part of the existing unallocated space instead of remaining separate. That’s because unallocated space has no separate identity or boundary — it’s simply disk space that isn’t assigned to a partition.
Since the 30 GB we freed up was directly next to the existing unallocated space, there was nothing between them to separate them. They therefore became one continuous stretch of unallocated space.
That raises an interesting question: what if something did sit between them? Suppose a new Volume F existed immediately to the right of Volume E — would shrinking E still connect its freed space to the disk’s larger pool of unallocated space? Let’s find out.
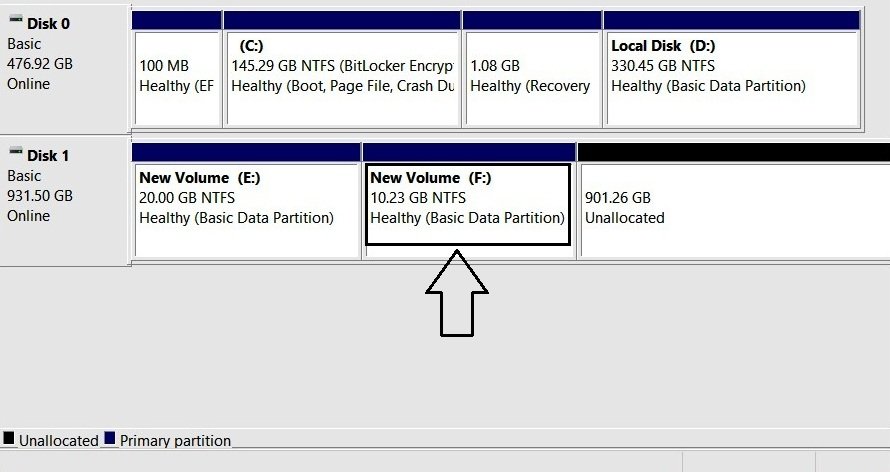
I created a new 10 GB Volume F, Next, i’ll perform another shrink operation on E:.
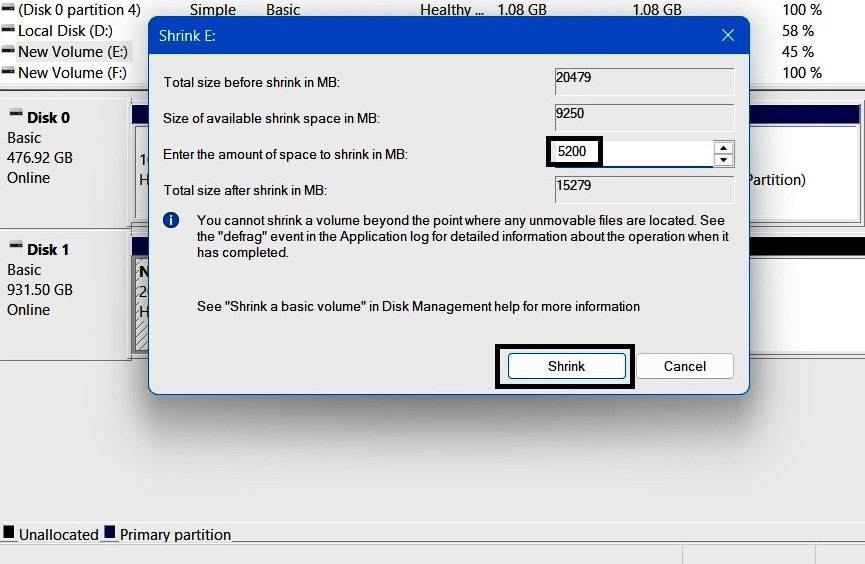
The process is identical to before, so no need to repeat it — this time it showed roughly 9 GB (9251 MB) available to shrink, and I chose to shrink about 5 GB (5200 MB).
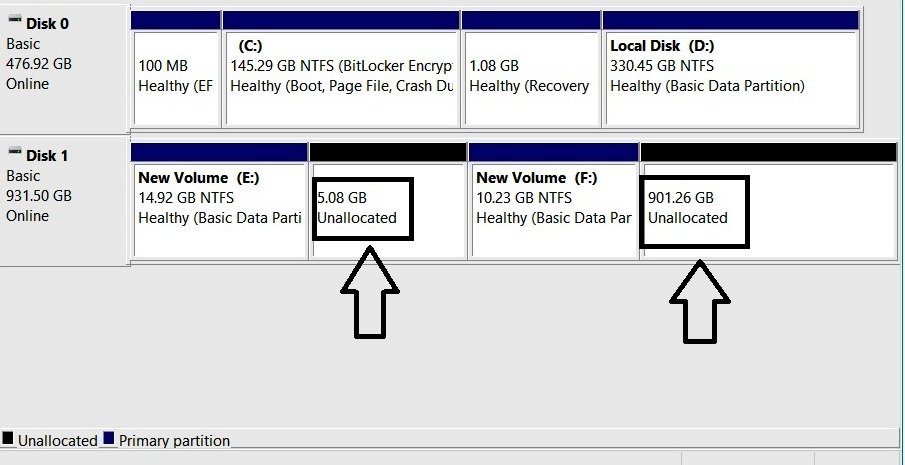
This time, the result looks different — and it confirms exactly what we just reasoned through. The freed 5 GB sits right next to Volume E, but it does not merge with the larger pool of unallocated space further down the disk, because Volume F now sits directly between them. Volume F acts as a barrier — there’s a partition in the way, so the two unallocated regions stay separate, unable to combine even though they’re technically both “unallocated space” on the same disk.
One more practical: Earlier, we saw that Volume E gave us a shrinkable amount nearly identical to its free space because it was a new volume, without the specific unmovable files that can limit how far a volume can be shrunk. To see the contrast, let’s run the same operation on Volume D on Disk 0 — a real, long-used system volume.
Right-click Volume D, select Shrink Volume, and let the querying window pass, bringing up the Shrink D: window.
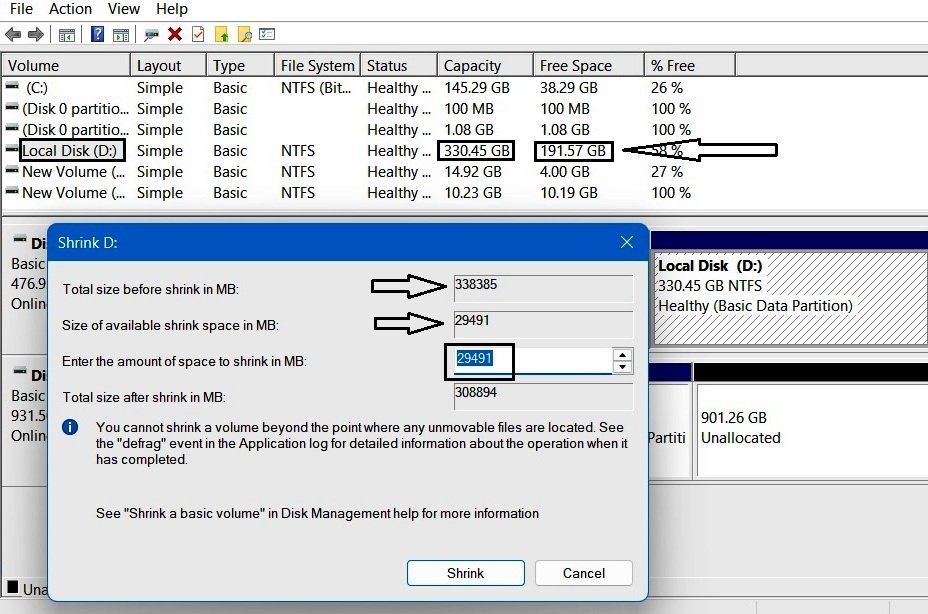
Here’s where it gets interesting. Looking at the List View, D: shows 191.57 GB of free space — but the “Size of available shrink space in MB” here shows just 29491 MB, roughly 28.80 GB.
That’s a massive gap between what’s technically free and what’s actually shrinkable — it’s the exact scenario that confuses most users encountering this for the first time.
Warning Note and Log Event
If you look carefully at any of the Shrink windows in this section, you’ll notice a warning message at the bottom.
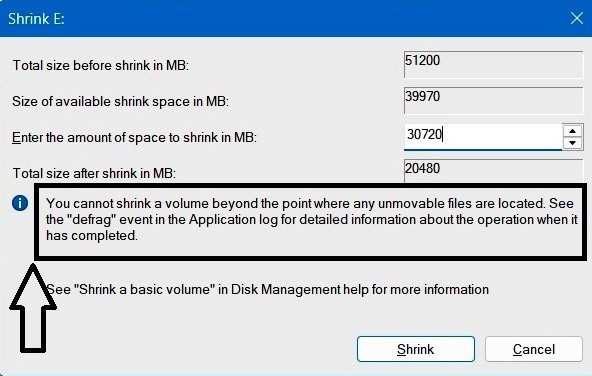
It reads: “You cannot shrink a volume beyond the point where any unmovable files are located.” We already covered this in the theory section — if an unmovable file sits toward the end of a volume, that becomes the hard limit for shrinking, regardless of how much total free space the volume has.
The message also mentions checking the Application Event Log for defragmentation-related events if you want additional details about factors affecting the shrink operation. For most users, however, understanding that unmovable files can limit shrink size is enough.
With that, this covers Shrink Volume. Let’s move on to another important operation — Extend Volume.
Part 5 — Extending a Volume
Before we begin, let’s reset our test setup — Volume F has been deleted, and Volume E is back to its full 50 GB, with 881.50 GB of unallocated space sitting next to it, just like it was right after we first created E. This gives us a clean, consistent starting point for exploring Extend Volume.
5.1 Understanding How Extend Volume Works
If Shrink Volume reduces the size of a volume, then Extend Volume does the exact opposite.
The purpose of Extend Volume is simple: it allows Windows to increase the size of an existing volume by taking space from nearby Unallocated Space.
For example, suppose you originally created a 50 GB volume and later realised that it wasn’t large enough. Rather than deleting the volume and recreating it, Windows allows you to increase its size using the Extend Volume feature. When the operation completes, the volume grows larger and the amount of Unallocated Space becomes smaller.
Where Does the Additional Space Come From?
Unlike shrinking, extending cannot create space out of nowhere. Windows must take storage capacity from existing Unallocated Space. This means that before a volume can be extended, there must already be unallocated space available on the disk.
If no unallocated space exists, the Extend Volume feature has nothing to use and therefore cannot increase the size of the volume.
The Most Important Rule: Location Matters
This is the single most important concept to understand about Extend Volume. For a standard Basic Disk, Disk Management generally requires the unallocated space to be located immediately to the right of the volume you want to extend. Consider the following layouts:
This usually works:
[E:] [Unallocated Space]The unallocated space is directly adjacent to E:, so Disk Management can normally extend the volume.
This usually does not work:
[E:] [F:] [Unallocated Space]Even though unallocated space exists, it is separated from E: by another volume. In this situation, Disk Management typically cannot extend E: because the required unallocated space is no longer directly adjacent.
We actually encountered this same concept during the shrink experiments in Part 4, where Volume F acted as a barrier between two unallocated regions.
Why Extend Volume Can Be Greyed Out
One of the most common questions users ask is:
“Why is the Extend Volume option greyed out?”
In most cases, the answer is related to one of these reasons:
- There is no unallocated space available.
- The unallocated space is not located immediately to the right of the volume.
- The selected volume does not meet the requirements for extension. For example, the volume might not be using a supported file system, or Windows may be unable to extend it because of how the disk is currently configured.
Let’s perform some practical experiments and see how Windows behaves in both successful and unsuccessful scenarios.
5.2 Practical Extend Operation
In the shrink practical, we shrank 30 GB from Volume E, taking it from 50 GB down to 20 GB. Now, we’ll do the reverse — extending Volume E by that same 30 GB. Currently, unallocated space on Disk 1 stands at 881.50 GB.
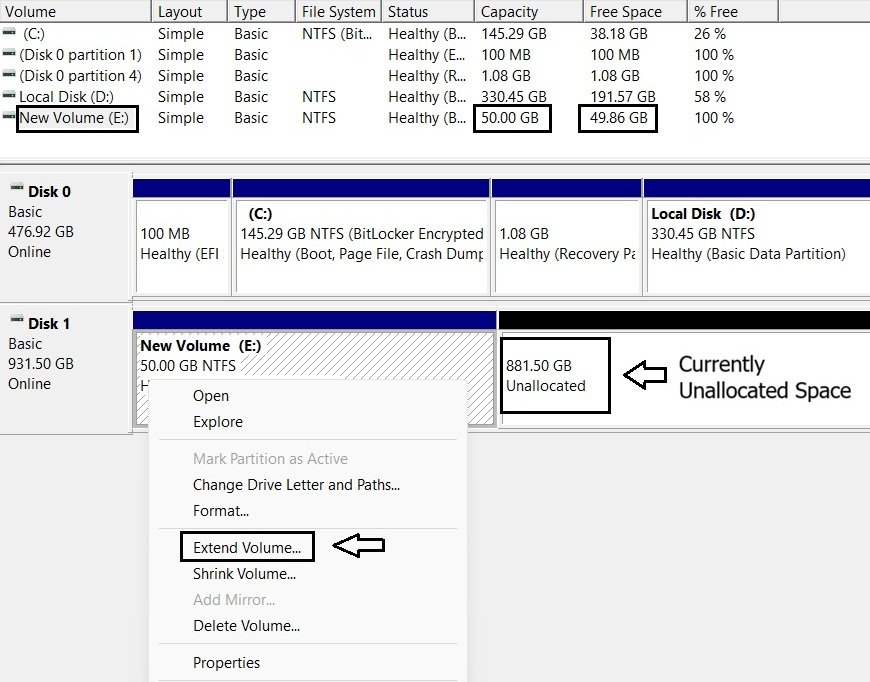
This opens the Extend Volume Wizard. Before going further, it’s worth understanding what this wizard actually is — it’s used for both Simple and Spanned volumes. Basic disks create Simple volumes; Dynamic disks create Spanned volumes. Since one wizard handles both, you’ll see some options here that simply don’t apply to what we’re doing.
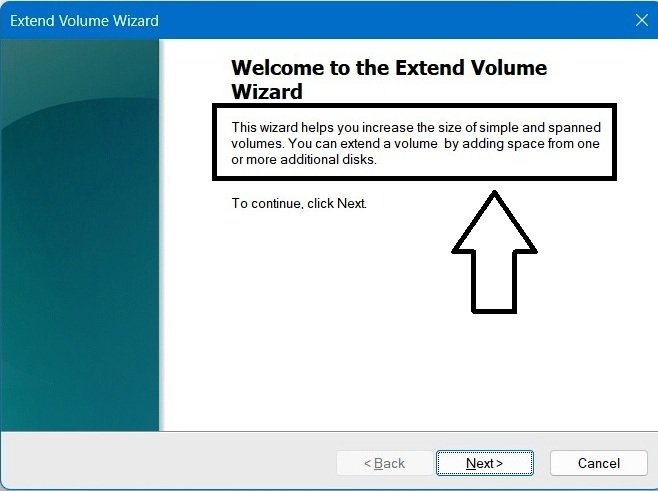
You can see this stated directly: “This wizard helps you increase the size of simple and spanned volumes.“ Click Next.
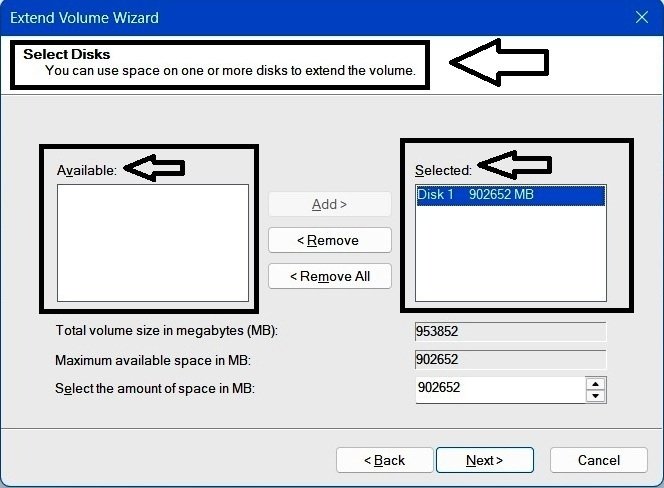
The message at the top of this screen reads: “You can use space on one or more disks to extend the volume.“ This line is really written for Spanned volumes — since those combine unallocated space from multiple physical Dynamic disks into a single volume. We’re working with a Simple volume on a Basic disk, so this particular message doesn’t apply to us — but it’s good to know why it’s there.
Below that, you’ll see two columns side by side: Available (empty by default) and Selected (defaulting to Disk 1, showing 902652 MB). Both are worth understanding. The Available column is empty because, on a Basic disk, a volume can only be extended using unallocated space from the same disk it already lives on — Disk 1, in this case. Since there’s no other disk Windows could possibly pull space from, nothing appears here. And because Disk 1 is the only valid option, it’s automatically placed in the Selected column from the start, along with its available free space.
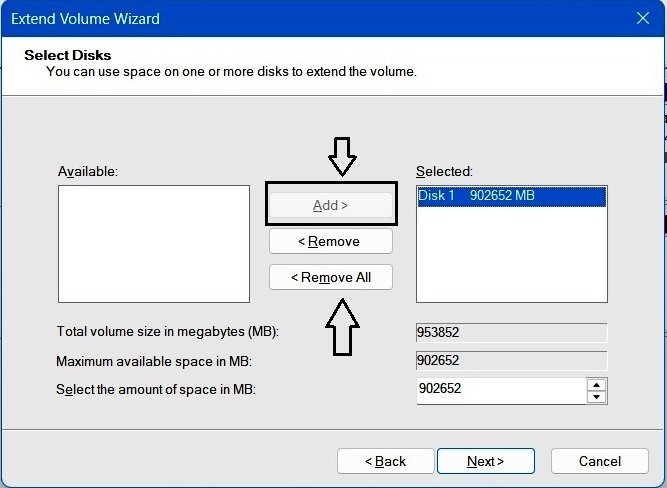
Between the two columns are three buttons: Add (greyed out), Remove, and Remove All. Add is disabled simply because the Available column is empty — there’s nothing there to move over. Let’s try a quick experiment: click Remove.
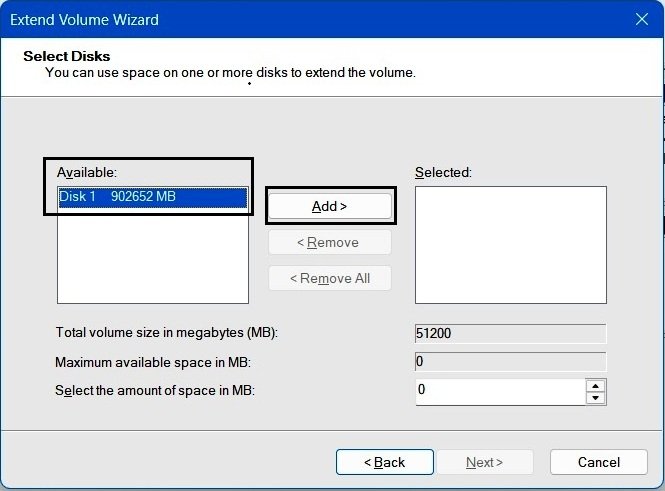
Disk 1 now moves into the Available column — confirming it really is the only disk this volume could ever extend into. At the same time, Remove and Remove All both grey out, since the Selected column is now empty and there’s nothing left to remove. Only Add is active now. Click Add to move Disk 1 back into Selected, and let’s continue.
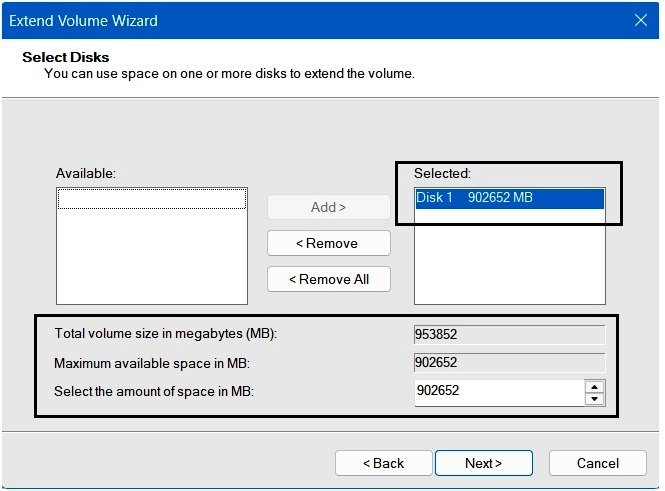
With Disk 1 selected again — showing its available space, 902652 MB, remember this is the total unallocated space — three fields appear at the bottom:
- Total volume size in MB: 953852 — this isn’t E’s current size, and it isn’t the amount being added either. It’s a live preview of what E’s total size will become once the extension finishes: E’s current 51200 MB, plus the 902652 MB selected to add.
- Maximum available space in MB: 902652 — this is the true ceiling: the total unallocated space physically available on Disk 1. Unlike the other two fields, this number never changes no matter what you select.
- Select the amount of space in MB: 902652 by default — this is the one field you actually control.
Let’s change this to 30720 (30 GB), matching what we shrank earlier. As soon as you do, two things update automatically: Disk 1’s listed amount at the top changes from 902652 to 30720, reflecting your new selection rather than the maximum, and Total volume size recalculates to 81920 MB — 51200 (E’s current size) plus the 30720 you just chose to add. Maximum available space stays exactly where it was, at 902652, since that number reflects what’s physically available on the disk, not what you’ve chosen to use.
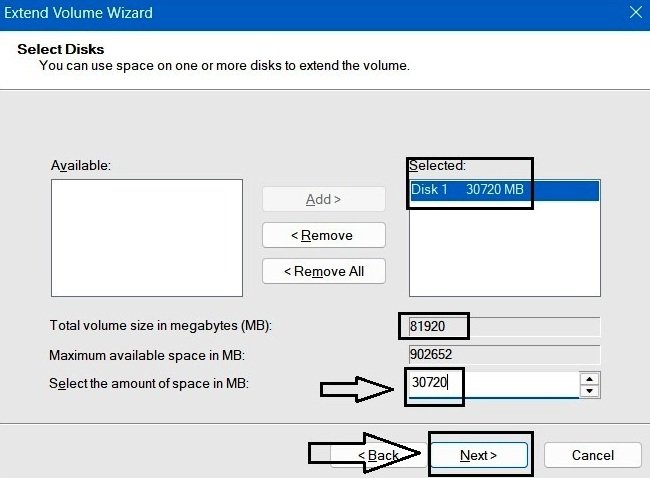
Click Next to finish the wizard.
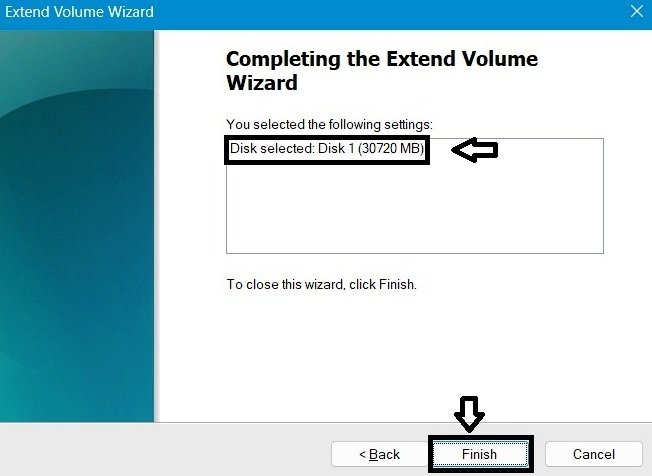
The final screen confirms: Disk Selected: Disk 1 (30720 MB) — simply confirming we’re adding 30 GB from Disk 1. Click Finish. Disk Management processes briefly, then refreshes automatically.
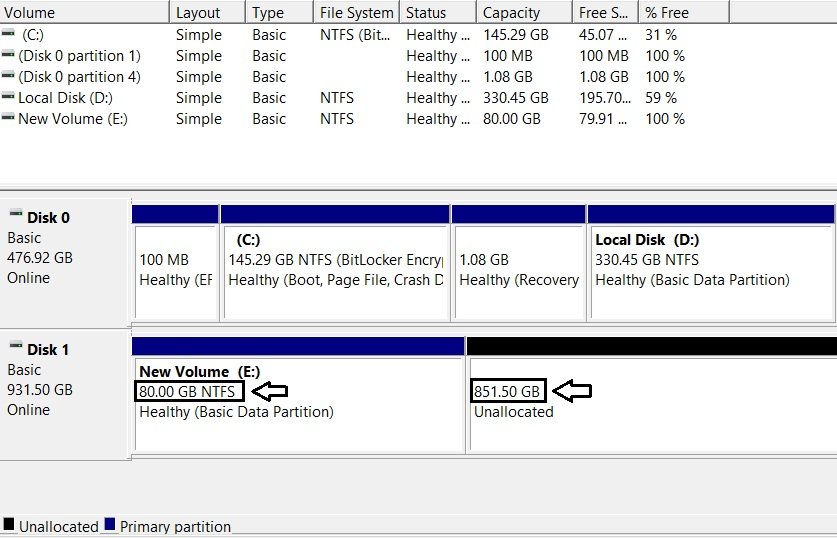
Volume E is now 80 GB, and unallocated space has shrunk by that same 30 GB.
Another practical: When we examined the Select Disks page earlier, we saw only Disk 1 in the Selected column. A reasonable question now is:
What if another disk also has unallocated space? Will Windows allow us to use that space to extend E:?
Let’s test it rather than simply assuming the answer. I shrank Volume D on Disk 0, creating 28.80 GB of unallocated space there.
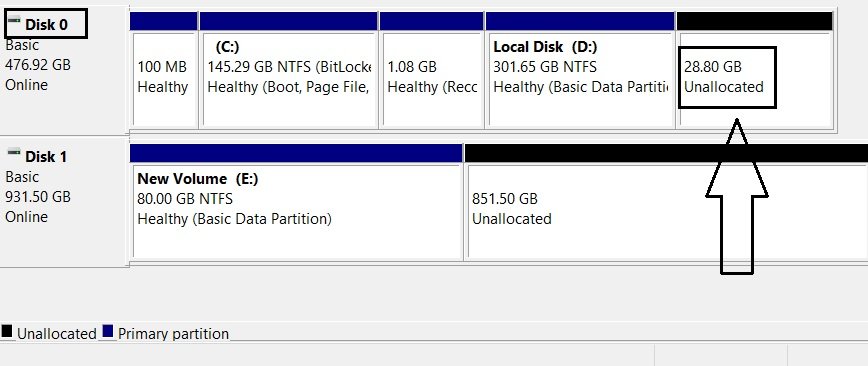
Now let’s extend E again — right-click, Extend Volume, Next — bringing up the same Select Disks screen.
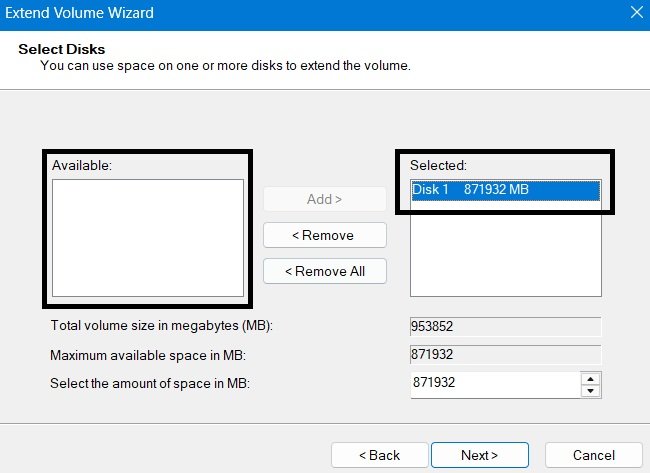
Disk 0 still doesn’t appear — only Disk 1 shows up. This confirms what we covered earlier: extending across multiple disks is reserved specifically for Dynamic disks, regardless of whether other disks happen to have free space available.
When Extend Volume Isn’t Available
Back in the theory section, we covered a few reasons Extend Volume can be greyed out — let’s see one in action. I reset Disk 0 back to having no unallocated space. Right-clicking Volume D now:
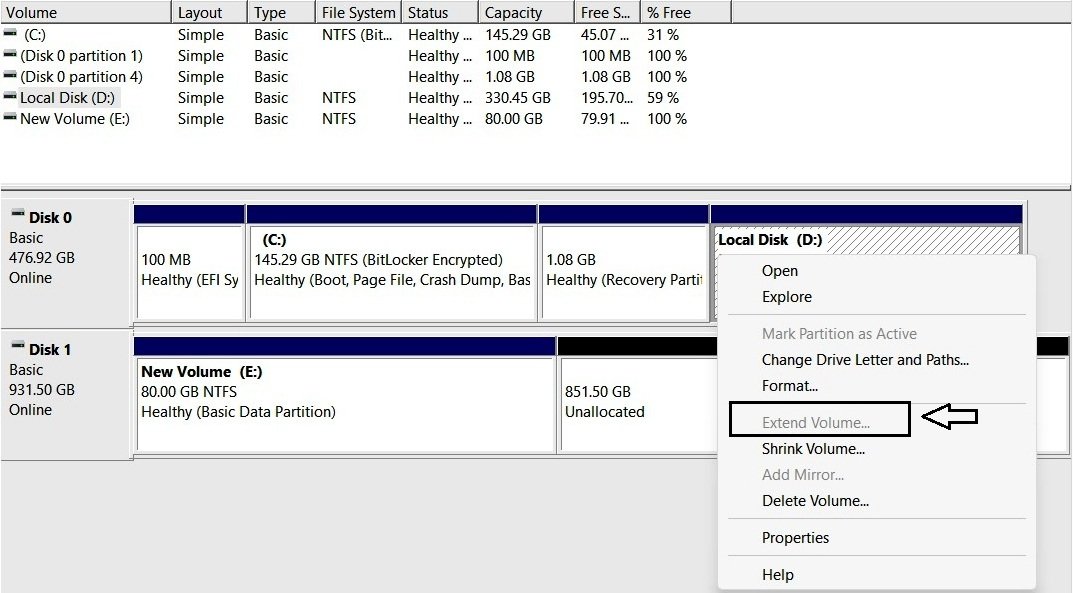
With no unallocated space available at all, Extend Volume is disabled. Let’s shrink D again to create 28.80 GB of unallocated space and right-clicking D: shows Extend Volume enabled.
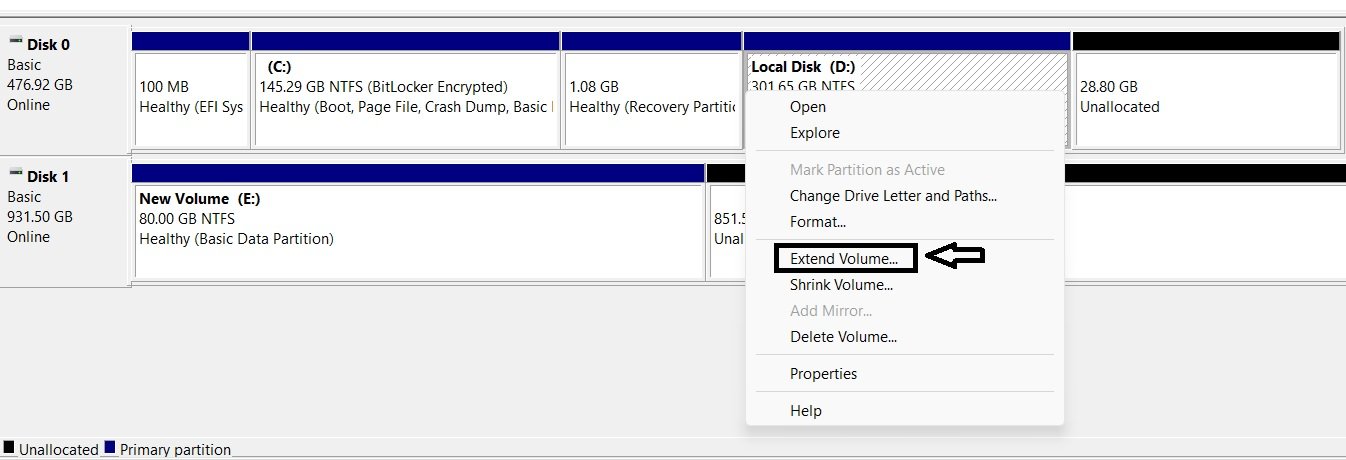
That makes sense — the unallocated space sits directly next to D. But here’s the interesting part: with that same unallocated space present on Disk 0, does Extend Volume become available for C: too?
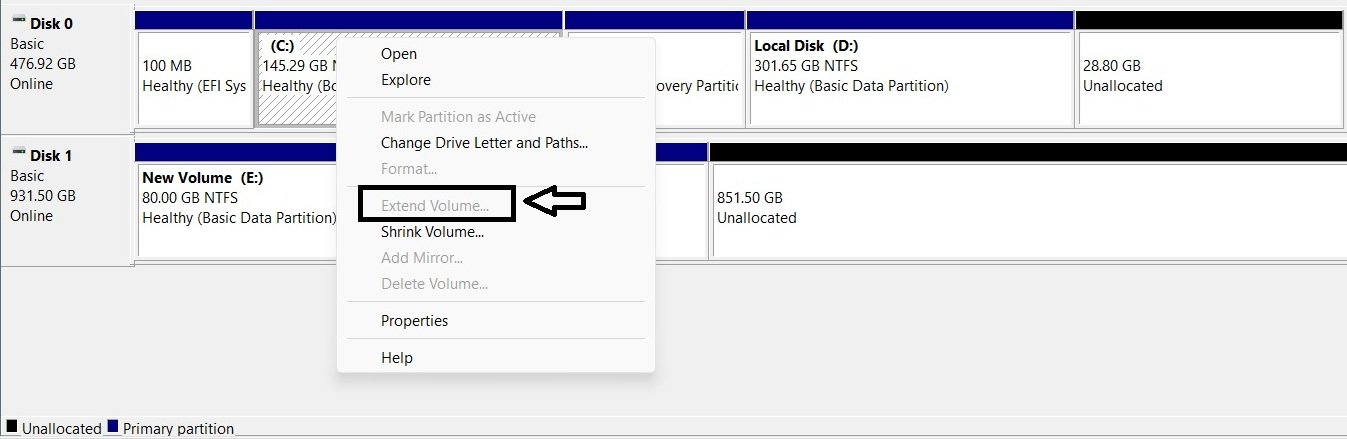
It doesn’t. This confirms exactly what the theory told us: having some unallocated space on a disk isn’t enough — its location matters just as much. Since the Recovery partition sits directly after C:, not unallocated space, C: can’t be extended, no matter how much free space exists elsewhere on the disk.
These are the most common reasons Extend Volume greys out — a few other, less common causes exist too, like an unsupported file system or certain disk configurations.
The Warning: “This Will Convert the Selected Basic Disk(s) to Dynamic Disk(s)”
This final practical experiment unexpectedly brings our lesson full circle.
Earlier in the lesson, we noticed that Convert to Dynamic Disk was greyed out on Disk 0 because it contains the Windows installation. However, Disk 1 does not contain the operating system. Let’s check whether the option is available there.
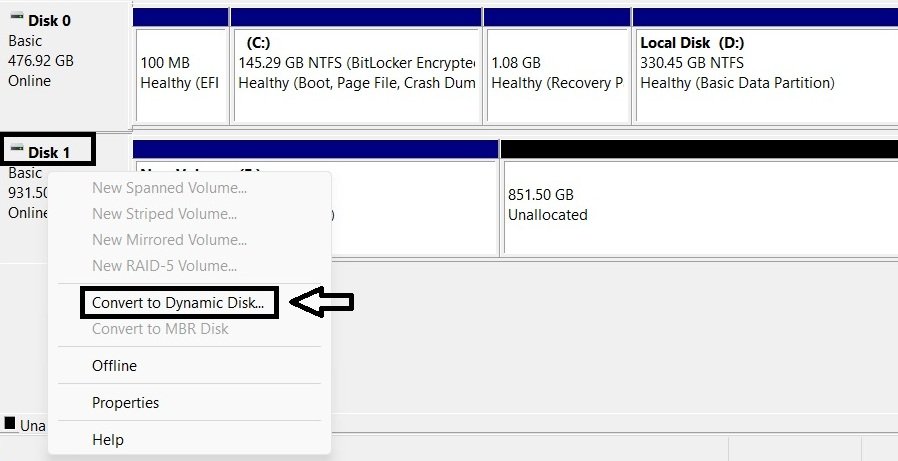
It’s available. We won’t actually convert it — that’s outside this lesson’s scope — but this difference is key to what happens next.
To test it, let’s recreate the same scenario we just saw fail on Disk 0 — but this time on Disk 1. I created a new Volume F, so the layout is now E, then F, then unallocated space.
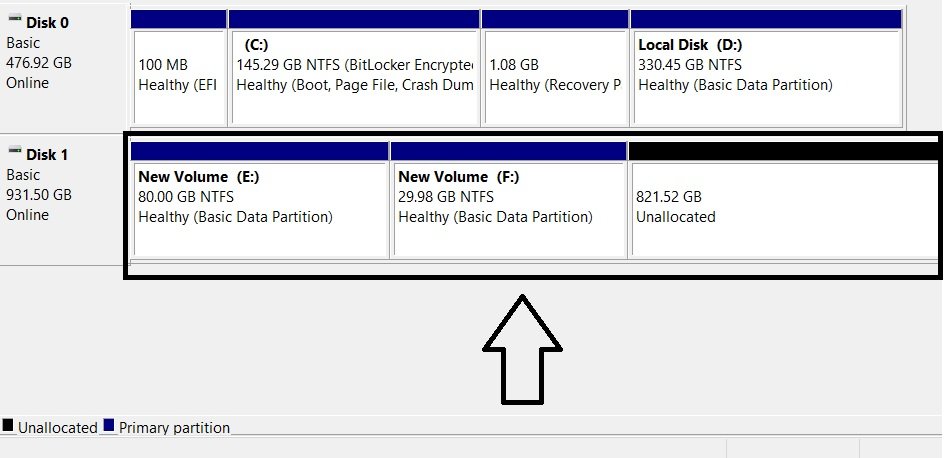
Right-clicking F shows Extend Volume enabled — no surprise there, since unallocated space sits directly next to it. But following the same logic as our C: test, right-clicking E should show Extend Volume greyed out, since F sits between E and the unallocated space.
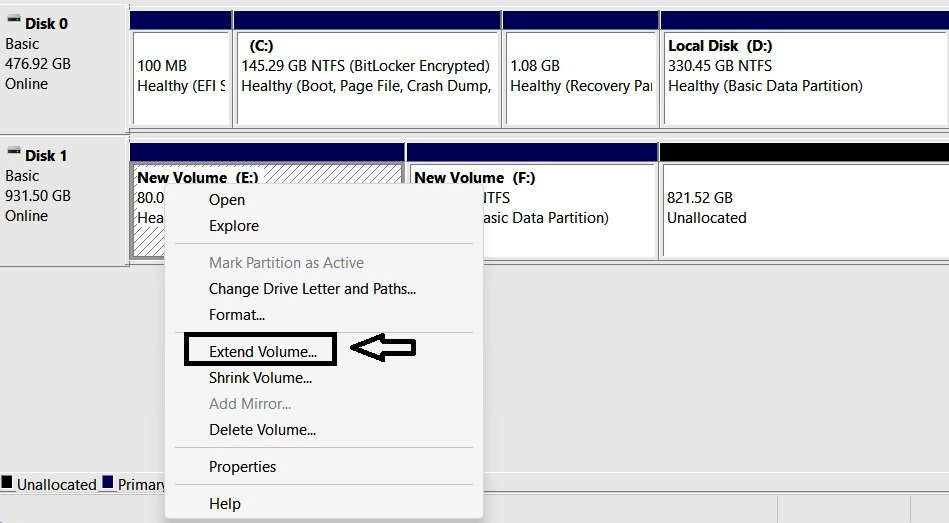
But it’s enabled. Let’s find out why — click Extend Volume, then Next, opening the same Select Disks screen as before. Disk 1 appears with its unallocated space, same as before — nothing new to explain here. Let’s enter roughly 10 GB (10200 MB) and click Next.
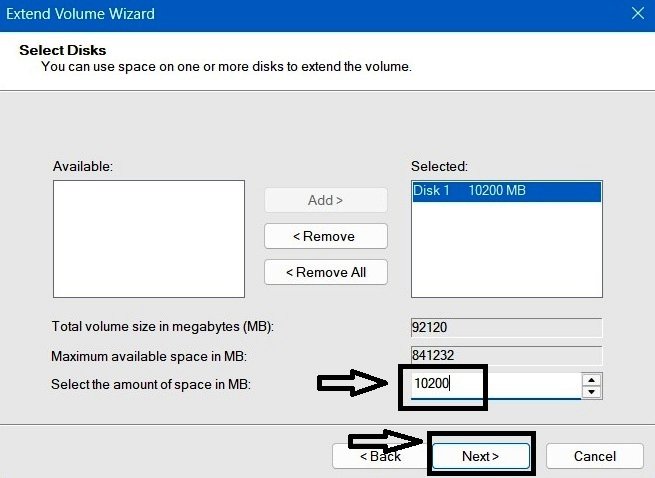
The final confirmation screen appears — click Finish. But instead of completing immediately, a warning appears:
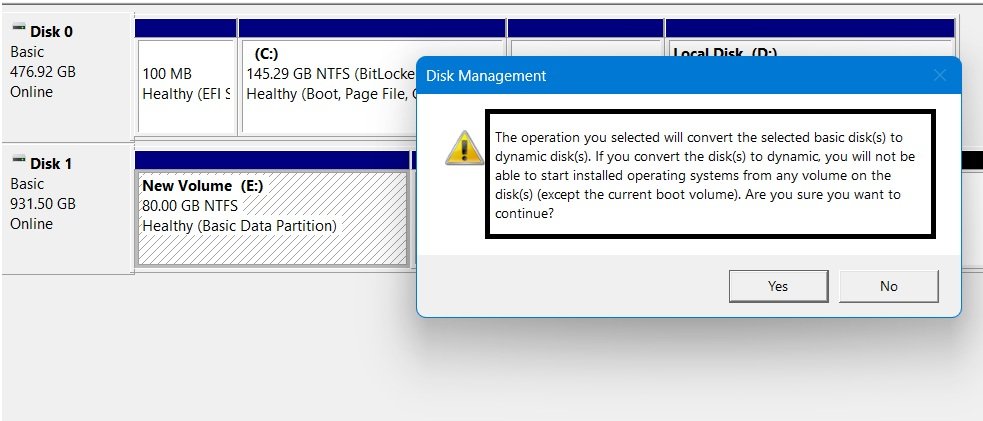
When this popped up on my screen, I couldn’t help but laugh — it gave this lesson a perfectly fitting ending, since it’s the very similar warning I encountered years ago on XP, trying to create a fifth primary partition.
Here’s what’s actually happening: the warning states that continuing will convert Disk 1 to a Dynamic disk. That’s because extending Volume E into unallocated space that isn’t immediately adjacent — with Volume F sitting in between — is only something a Dynamic disk can do. Since Disk 1 can be converted to a dynamic disk (unlike Disk 0), Windows offers Extend Volume as an option here. However, if we complete this operation, Disk 1 will be converted from a basic disk to a dynamic disk.
This confirms that Extend Volume behaves differently for Basic and Dynamic disks.
With that, this lesson’s practical work is complete. As promised earlier, it’s time to move into the terminology section we set aside at the very start.
Part 6: The Language of Disk Management
Have you noticed, throughout this lesson, I’ve used several words — “Volume,” “Drive,” “Partition,” and more? There are other terms too, often used in similar contexts when talking about disk management. You can see the confusion clearly in a common scenario: when a user thinks “I need a new drive,” but Windows says “New Simple Volume,” and a tutorial says “create a partition,” it’s easy to feel lost before you’ve even started.
6.1 The Everyday Terms
The following are the common terms used by everyday Windows users.
- Disk — the physical (or virtual) storage device itself. This is the one term that stays fairly consistent — but it’s also the reason “drive” gets confusing below.
- Drive — the most loosely used word of the bunch. People say “hard drive” to mean the whole physical disk, but they also say “C: drive” to mean one specific lettered section of it. Same word, two different layers — the physical thing and a usable piece of it — and that overlap is where a lot of the confusion starts.
- Partition — a defined section of a disk’s storage space, carved out from the whole. This is the more technical/structural term — it describes how the disk is divided, not what you interact with day to day, which is why ordinary users rarely say “partition” themselves but see it constantly in tutorials and wizards.
- Volume — a partition once it’s been formatted with a file system and made usable. You actually saw Windows use this word directly — back in Part 3’s List View, the very first column was labeled “Volume,” not “Partition” or “Drive.” In an ordinary single-partition setup like ours, a volume and a partition are effectively the same thing — and this wasn’t always so blurred: Microsoft itself only started using “volume” to describe ordinary partitions starting with Windows Server 2008; before that, it was reserved specifically for dynamic disks.
- Storage — the vaguest of the five. It doesn’t specify which layer you’re talking about at all — “I’m low on storage” could mean the disk, a drive letter, or a specific volume, and the word works regardless because it’s really just shorthand for “the space.”
Two more terms worth revisiting, since you’ve now worked with both directly:
- Unallocated Space — space on a disk not currently part of any partition at all.
- Free Space — unused space inside an existing partition/volume.
6.2 The Technical Terms
Back at the start of this lesson, these were just names to preview. Now you’ve actually worked with most of them directly:
- Basic Disk — the disk type both Disk 0 and Disk 1 used throughout this entire lesson.
- Dynamic Disk — the disk type we deliberately avoided, although we saw how it can come into play. On our boot disk, Convert to Dynamic Disk was greyed out. On Disk 1, the option was available.
- MBR and GPT — the two partitioning schemes we covered in Part 2, with GPT being what both of our disks actually used.
- Primary Partition, Extended Partition, and Logical Drive — the older MBR-specific concepts.
- RAW — the one term here we haven’t met hands-on. It’s the label Disk Management shows when it can’t recognize a volume’s file system, usually because the volume was never formatted or its file system is damaged.
So if these terms ever seem confusing, you’re not alone. They are often used loosely, and after working through this lesson, you should now have a clearer idea of what each one means.
Summary: Key Takeaway
- Disk Management and File Explorer both offer ways to manage your drives, but they overlap only partially — some tasks are only possible in one or the other.
- Every disk starts as “Not Initialized” and must be initialized with a partition style (MBR or GPT) before it can hold any volumes.
- Basic disks are effectively mandatory for a working Windows installation, and current Windows blocks converting your boot disk to Dynamic entirely.
- Creating a volume walks through sizing, drive letter assignment, and formatting — and modern Windows no longer asks you to choose between Primary and Extended partitions the way older versions did.
- Formatting and deleting a volume are not the same operation — formatting keeps the volume intact and just resets its file system, while deleting removes the volume structure entirely and returns the space to unallocated.
- Shrinking a volume is limited by unmovable files (like the pagefile or Shadow Copy data), not just by how much free space appears to be available.
- Extending a volume normally requires unallocated space to sit immediately adjacent to it — but on a non-boot Basic disk, Windows can quietly offer to convert the disk to Dynamic to work around that limitation entirely.
- Words like Disk, Drive, Partition, Volume, and Storage are used loosely everywhere — so don’t worry about using them with total precision either.
Note
One more thing worth knowing: everything in this lesson was done through Disk Management’s graphical interface. There’s also a command-line tool, DiskPart, that can do all of this and more — we’ll save that for a dedicated future lesson.
Systematic Mode Insight
A few things worth reflecting on before we close this one out.
First — you’ve now seen that a volume can be managed from both File Explorer and Disk Management, but they’re not equal in scope. Some things, like changing a drive letter, only exist in Disk Management.
However, some options are available in both File Explorer and Disk Management.
Format is a good example. In such cases, my recommendation is to use the File Explorer option when it already provides everything you need. There is no need to open Disk Management just to format a drive.
That’s a personal habit, not a rule; use whichever you’re comfortable with.
But there’s one distinction worth actually remembering: right-clicking a volume only ever lets you manage that volume. Disk Management can manage the volume and the disk it lives on. That’s the real difference between the two tools, more than convenience.
Second — Shrink and Extend. I’d call these two of Disk Management’s best features, genuinely. I’ve used Disk Management since the XP days, and these options simply didn’t exist back then — they arrived with Windows Vista, though I didn’t actually start relying on them myself until Windows 7.
They felt confusing at first, but once you understand the math behind them, both become straightforward. That’s exactly why I went as deep as I did on both in this lesson — not just so you’d know how to click through the wizards, but so you’d understand what Windows is actually doing behind the scenes when you do.
Third — GPT. GPT didn’t just change the way Windows handles partitions; it also removed the old four-primary-partition limitation of MBR. I didn’t get the chance to demonstrate this during the practical sections of this lesson, so here’s something you can try yourself: on a GPT disk, create more than four partitions — five, six, or even more — and see what happens.
You won’t get the old warning about Windows needing to convert the disk to a Dynamic Disk simply because you’ve created more than four partitions. That’s one of the practical differences between GPT and the older MBR partition structure.
And last, a genuine word of caution: every practical in this lesson was performed on a spare disk whenever possible. I did use my system drive for a few practicals where it was necessary to demonstrate or clarify certain points, but I avoided making unnecessary changes to it.
Everything here is accurate and well-documented, but Windows can still behave unexpectedly, and testing this on a drive holding real data or your OS is a real risk not worth taking. Grab a spare disk if you can, and experiment freely there instead.
What’s Next
You now know how to look inside your PC’s storage and manage it with confidence — but storage is only half the picture. The other half is what’s actively running on your PC right now: the apps, background processes, and services quietly using your CPU, memory, and startup time.
That’s exactly where we’re headed next. In the upcoming lesson, we’ll open up Windows Task Manager and go beyond the “End Task” button most people only ever use it for — understanding what each tab is really telling you about your PC.
Stay tuned and we’ll see you in the next lesson on SystematicMode.com!

One thought on “Windows Disk Management: Understanding and Managing Partitions”