Introduction
Welcome to Systematic Mode!
If you followed our previous lesson on Windows File Extensions, you’ll remember how we built our foundation around an everyday reality: why your documents open in specific apps, and how Windows handles file types behind the scenes.
Today we face a different kind of everyday problem.
Have you ever installed a new program, driver, or system update, only to find that your computer starts slowing down, freezing, or showing unexpected errors? You may realize that the recent installation caused the problem. You uninstall the software, restart your PC, and expect things to return to normal — but the problem remains.
This is where System Restore can help. It allows Windows to roll back certain system-level changes and return the system to an earlier state.
In my years working in technical support, I’ve found that System Restore remains one of Windows’ most underrated and misunderstood features. Some people don’t know it exists, while others have tried it once, didn’t get the expected result, and concluded that it simply “doesn’t work.”
System Restore works exceptionally well—once you understand what it actually does.
What You’ll Learn in This Lesson
In this lesson on Windows System Restore, you will learn:
- What System Restore actually does (and, more importantly, what it does not do)
- How restore points work
- How to enable and configure System Protection
- How to create restore points and perform a restore
- How to access System Restore even when Windows will not start normally
- Common reasons restores fail or appear to fail
So, If you’ve heard something different about System Restore, let’s clear that up first. We’ll begin with what System Restore is NOT, then look at what it actually does.
Part 1: What System Restore Is Not
System Restore is surrounded by several misconceptions, but the biggest one is the idea that it’s a backup feature. It’s worth clearing this up first because it shapes how you understand everything else in this lesson.
1.1 The Common Assumption: “System Restore Is a Backup”
It’s an easy mistake to make. The word “restore” naturally makes us think of a backup—after all, you restore files from a backup. But System Restore was never designed to protect your personal data.
When you use System Restore, your documents, photos, videos, downloads, and other personal files remain untouched. They stay as they were before, during, and after the restore. That may sound reassuring, but it also means System Restore cannot recover a deleted photo or lost document. That simply isn’t its job.
This is why System Restore should never be considered a replacement for a proper backup strategy. It solves a different problem, which we’ll explore shortly.
1.2 What Else System Restore Is Not
The backup misconception is the big one, but it’s not the only one. Here are a few more boundaries worth knowing upfront — we’ll come back to some of these in more detail later in the lesson:
- It’s not a personal-file recovery tool
- It’s not a complete system-image backup
- It’s not the same as “Reset this PC”
- It’s not a Windows reinstallation
- It’s not a hardware repair tool
- It’s not a universal malware-removal tool
If System Restore isn’t backing up your files, isn’t reinstalling Windows, and isn’t fixing your hardware — what exactly is it doing? That’s what we’ll unpack next.
Part 2: What System Restore Actually Is
Now that you know what System Restore isn’t, let’s clear up what it actually is — how it works at a conceptual level, and what exactly it means to “restore” your system.
2.1 The Core Idea: Rolling Back System State
At its core, System Restore is an “Undo” button for Windows system-level changes.
To understand how it works, separate your computer into two areas:
- Personal Data: Your photos, documents, music, videos, downloads, and other personal files.
- System State: The underlying configuration of Windows, including settings, drivers, the Registry, critical program files, and core system files.
System Restore leaves your personal data alone and focuses on the System State. When software, drivers, or system settings become corrupted or misconfigured, it rolls Windows back to an earlier, known state without affecting your personal files.
Its purpose is narrow but practical: when a recent system-level change causes problems, System Restore gives you a way to roll that change back without reinstalling Windows or affecting your personal files.
2.2 What It Touches — and What It Leaves Alone
When you execute a restortion, System Restore is designed to roll back specific Windows system components and configuration while leaving personal files untouched.
| Category | What System Restore Modifies | What System Restore Ignores |
|---|---|---|
| Operating System | System files (.dll, .exe), Windows configuration settings, and system services. | User accounts, personal desktop layouts, and custom personal options. |
| Drivers & Hardware | Newly installed device drivers, updated hardware configurations, and driver rollbacks. | Physical hardware settings and external peripherals. |
| Applications | Installed software executable files, desktop program entries, and system integrations. | Files created or saved by those programs, such as .docx files and saved projects. |
| Registry | Registry keys and configuration hives are reverted to their previous states. | Personal file associations tied to user profiles. |
| User Data | None. | Photos, videos, documents, browser bookmarks, downloads, and other personal files. |
Understanding this split explains why System Restore is so effective: it restores operating system stability without putting your personal files at risk.
2.3 What Is a Restore Point?
System Restore cannot rewind Windows without something to return to. It relies on a stored marker called a Restore Point.
A restore point is a record of the Windows system state at a particular point in time.
- It is not a full hard drive copy: It does not clone your entire drive or store all your personal files.
- It records important system information: This can include system files, Registry information, drivers, and other system configuration data.
- It represents a specific point in time: A restore point created Monday at 9:00 AM represents the system state from that moment. If a problem occurs on Tuesday, System Restore can use that point to roll relevant system changes back to Monday’s state.
Different restore points represent different historical system states. When you choose one, you are choosing which earlier state of Windows to return to.
A common misconception is that System Restore and a restore point are two separate features. They are not. A restore point is the saved system state that System Restore uses. When you run System Restore, you select a restore point and Windows uses it to roll back the relevant system changes.
Technical Note: Why Restore Points Are Called “Snapshots”
In technical documentation, restore points are often described as snapshots because they represent the system state at a particular moment. Think of it like a freeze-frame of important Windows system information. System Restore uses that saved state to roll relevant system changes back to that point.
Part 3: Setting Up & Enabling System Protection
Before you can create or use restore points, Windows requires System Protection to be configured.
System Protection controls whether System Restore can operate on a drive, how much disk space it can use, and which drives are protected. Without it enabled, System Restore cannot create or use restore points.
In this section, we’ll focus on finding System Protection and configuring these settings. Creating restore points and performing a restore come later.
3.1 Navigating to System Protection in Windows 11
Let’s start by locating this foundational setting. In Windows 11, you can access this panel through the main Settings app:
- Open Settings by pressing
Win + I(or right-click the Start button and select Settings). - Ensure System is selected in the left sidebar, scroll down on the right pane, and click About.
- Under the Related links section, click System protection.
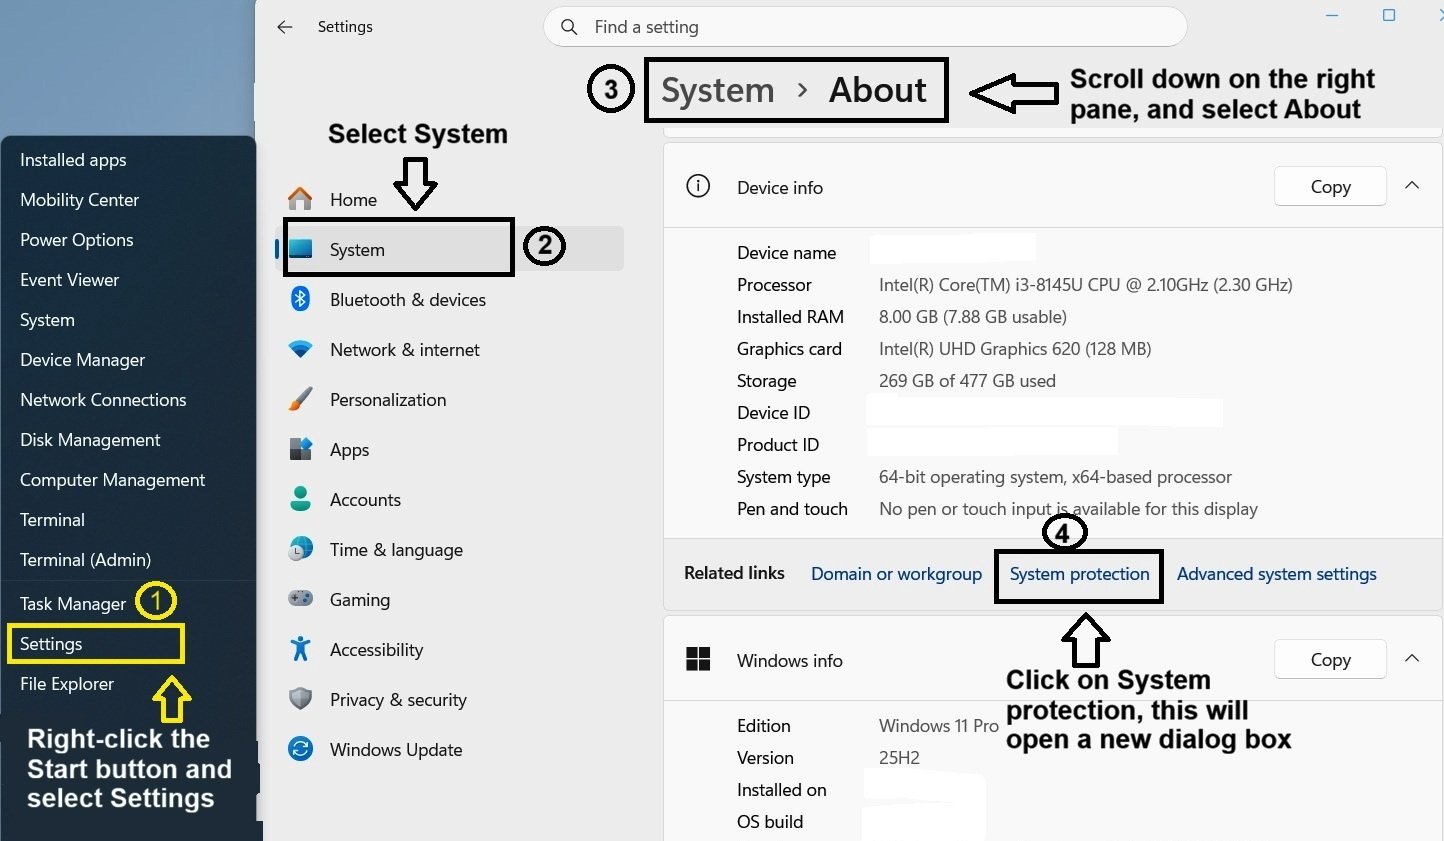
Windows will open the System Properties window directly on the System Protection tab.
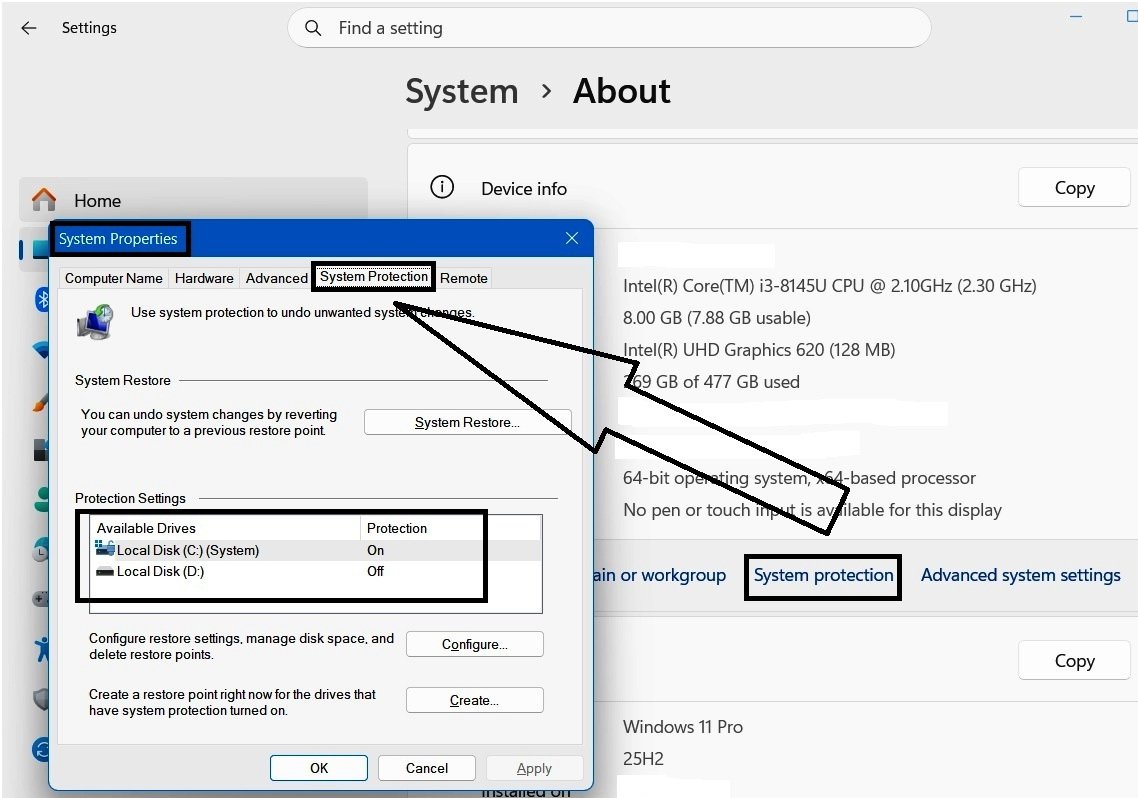
Notice that System Protection is a tab within the System Properties window. Here, Windows lists the available drives and shows whether protection is currently On or Off for each drive.
We’ll get into actually configuring these settings shortly. But first, let’s look at an even quicker way to reach this same screen.
Note: The Related links section can look slightly different depending on your Windows 11 version or build. If you don’t see System protection directly listed, select Advanced system settings instead. In the System Properties window that opens, select the System Protection tab.
3.2 Accessing System Protection via Run Command
You might wonder why we need a second method when the first one already works. The reason is simple: Windows has changed the location and names of menus across versions. Having an alternative method gives you a reliable way to reach System Protection regardless of which version you’re using.
The fastest way is a single command:
- Press Win + R to open the Run dialog box
- Type
SystemPropertiesProtection - Press Enter
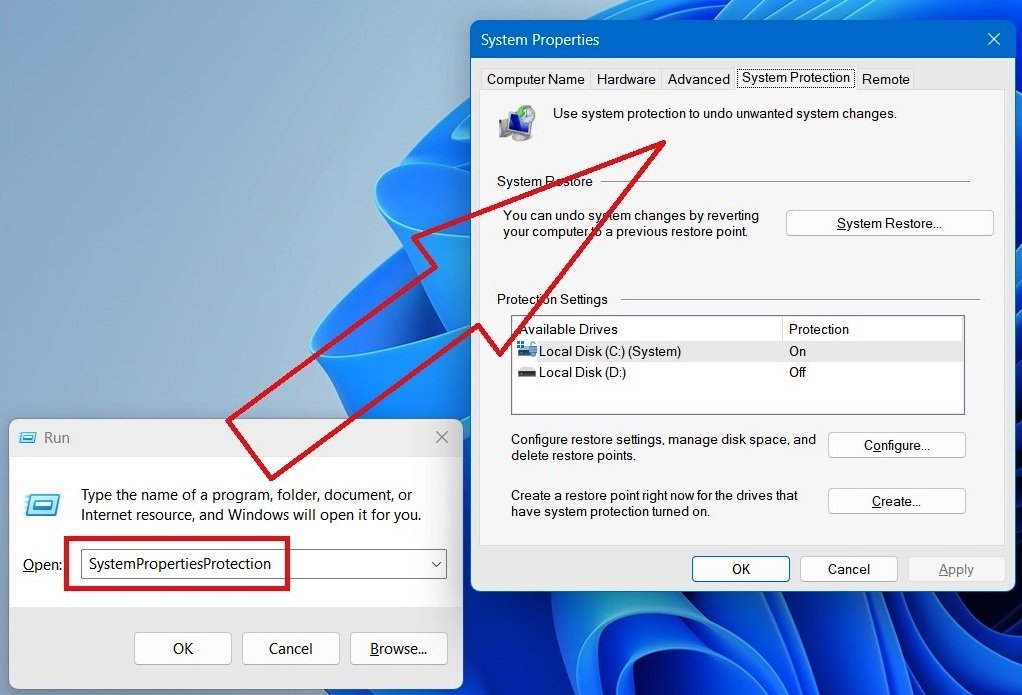
There’s also a more general version of this command worth knowing: sysdm.cpl
- Press Win + R to open the Run dialog box
- Type
Sysdm.cpl - Press Enter
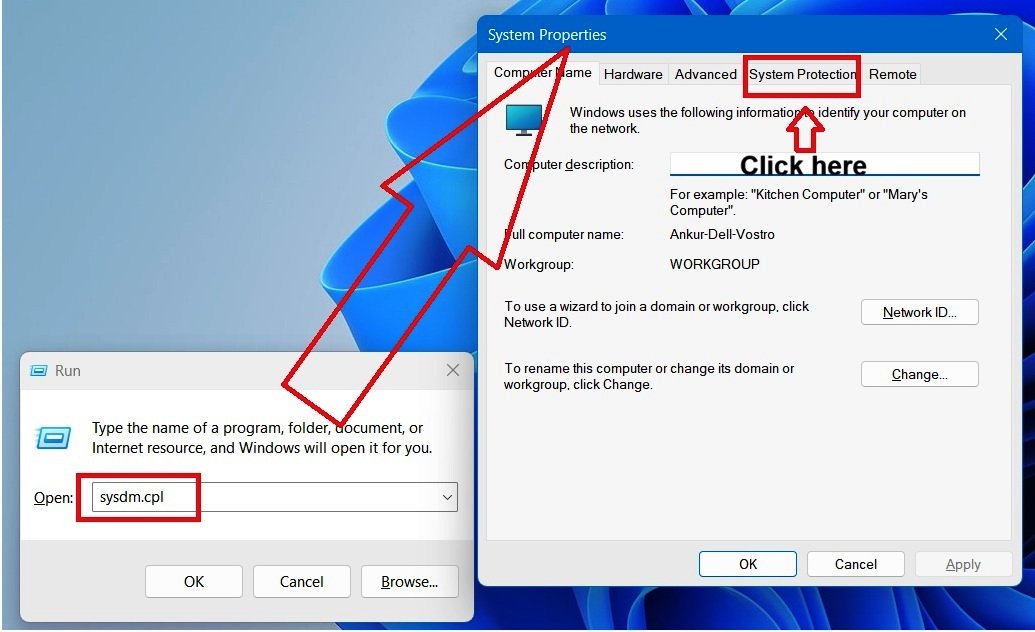
This opens the System Properties window itself — from there, you’d click the System Protection tab manually to get to the same place. It takes one extra click, but it’s useful to know since sysdm.cpl is a well-known command that opens System Properties.
Now, let’s move on to actually configuring System Restore.
3.3 Configuring Settings for System Restore
Now that System Protection is open, let’s configure what it actually needs.
First, select the drive your Windows installation is on — for most people, that’s the C: drive. You’ll notice each drive shows a Protection status of On or Off. Whether it’s already on or off on your machine depends on how Windows was installed, or on settings you (or someone else) may have changed before. In my case, protection is already on for the C: drive, since I enabled it earlier.
Select your drive, then click Configure.
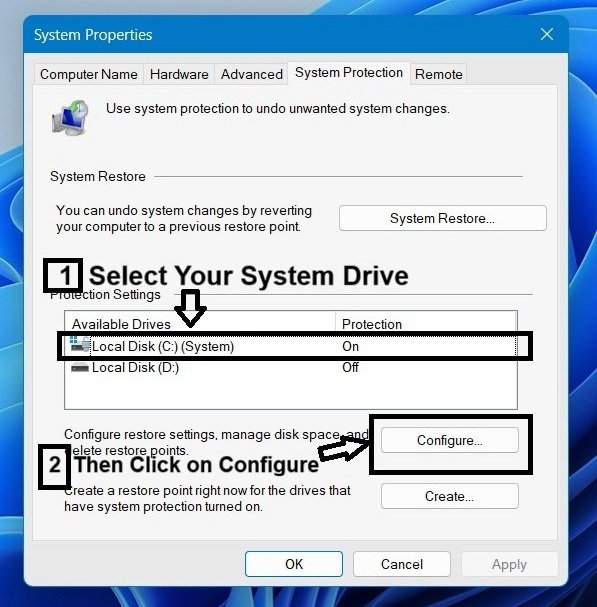
This opens the System Protection settings for that drive, where you’ll find two important settings.
1. Restore Settings
Controls whether System Restore is enabled:
- Turn on system protection — Enables System Restore and allows Windows to create restore points.
- Disable system protection — Disables System Restore; no new restore points will be created.
If protection is already enabled, Turn on system protection will be selected. Otherwise, select it to enable protection.
2. Disk Space Usage
Controls how much space Windows can use for restore points. More space allows more restore points to be retained.
- Adjust Max Usage to control how much disk space System Protection can use for restore points. More allocated space can allow more restore points to be retained.
- When the space is full, Windows automatically removes older restore points to make room for new ones.
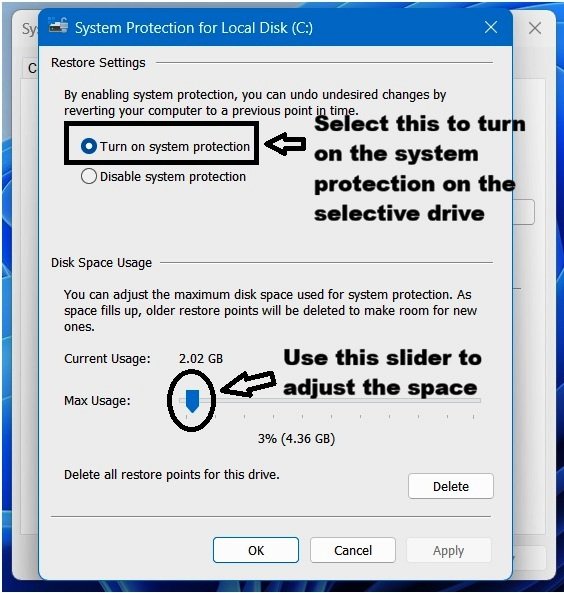
Once you’ve made your selections, click Apply, then OK.
You may also see a Delete button, which removes all existing restore points. We’ll cover that in an upcoming section.
So, before System Restore can work, verify these three things:
- Select the drive you want to protect.
- Select Turn on system protection.
- Allocate disk space for restore points.
But why does System Protection matter so much to System Restore? Let’s find out.
3.4 The Relationship Between System Protection and System Restore
System Protection isn’t a separate feature alongside System Restore—it’s the mechanism System Restore depends on. Think of it this way: System Protection makes restore points possible; System Restore uses them to roll Windows back.
Without System Protection enabled on a drive, Windows cannot create restore points for that drive, and System Restore has nothing to use.
This is also why protection is configured per drive rather than through a single system-wide switch. Only protected drives can have restore points created for them. In most cases, that means the Windows system drive, where the system state System Restore primarily works with is located.
In short, System Protection is the gatekeeper: it determines whether restore points can exist, while System Restore lets you use them.
With System Protection configured, the foundation is in place. Now let’s put it to use by creating your first restore point.
Part 4: Creating and Managing Restore Points
With System Protection enabled, you’re ready to put it to work. In this part, we’ll create a restore point manually, see which restore points already exist, and understand where they come from.
4.1 Creating a Restore Point Manually
To reach the creation menu, you can use any of the access methods we covered in Part 3, or simply press Win + S, type “Create a restore point” and press Enter.
Once you’re there, click Create. You’ll be asked to name the restore point.
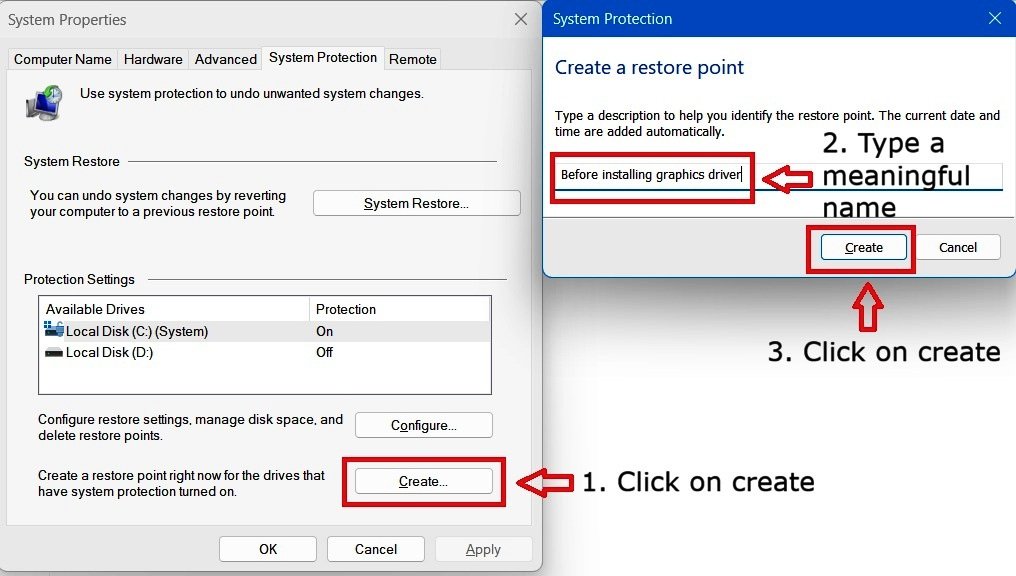
Take a moment to choose a meaningful name. Something like “Before installing graphics driver” is far more useful later than a generic name like “Test” or “Restore Point 1”. When you need to choose a restore point, a clear name can save you a lot of guesswork.
Click Create, and Windows will take a moment to generate the restore point.
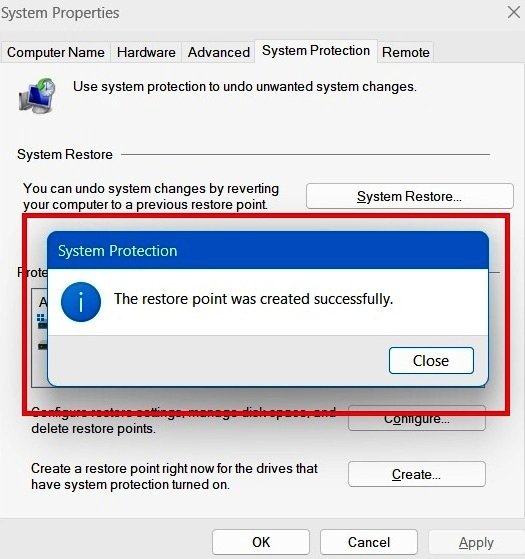
Once complete, you’ll see a confirmation message: “The restore point was created successfully.”
When Should You Create a Manual Restore Point?
Since restore points use disk space, it’s better to create them deliberately rather than at random. Good times include:
- Before installing unfamiliar software or software from an untrusted source
- Before installing or updating a driver
- Before making major system configuration changes
- Before editing the Registry or applying advanced system tweaks
The core idea: If you’re about to make a change you may want to undo, create a restore point first.
Now that we’ve created one, let’s check it.
4.2 Viewing Available Restore Points
Back in the same System Protection window, click System Restore. This opens the System Restore wizard — click Next to continue.
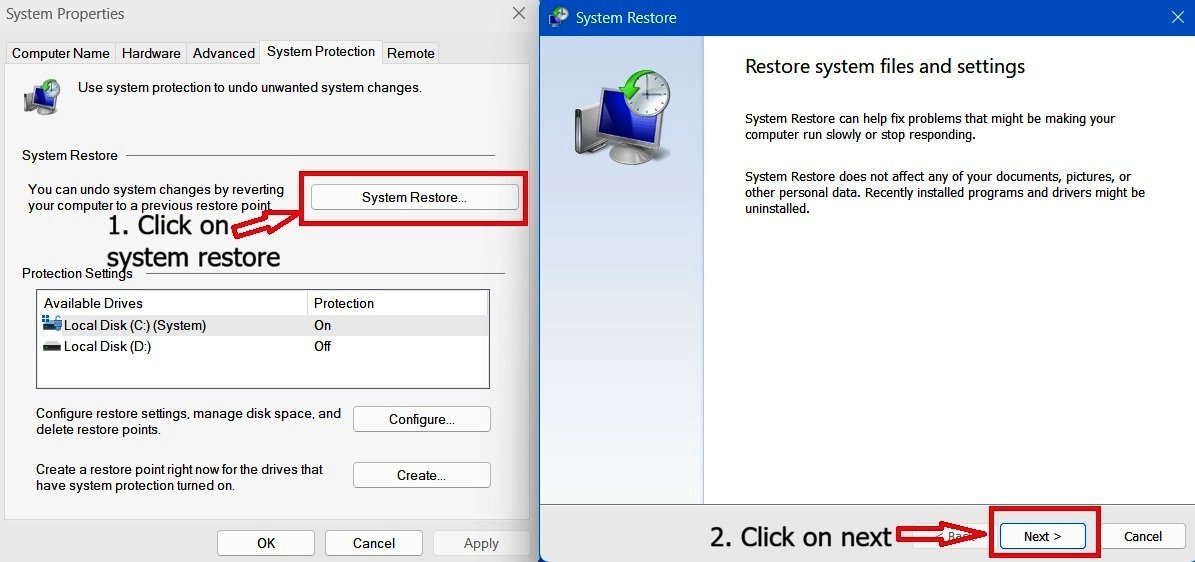
The next screen shows every restore point currently available on your system.
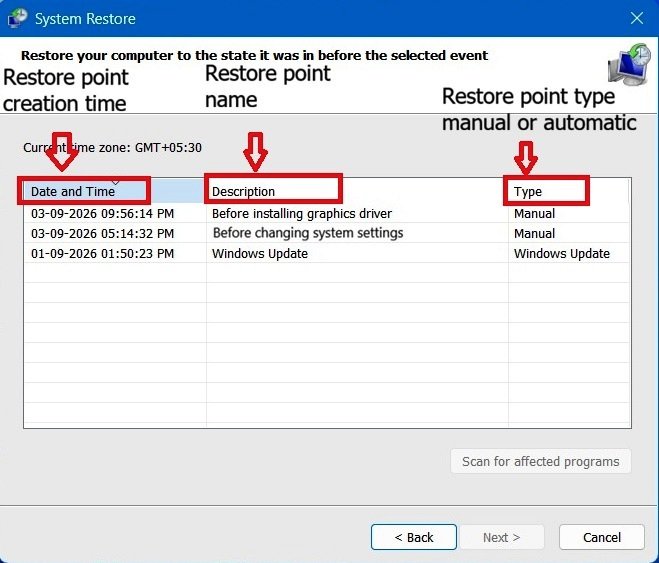
Look at the list in the screenshot above. You’ll see three restore points.
The top one, “Before installing graphics driver,” is the one we just created—dated September 3, 2026, and marked Manual. Below it is another Manual restore point from earlier that same day. The third, dated September 1, is marked Windows Update under Type. This one wasn’t created manually; Windows created it automatically.
So where did that restore point come from? That’s what we’ll explore next.
4.3 Manual vs. Automatic Restore Points
Looking back at the list from the last section, you already saw the difference in action: two entries marked Manual, and one marked Windows Update. Let’s unpack what that actually means.
Manual vs. Automatic:
- Manual: Created by you, on-demand, for a specific purpose (like the one you just created).
- Automatic: Created by Windows without your direct intervention.
Why Windows Creates Automatic Points:
Windows automatically creates restore points in specific scenarios to act as a safety net:
- Software and driver installations: Before installing a new application or driver .
- Windows Updates: Before applying an update downloaded via Windows Update .
- Scheduled check-ins: Windows routinely checks.
Restore Points Aren’t Created for Every Change:
Windows doesn’t create a restore point for every change you make. Everyday actions such as installing a small app, changing a setting, or copying files may not trigger one. Automatic restore points are generally created for changes Windows considers significant enough to protect against.
Windows also creates a scheduled restore point only when no other restore point has been created within the previous seven days. This helps ensure there is a reasonably recent restore point even when no significant system change has triggered one.
What Happens to Older Restore Points?
Restore points aren’t kept forever. System Restore uses allocated disk space to store restore-point information. When that space becomes limited, Windows automatically removes older restore points to make room for newer ones.
So, the restore-point list you see today may look very different several weeks or months from now.
Note: Automatic restore-point creation can involve event-driven triggers and scheduled tasks, while older restore points are managed as storage space fills up. These details are beyond the scope of this lesson and will be covered in a future lesson.
Now it’s time to actually use one of these restore points — which is exactly what we’ll do next.
Part 5: Performing and Undoing a System Restore
You’ve built the foundation, created a restore point, and understand how it all works. Now it’s time to put System Restore to work—and learn what to do if things don’t go as expected.
5.1 Performing a System Restore
Opening System Restore
While you can launch the System Restore wizard by navigating through the System Protection settings, as shown in the previous sections, there’s an even faster method: a command that works across Windows versions.
- Press
Win + Ron your keyboard to open the Run dialog box. - Type
rstruiand press Enter (or click OK). - The System Restore wizard will launch directly on your screen. Click Next >.
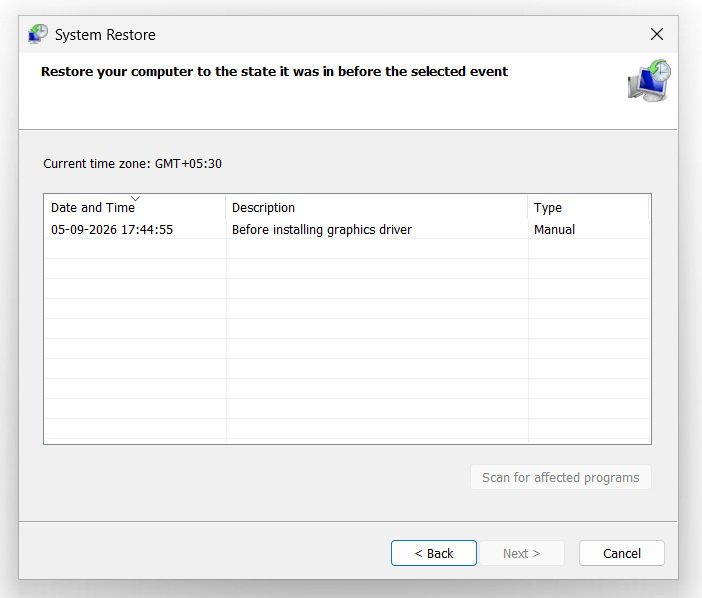
Selecting the Right Restore Point
You’ve already seen this list, so there’s no need to re-explain how to read it. For this walkthrough, I’m selecting “Before installing graphics driver” — the same name as earlier, but note that this screenshot is from a different computer than the one used in Part 4, so you’ll only see a single restore point listed here rather than the three from before.
As soon as you select a restore point, notice that the Scan for affected programs option becomes active.
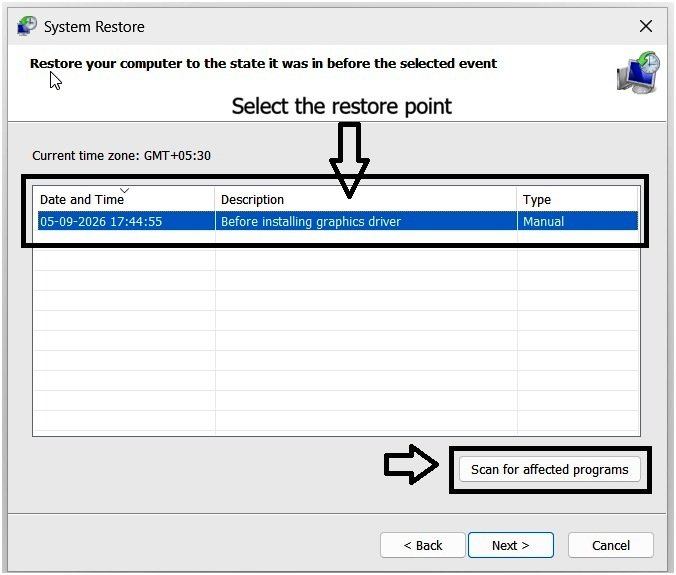
Understanding “Scan for Affected Programs”
Before continuing, it’s worth checking this option. It shows which installed programs and drivers may be affected by the restore—some may be removed, while others may be restored. Think of it as a preview of the restore’s potential side effects.
Click Scan for Affected Programs. System Restore will scan your system, which may take a few seconds.
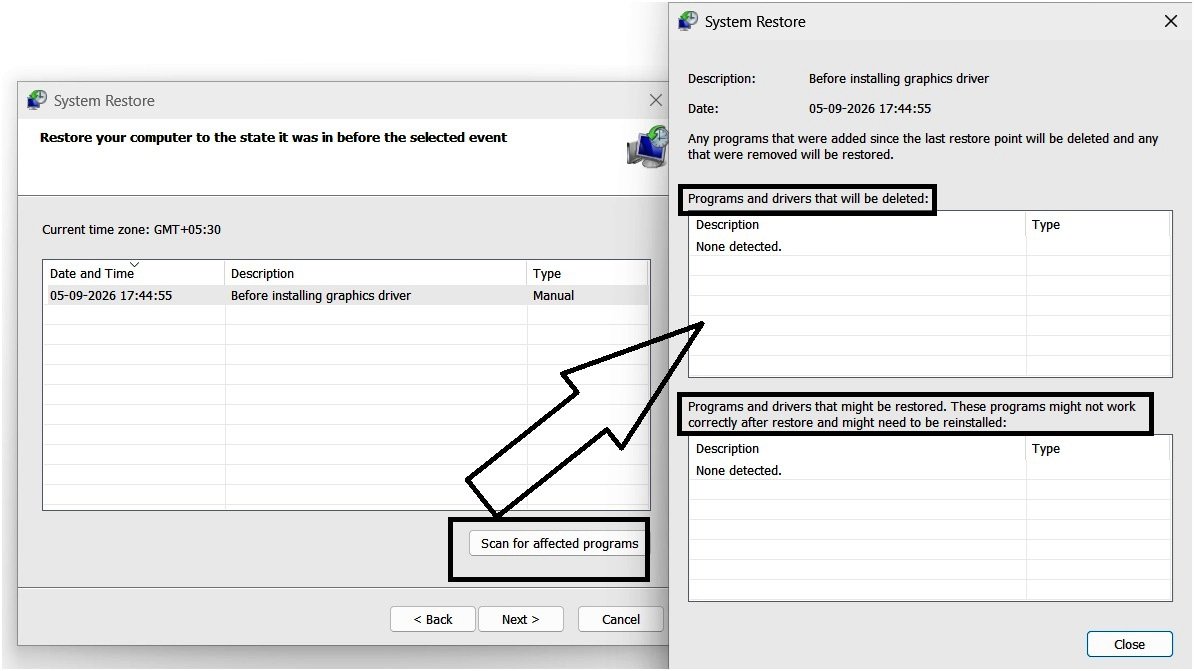
Once the scan finishes, you’ll see two sections:
- Programs and drivers that will be deleted — Items installed after the selected restore point that will be removed.
- Programs and drivers that might be restored — Items that existed at the restore point and may return. Windows warns that these programs might not work correctly afterward and may need to be reinstalled.
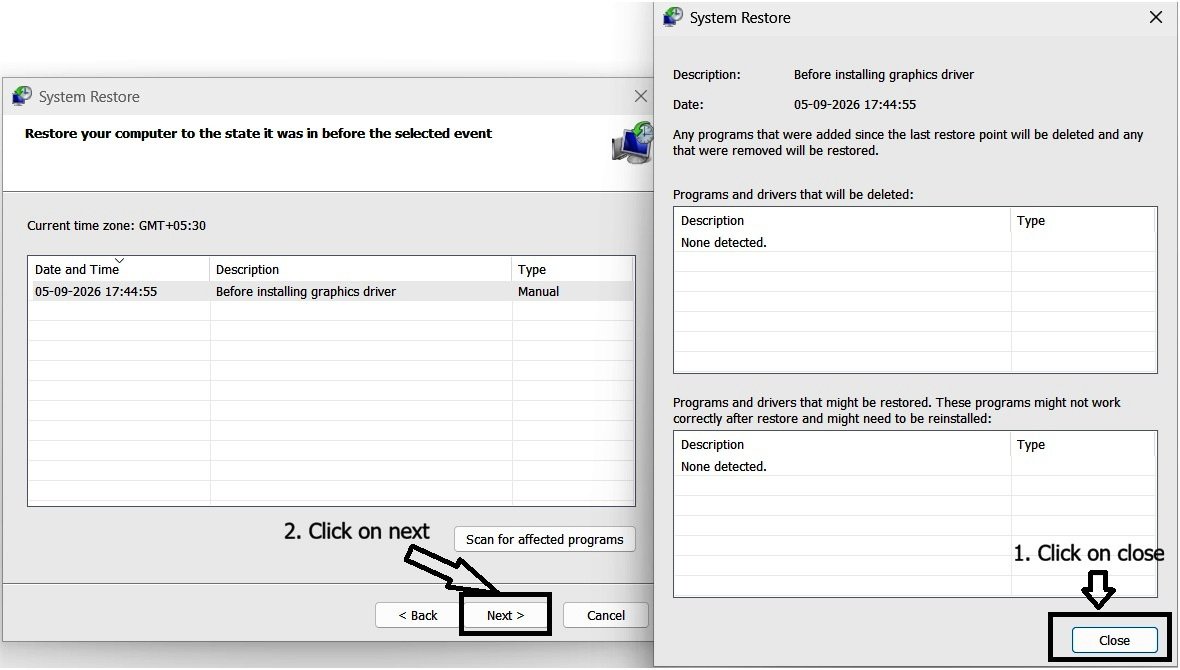
Review the list, then click Close to return to the restore point screen and select Next.
Final Confirmation
Clicking Next brings up a final confirmation screen. This shows the restore point’s date and time, its description, and which drive will be restored (typically your C: drive). You’ll also see the Scan for affected programs option again here, in case you want to double-check before committing.
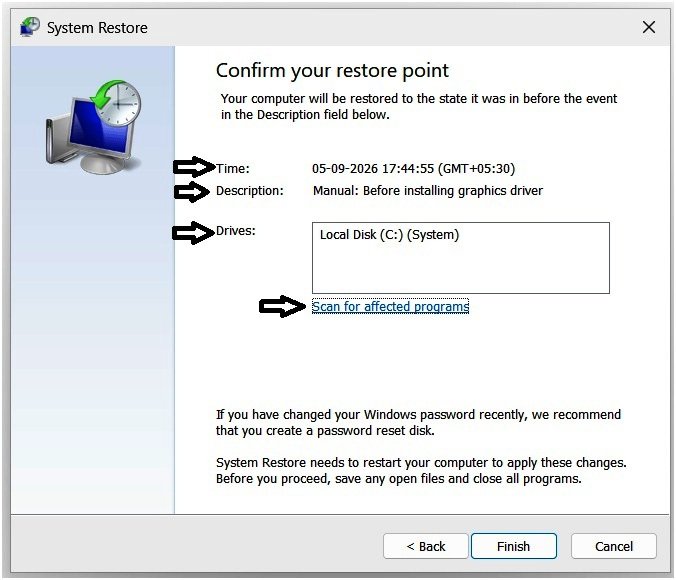
Click Finish, and a warning dialog box will appear, letting you know that once started, this process shouldn’t be interrupted.
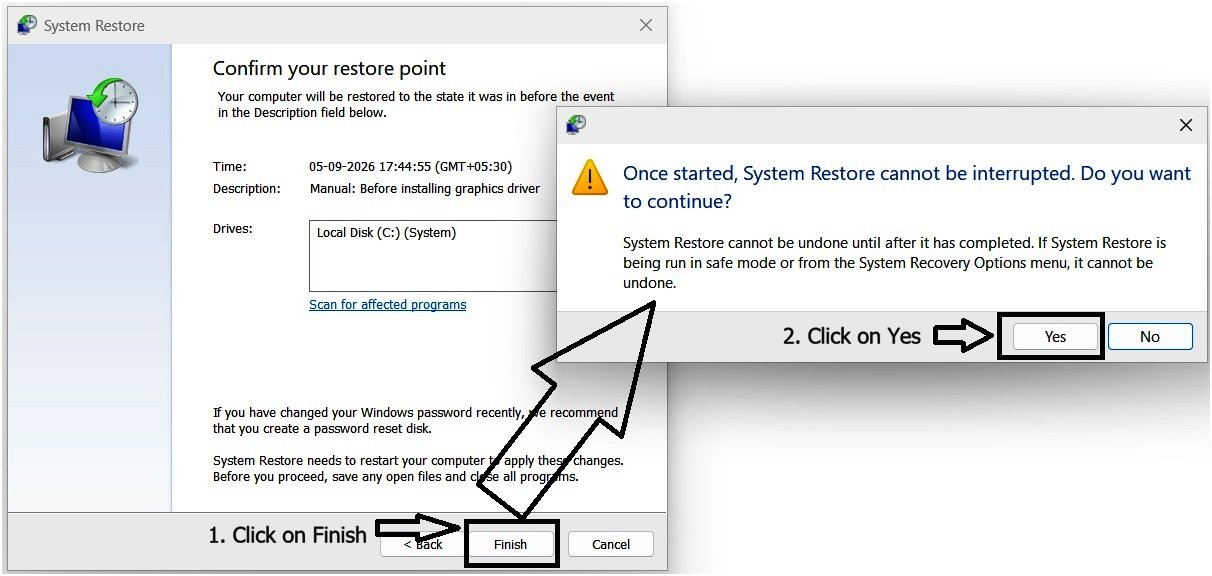
Click Yes to continue. Windows will show a “Preparing to restore your system” message, and shortly after, your computer will restart on its own — System Restore takes over from there.
During the process, you’ll see a series of status messages appear, one after another: initializing, restoring the registry, removing temporary files, and finally, a message confirming the restore is complete. Your system will then restart automatically.
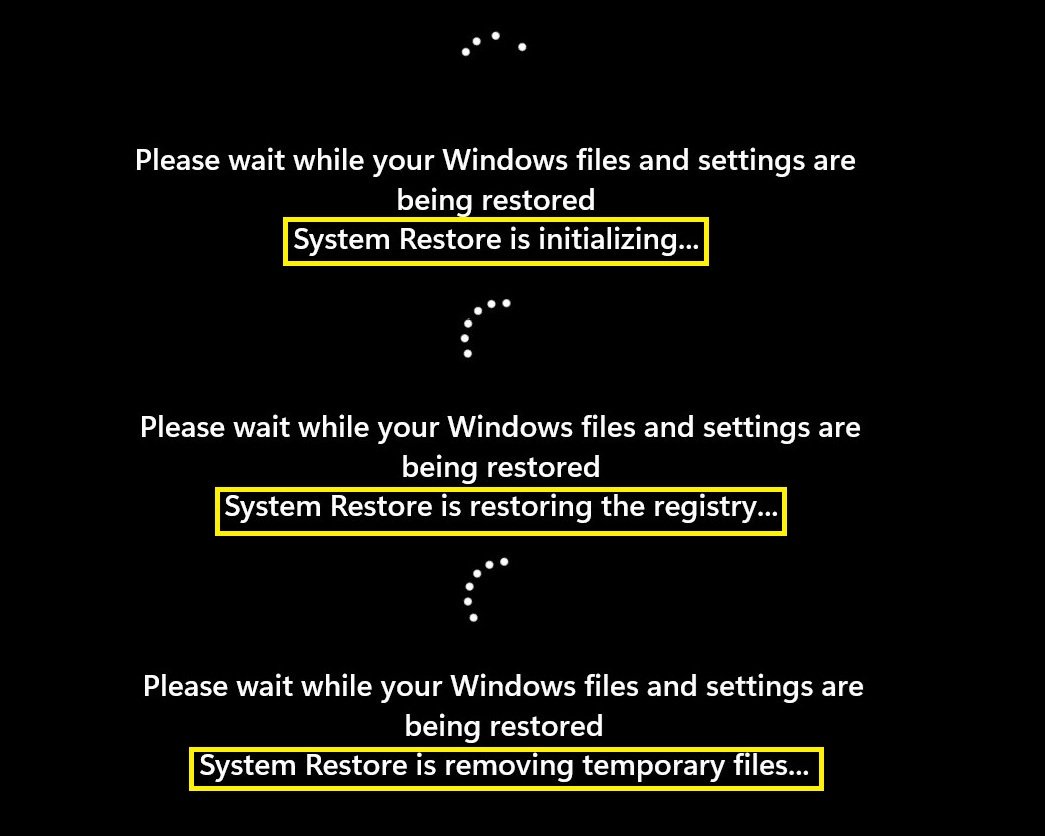
It’s worth repeating: don’t interrupt this process under any circumstances, until your system restarts and the restore is confirmed complete. The process can take some time, and there is no reliable fixed duration.
Never forcefully power off or interrupt your PC during this phase.
Once your system restarts, log in as usual — the desktop may take a moment longer than normal to fully load. As soon as it does, a dialog box will appear confirming the restore completed successfully. It won’t show you the restore point’s name, just the date and time your system was restored to.
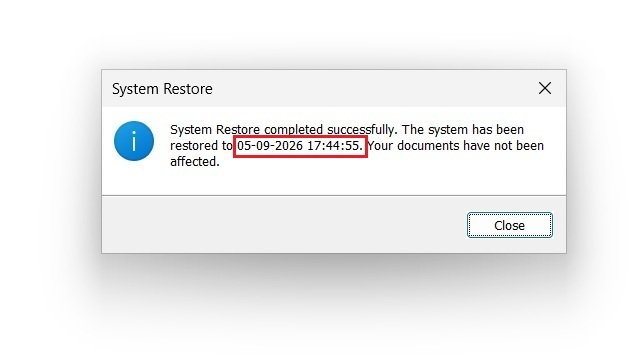
Now, there’s a real possibility that after all this, your issue isn’t resolved — or worse, something else feels off compared to before. In that case, you might be wondering: can I undo this? Let’s find out.
5.2 Undoing a System Restore
If a restore doesn’t fix the problem—or makes things worse—you have two options: choose a different restore point or undo the most recent restore. Choosing a different restore point follows the process in 5.1, while undoing the restore takes you back to the state before that restore.
Open System Restore again using the rstrui command. This time, you’ll see two options:
- Undo System Restore — Reverts the most recent restore operation.
- Choose a different restore point — Starts the process covered in 5.1.
The Undo System Restore option is available only for the most recent restore operation. If you perform another restore afterward, the undo option for the earlier restore may no longer be available.
Select Undo System Restore and click Next.
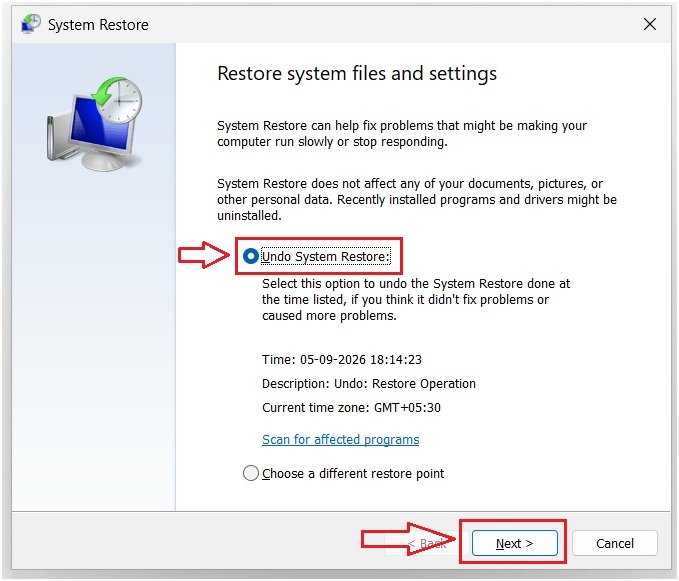
The next screen, “Confirm your restore point,” shows the same details as before: the time, description, drive, and the option to scan for affected programs.
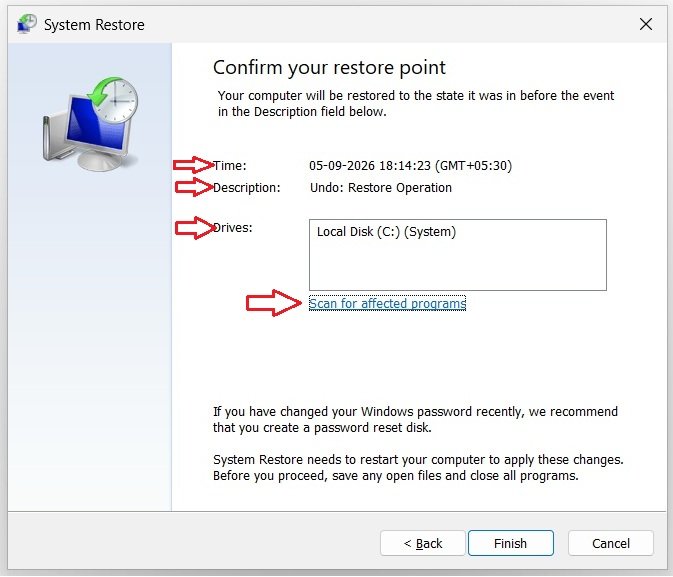
From here, the process is identical to what you already walked through in 5.1. Click Finish, and the same warning dialog appears, telling you not to interrupt the process.
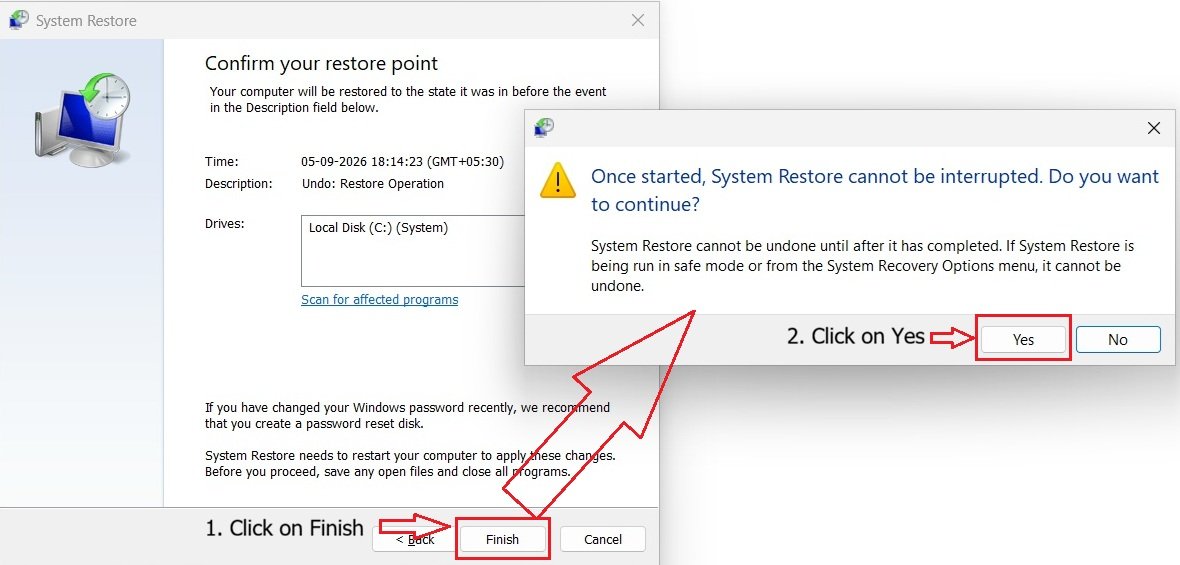
Click Yes, and your system restarts to carry out the process — the same sequence of status messages you saw in 5.1 plays out here too, so there’s no need to walk through it again. Once it’s done, you’ll see the same familiar confirmation message on your welcome screen, letting you know the restore completed.
It’s worth pointing out: Undo System Restore is itself another System Restore operation—Windows is simply restoring the system back to the state that existed immediately before the previous restore.
5.3 Accessing System Restore When Windows Won’t Start
So far, we’ve launched System Restore from a working Windows desktop. But what if a bad driver update or system corruption prevents Windows from starting?
System Restore is still available through Windows’ built-in recovery environment:
Repair your computer → Troubleshoot → Advanced options → System RestoreThis is not a different version of System Restore. It uses the same restore points you’ve already seen in this lesson, whether they were created manually or automatically by Windows. The only difference is how you access it.
This section is only an introduction. Windows’ recovery environment deserves a dedicated lesson, where we’ll explore it in more detail.
5.4 Deleting Restore Points
Back in Part 3, when we first configured System Restore, you may have noticed a Delete button sitting in that same window — we said we’d come back to it, and this is that moment.
Open System Protection, click Configure (the same path covered earlier — no need to repeat it here), and you’ll see the Delete option.
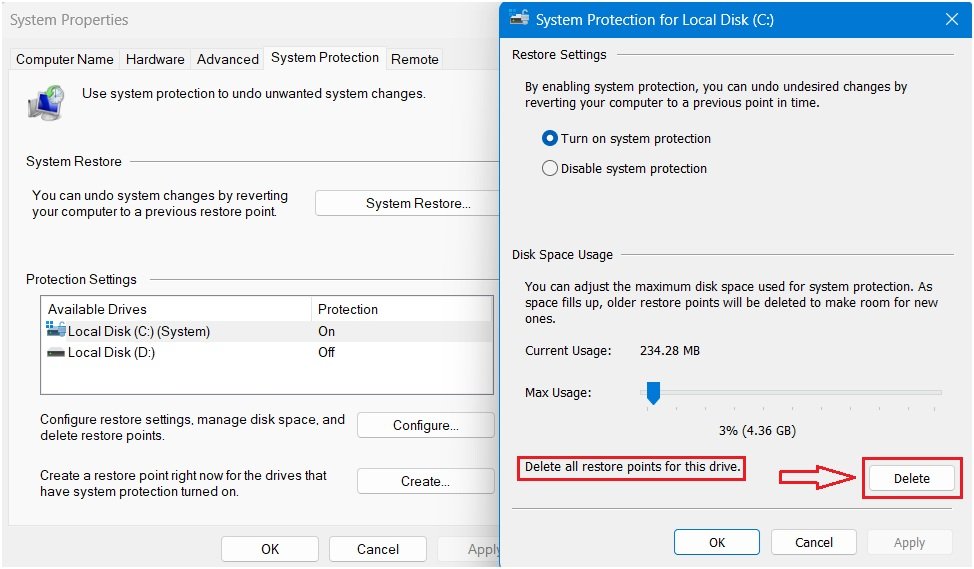
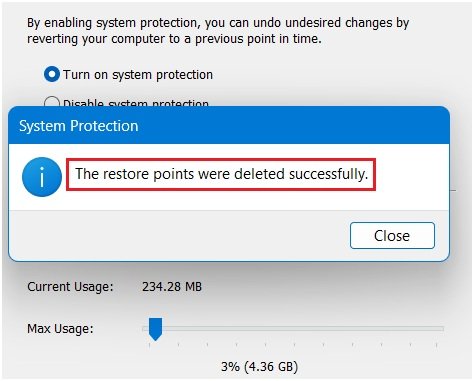
Notice the label next to it: “Delete all restore points for this drive.” As that wording suggests, Windows doesn’t let you delete a single restore point from here — only all of them, in one action. Click Delete, and Windows will warn you that you’re about to remove every restore point on that drive.
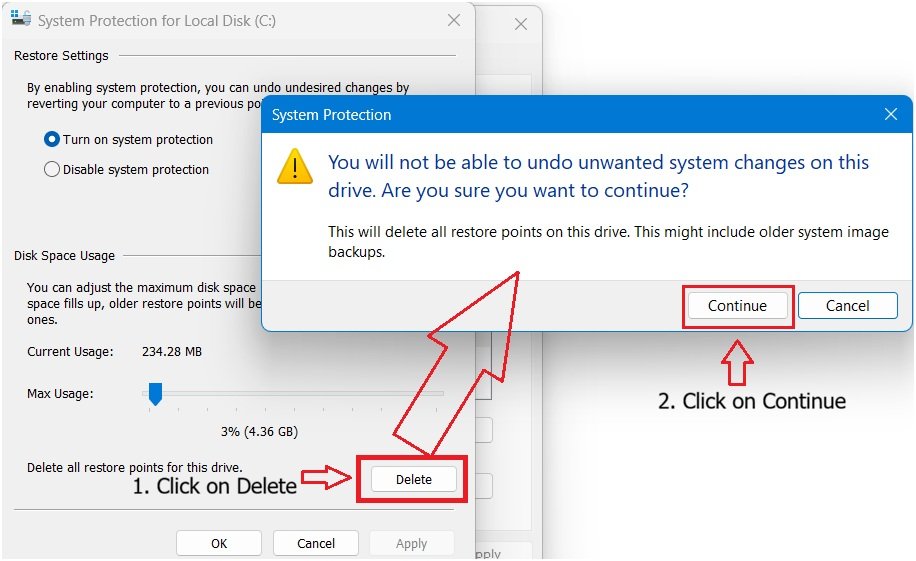
Click Continue, and Windows deletes all restore points on that drive, followed by a confirmation message: “The restore points were deleted successfully.”
Turning Off System Protection Also Removes Existing Restore Points
Earlier, we saw that System Protection can be turned on or off for a drive. You might assume that turning it off temporarily would simply pause System Restore while keeping your existing restore points. That’s not how it works.
If a drive has five restore points and you turn off System Protection, Windows deletes the restore points associated with that protection. Turning protection back on does not bring them back; only new restore points can be created afterward.
In other words, disabling and re-enabling System Protection effectively wipes out the restore points you had.
Now that you know how to create, use, undo, and remove restore points, there’s one more important topic: why System Restore sometimes fails—or appears to.
Part 6: When System Restore ‘Fails’
This is where we address System Restore’s reputation for “not working.” Often, the feature hasn’t actually failed—something specific went wrong, or expectations didn’t match what System Restore is designed to do. Let’s look at the real reasons, one by one.
6.1 “There Are No Restore Points”
The most common cause is that System Protection was never turned on for that drive, so no restore points were created. Two other possibilities are things you’ve already seen in this lesson: the disk space allocated to System Protection may have filled up, causing older restore points to be deleted automatically, or System Protection may have been disabled at some point, which deletes all existing restore points immediately.
6.2 “System Restore Is Unavailable”
If the System Restore option itself is grayed out or missing, check the status of System Protection first. If protection is disabled for that drive, System Restore cannot create or use restore points.
On managed or work devices, it’s also possible that an administrator has disabled System Restore through policy. In that case, re-enabling the feature may be outside your control.
6.3 “The Restore Failed During the Process”
A restore can fail partway through for a few reasons: insufficient free disk space to complete the operation, a corrupted or incomplete restore point. Third-party security software or other software conflicts can sometimes interfere with the restoration process. If this happens, try a different, older restore point before assuming the feature itself is broken
6.4 “It Completed, But the Problem Remains”
This is the single biggest reason people conclude System Restore “doesn’t work” — and it’s worth slowing down on, because often, the feature worked exactly as intended.
A few real explanations:
- The restore point you chose wasn’t actually from before the problem started
- The problem wasn’t caused by a reversible system change at all (a hardware issue, for instance, has nothing to do with system state)
- The specific component causing the issue simply wasn’t part of what that restore point covered
- The underlying problem existed before the point you rolled back to
In all of these cases, System Restore did its job — reversing system state to that point in time. The issue is that the cause of the problem was never something a restore could touch in the first place.
6.5 Common Error Codes
Sometimes a failed restore comes with a specific error code attached, rather than a vague failure message. A few you may run into:
| Error Code | Common Cause |
|---|---|
| 0x80070005 | Access denied — often antivirus/security software blocking the process |
| 0x80042302 | Volume Shadow Copy Service isn’t running or is disabled |
| 0x80070091 | Missing or corrupted system files, often related to the WindowsApps folder |
| 0x80070017 | Corrupted data encountered during the restore |
Note: These codes and causes are based on research rather than errors I’ve personally encountered on my own machine, so treat them as a general starting point rather than a definitive list. If you run into one of these — or any other code — search it directly on Microsoft’s support site or the web, since fixes are often specific to the exact code and your situation.
6.6 Misconceptions That Lead to “It Failed”
One of the most common reasons people believe System Restore failed is that they expected it to do something it cannot do. Here are the misconceptions that most often cause this confusion:
- System Restore will recover deleted personal files (documents, photos, videos, etc.)
- System Restore is the same as Reset this PC or a full Windows reinstallation
- System Restore can fix any Windows problem, including hardware failures
- System Restore removes every trace of malware
- A successful restore means the original problem is permanently solved
- If System Restore did not fix my issue, the feature itself is broken
When any of these expectations are in place, even a perfectly working System Restore can feel like a failure. Understanding what the feature actually does (and does not do) prevents most of this frustration.
6.7 A Quick Troubleshooting Flow
When something feels wrong, work through this in order:
- Is System Protection actually enabled for the drive?
- Is there a restore point available that predates the problem?
- Did you check “Scan for affected programs” before restoring?
- Did the restore process complete without errors?
- Was the original problem actually caused by a reversible system change — or something else entirely?
Note: Some restore failures trace back to deeper causes — corrupted shadow copies, boot configuration issues, or problems that require command-line recovery tools. Those go beyond what a foundation lesson needs to cover, and we’ll get into them properly in a future, more advanced lesson.
Summary: Key Takeaways
- System Restore is not a backup feature — your personal files are never touched, in either direction
- It reverses certain system-level changes: system files, settings, registry entries, drivers, and some application/update changes
- A restore point is a saved snapshot of your system’s state at a specific moment in time
- System Protection is the setting that makes restore points possible in the first place — without it enabled, System Restore has nothing to work with
- Restore points can be created manually or automatically by Windows, and both types compete for the same allocated disk space
- Older restore points get deleted automatically once that space runs out — and disabling/re-enabling System Protection deletes all of them instantly
- You can perform a restore, and just as importantly, undo one if it doesn’t go as expected
- The same System Restore feature is also reachable when Windows won’t boot normally, through the recovery environment
- System Restore is a tool for a specific job: undoing a recent, reversible system change — not a universal fix for every Windows problem
Windows 11 Note: Point-in-Time Restore
Windows 11 also includes a newer recovery feature called Point-in-time restore. Despite the similar name, it is different from the System Restore feature covered in this lesson.
Unlike System Restore, which primarily rolls back Windows system files, settings, drivers, and other system-level changes while leaving personal files alone, Point-in-time restore can restore a much broader set of data, including apps, settings, and personal files.
Point-in-time restore is available in Windows 11 version 24H2 and later and works differently from traditional System Restore. Because the two features serve different purposes, we’ll cover Point-in-time restore separately in a future lesson.
Systematic Mode Insight
Now that we have reached the end of this lesson, there is one important thought that naturally comes to mind:
“System Restore depends on restore points.“
Without a restore point, System Restore is like a smartphone without a battery — the feature exists, but there is nothing available to power the recovery process.
As we learned, Windows can create restore points automatically. But Windows does not work according to your schedule. You cannot assume that an automatic restore point will always exist at exactly the moment you need one.
That’s why I would recommend creating restore points manually as part of your own routine.
You don’t have to create one every day. Instead, choose a pattern that makes sense for you. For example, you might decide:
- Every Sunday, create a restore point.
- Or create one every 7–10 days.
- Or simply create one whenever you feel your system should have a recent recovery point.
The schedules above are not strict rules you need to follow. They’re simply my recommendations, and the exact schedule is up to you. The important thing is to choose a routine that you can actually follow.
And there is one more practice worth remembering: create a restore point before making system changes, even when the change seems minor.
A small setting change may look harmless, but sometimes a seemingly minor change can have an unexpected effect on Windows. Creating a restore point first gives you a way back if something goes wrong.
We have already discussed what kinds of changes are worth creating a restore point for, so there is no need to repeat that list here. The important thing is to develop the habit of creating your own recovery point when you are about to make a change that could affect the system.
And finally, I would end this lesson with the same thought from the beginning:
System Restore works exceptionally well — once you understand what it actually does.
What’s Next
In the next lesson, we’ll shift our focus from protecting Windows system state to managing disk space itself with Windows Disk Quotas.
You’ll learn what disk quotas are, how Windows uses them to limit and track storage usage, how to configure them, and when they can actually be useful.
Stay tuned and we’ll see you in the next lesson on SystematicMode.com!


2 thoughts on “Windows System Restore: What It Really Does and Why Most People Misunderstand It”