Introduction
Welcome to Systematic Mode!
Today’s scenario is one you’ve probably experienced in some form: sharing your computer with someone else. In my case, it wasn’t complicated at first — I gave the other person a standard account, not an administrator account. He couldn’t change important settings, install software, or make system-level changes. On paper, that felt like enough control.
But there was a gap I hadn’t accounted for: none of that stopped him from filling up my hard drive completely. Photos, movies, downloaded games — none of these require administrator privileges, and none of them were ever blocked.
Watching my free space slowly disappear made it clear that I needed an actual solution. That solution turned out to be a feature already built into Windows: Windows Disk Quotas. Like System Restore from our last lesson, Disk Quotas is a feature that has been part of Windows for years, but many people have never heard of it.
Before we go any further, here’s the one thing worth knowing upfront: Disk Quotas is fundamentally an administrator’s tool. It’s not something a standard user sets up for themselves — it’s something an administrator configures to manage storage usage for users on the computer. If you’re responsible for managing a shared PC — whether as a parent, landlord, office administrator, or simply the person managing the computer — this is exactly what Disk Quotas is designed for.
In short, Disk Quotas lets an administrator give each user on a shared computer a defined storage limit, so one person’s storage usage can’t quietly consume space needed by everyone else.
What You’ll Learn
- What Disk Quotas actually are and how Windows tracks them per user
- Where this feature is genuinely useful — shared family PCs, offices, hostels, college labs
- The administrative requirements you need to know before setting it up
- How to find and enable Disk Quotas in Windows 11
- How to set a shared default limit for every user
- How to give individual users their own separate limits
- What actually happens when someone hits their limit — warnings, enforcement, and the event log
- How disk quotas behave for administrators
Let’s start with the basic idea behind Disk Quotas.
Part 1: What Are Disk Quotas in Windows?
Before configuring anything, let’s first understand what Disk Quotas actually do. We’ll start with the basic idea, look at how Windows keeps track of storage usage for each user, and then see where this feature makes sense in real-world situations.
1.1 The Basic Idea
A disk quota is a limit placed on how much storage space a particular user can use on a volume.
For example, suppose a computer has a 500 GB drive shared by three users. Without any quota, each user can continue storing files as long as the drive has available space.
With Disk Quotas, an administrator can assign the same storage limit to all users or set different limits for individual users, depending on how the shared volume needs to be managed.
For example, an administrator could give every user a 50 GB limit, or create different limits such as:
User A → 50 GB
User B → 100 GB
User C → 25 GB
The physical drive has not been divided into separate pieces. All three users are still using the same volume; the quota simply controls how much storage each user is allowed to consume.
This distinction is important: a disk quota is a storage-usage limit, not a separate partition or a fixed piece of the drive.
1.2 How Windows Tracks User Storage
To enforce a quota, Windows needs to keep track of how much storage is charged to each user. Disk Quotas does this based on file ownership: the storage used by a file is charged to the user who owns that file.
Let me give you a concrete example:
- User A creates a 5 GB video file in a shared folder and owns the file.
- User B can access and play that video file.
- The 5 GB is charged against User A’s quota, not User B’s, because User A owns the file.
So, the person accessing or using a file is not necessarily the person whose quota is affected. What matters for Disk Quotas is who owns the file.
For now, you don’t need to worry about the technical details of how Windows identifies file ownership. The important idea is simply:
Disk Quotas tracks storage based on the user who owns the files, not the user who happens to access them.
This user-level accounting is what allows Windows to apply different storage limits to different users on the same volume.
1.3 Where Disk Quotas Are Useful
Once you know it’s tracking usage per person rather than per folder, the practical use cases become obvious — anywhere multiple people share the same physical drive:
- Family computers where kids or other users might fill the drive with games, downloads, or media.
- Shared living situations such as roommates or hostel/dorm setups where several people use the same desktop.
- Offices where a shared workstation is used by different employees across shifts or departments.
- School and college labs where many students use the same machines over time and each needs a reasonable amount of storage.
In every one of these situations, the underlying problem is the same: several people, equal access, one drive. Disk quotas exist specifically to solve that — quietly, and without needing any third-party software. That’s exactly why it deserves more attention than it gets.
Before we can start configuring anything, though, there are a few administrative realities about this feature you need to understand first — including who this tool is actually built for.
Part 2: Requirements and Administrative Reality
As we discussed earlier, Disk Quotas is an administrative feature. But before we start configuring it, there are a few important things to understand about where quotas work, how they are applied, and which users they are actually designed to manage.
2.1 NTFS Is Required
Disk Quotas are a feature of the NTFS file system. If a volume uses a different file system, Windows does not provide the same Disk Quota functionality for that volume. Microsoft specifically documents user-level disk space quotas as an NTFS feature.
We already learned that Windows charges the storage used by a file to the user who owns that file. Windows identifies that owner through the user’s Security Identifier (SID) stored in the file’s security information.
This is one reason NTFS is important here. NTFS maintains the file ownership and security information that Disk Quotas use to associate storage usage with individual users.
For example, imagine a computer with two volumes:
D: — NTFS
E: — FAT32
On the NTFS volume, Windows provides Disk Quota management because NTFS supports user-level disk space quotas. On the FAT32 volume, Disk Quota management is not available.
This means that before configuring a quota, the first thing to check is which file system the volume is using.
We’ll verify this practically later in the lesson by comparing an NTFS volume with a FAT32 volume and seeing how Windows presents the Quota settings on each one.
2.2 Quotas Are Per Volume, Not Per Folder
This is a common point of confusion: Disk Quotas apply to an entire drive (volume), not to specific folders.
If you set a 10GB quota on the D: drive, that limit covers everything the user owns on D:—whether their files are in D:\Photos, D:\Games, or D:\Work\Projects. You cannot set different quotas for different folders on the same drive.
This also explains why Disk Quotas should not be confused with folder permissions. Folder permissions determine who can access something; disk quotas control how much storage a user can consume on a volume.
2.3 Standard Users vs. Administrators
Disk Quotas is designed to manage standard user accounts. By default, when quotas are enabled, Windows automatically adds an entry for the Administrators group itself with unlimited space — and Microsoft’s documentation recommends leaving this default alone, warning that changing it could interfere with an administrator’s ability to manage the system.
That said, this default doesn’t mean every administrator account is automatically excluded from quotas. You can absolutely assign a quota to an account with administrator privileges, and Windows will enforce it — in my own testing, I created a user with administrator privileges, set a quota limit, and logged in as that account. The limit applied exactly as it would for a standard user, with the available space reflecting the configured quota.
But here’s the catch: because that account holds administrator privileges, nothing stops it from simply opening the Disk Quota settings itself and undoing the restriction. It could:
- Disable the quota entirely
- Increase its own limit
- Delete the quota entry
- Clear the event logs
This is exactly why Disk Quotas is designed around standard users — people who use the computer but shouldn’t have control over system-level settings. If you’re setting this up for family members, roommates, or employees, make sure their accounts are standard users, not administrators.
Later in this lesson, we’ll do a full hands-on demonstration of applying quotas to administrator accounts and show exactly what happens when one tries to bypass the limit — so if any of this feels abstract right now, it’ll click once you see it play out directly.
Now that we understand the requirements and limitations, let’s see how to actually access and enable Disk Quotas on Windows 11.
Part 3: Accessing, Enabling, and Understanding the Quota Settings
This part is about orientation, not configuration — we’re not going to set any actual limits yet. Instead, we’ll confirm our drive qualifies for Disk Quotas, find our way to the settings screen, and walk through what every option on it actually does, so that when we do start setting real limits in the next part, nothing on screen is unfamiliar.
3.1 Confirm Your Drive Is NTFS-Formatted
Before configuring any quota settings, you must confirm that the volume is formatted with NTFS. Disk Quotas are available only on NTFS volumes; they are not supported on other file systems.
You can check this by right-clicking the drive and selecting Properties.
A quicker way: select the drive and press Alt + Enter — a shortcut that opens Properties instantly without needing the right-click menu at all.
By default, the General tab opens first, and that’s exactly where the file system is listed.
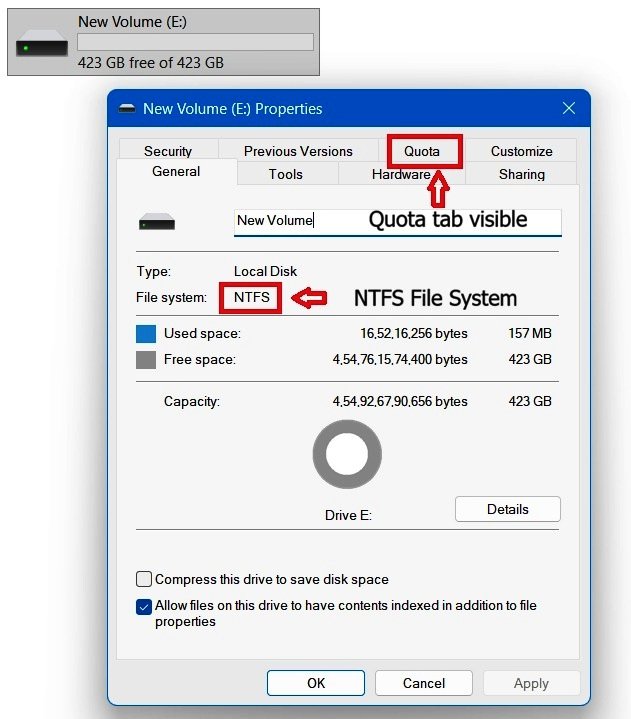
As you can see, my drive shows NTFS as its file system — and notice the Quota tab sitting right there among the other tabs. Now, remember what I mentioned earlier: if a drive uses a different file system, that Quota tab simply won’t be there at all. Here’s the same Properties window, this time for a drive formatted with FAT32:
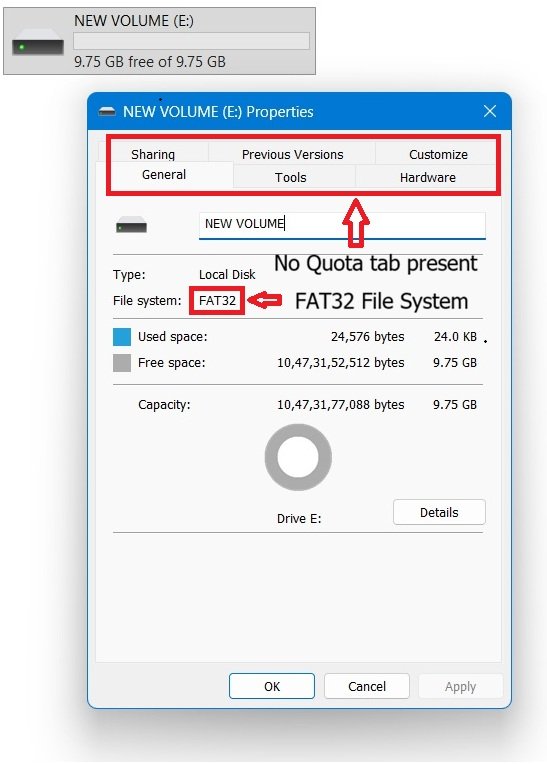
No Quota tab in sight. That’s the practical difference NTFS makes — without it, Disk Quotas isn’t a hidden setting somewhere else, it’s simply not available at all.
With NTFS confirmed, let’s move on to actually reaching the quota settings.
3.2 Accessing Disk Quotas
This walkthrough uses Windows 11. However, the path to this setting is the same in previous versions of Windows. If I find any differences in the settings or steps, I’ll add a brief note to help users of older versions follow along.
Right-click your NTFS drive (or press Alt+Enter as shown above), open Properties, and click the Quota tab. You’ll see a button labeled Show Quota Settings.
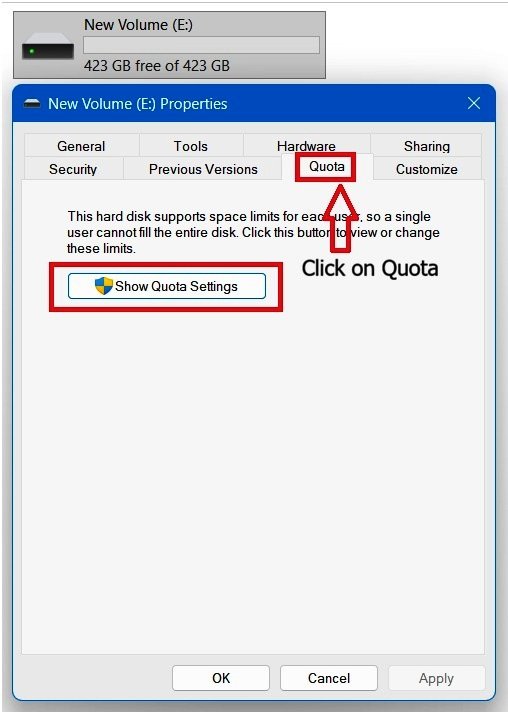
Click it, and a new window opens: Quota Settings for (volume name).
![Quota Settings for [volume] window highlighting the Status field showing 'Disk quotas are disabled'](https://systematicmode.com/wp-content/uploads/2026/09/Quota-Settings-window-showing-disabled-status.jpg)
Notice the Status field at the top of this new window. On my drive, it currently reads “Disk quotas are disabled” — which makes sense, since I’ve never configured this before. If you’ve already experimented with quotas on this drive in the past, your status may read differently at this point; what matters here is simply knowing where this indicator lives.
3.3 Enabling Disk Quotas
Back in the Quota Settings window, check the Enable quota management checkbox. As soon as you do, notice that the other options on this screen — previously greyed out — become available.
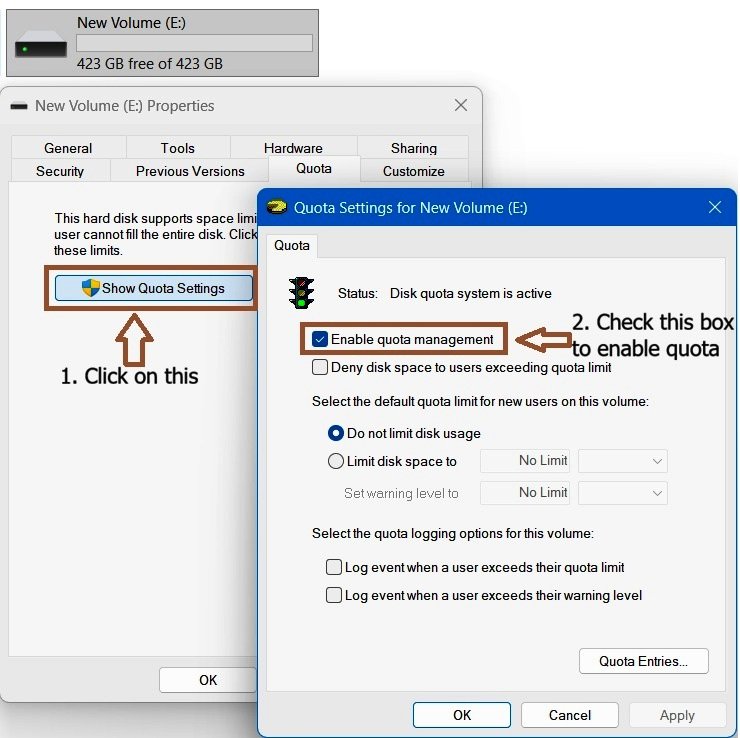
Even with the box checked, the Status field at the top still shows the old disabled state — checking the box only stages the change; it hasn’t been applied yet. Click Apply, and a warning dialog box appears.
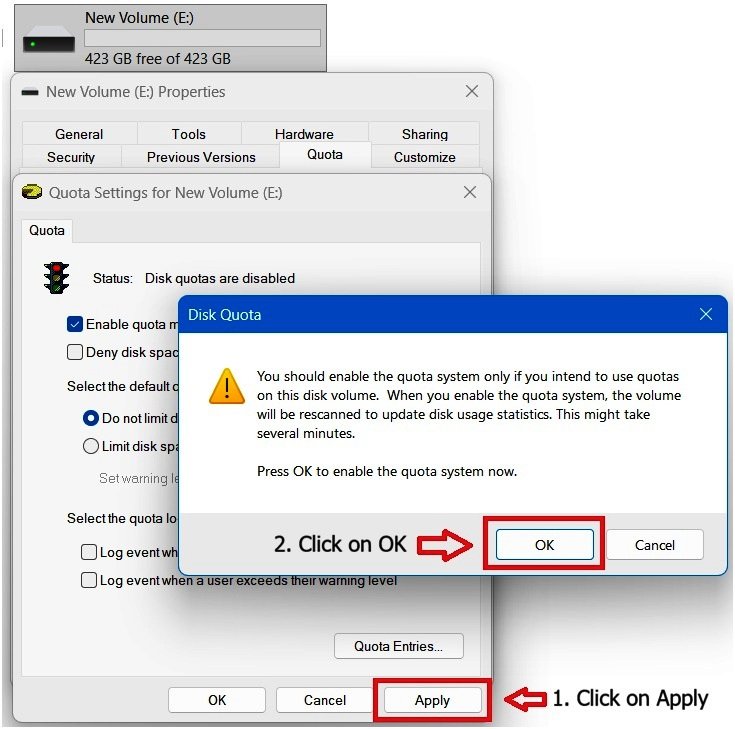
This warning is telling you that Windows needs to rescan the drive to calculate current disk usage for every user before quota tracking can actually begin — and depending on how much data is already on the drive, that scan can take anywhere from a few seconds to several minutes. Click OK to proceed.
The Quota Settings window then refreshes on its own, and the Status field updates to reflect the change, now reading “Disk quota system is active.”
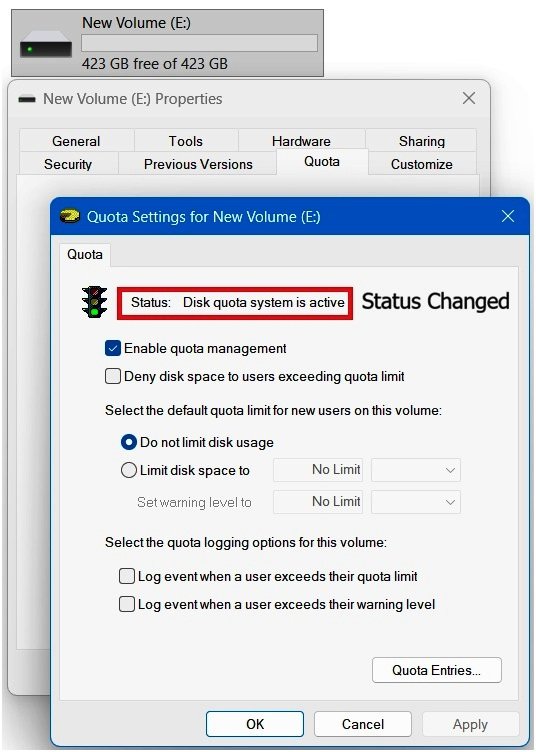
One important distinction before we move on: this active status does not mean any quota is actually being enforced yet. All we’ve done so far is turn the system on — no limit has been set for anyone. Before we get to that, let’s first understand exactly what every option on this screen actually controls.
3.4 Understanding Disk Quotas Settings
There are several settings packed into this one window, and each carries its own meaning and importance. Explaining them strictly in the order they’re laid out on screen would make the picture harder to follow, not easier — so instead, I’ve grouped them into four parts, numbered in the order that makes the most sense for understanding them. This grouping isn’t an official Microsoft categorization — it’s simply a mental map to make sense of what’s here. Here’s the full settings window with all four groups marked:
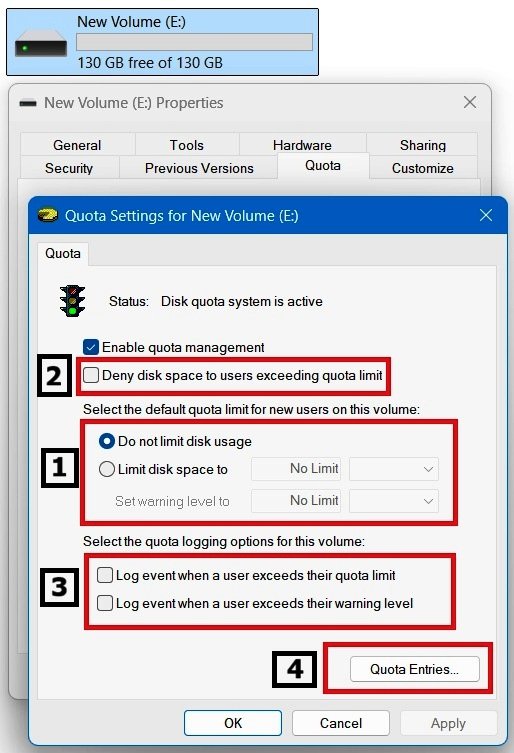
Let’s go through them one at a time.
#1 Quota Limit and Warning Level
Let’s look at the screenshot again, this time with only this group highlighted:
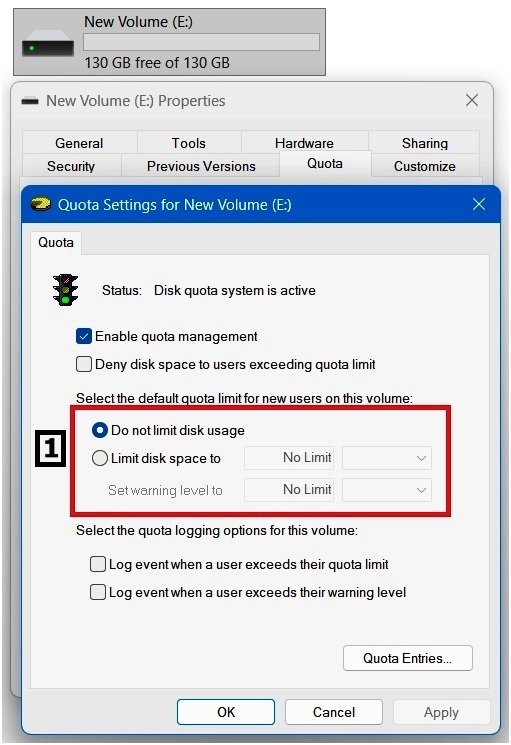
This is where you set the default quota — the limit that applies automatically to every user sharing this volume. Right now, “Do not limit disk usage” is selected by default, since no limit has been configured yet. Once you select “Limit disk space to,” the warning level field becomes active.
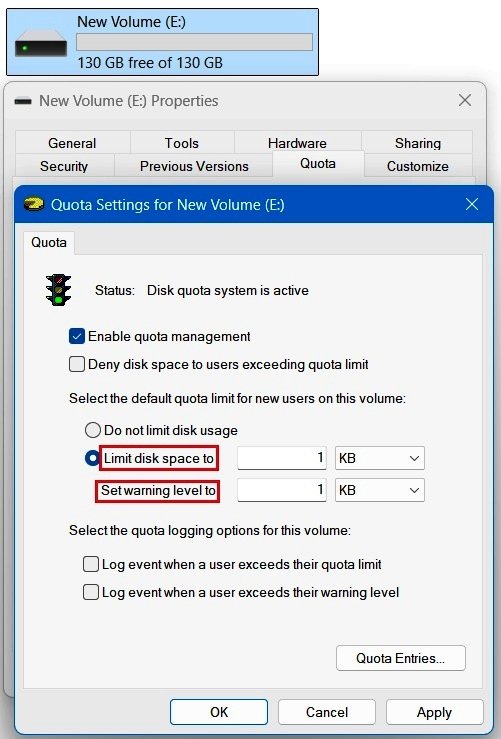
The distinction between these two fields matters:
- Quota limit — The limit is the maximum amount of storage a user can use.
- Warning level — The warning level is a lower threshold that Windows can use for monitoring.
For example, you could set a 50 GB limit and a 40 GB warning level. The warning level is optional, so you can configure a limit without setting one. It can also be set to the same value as the limit. However, it cannot be higher than the limit, because Windows does not allow a warning level to exceed the quota limit.
#2 Denying Disk Space: Soft vs. Hard Enforcement
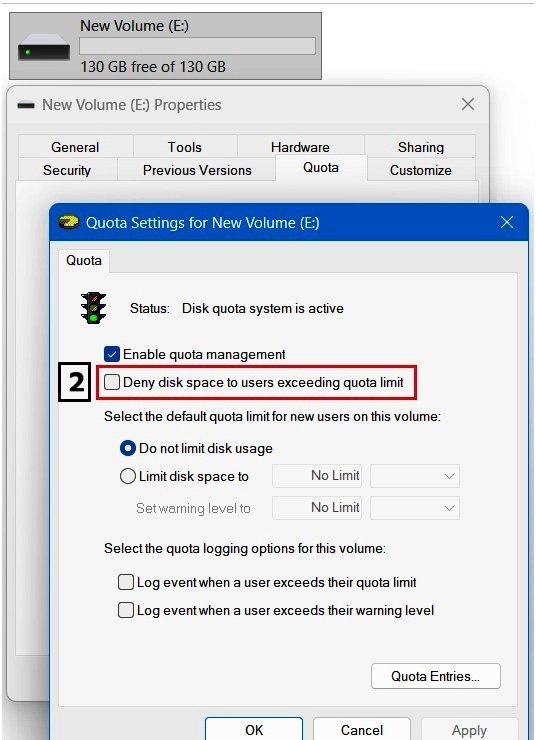
This checkbox is what actually decides whether the limit set in #1 means anything in practice. There’s no official Microsoft terminology for this distinction, but for clarity, I’ll borrow the terms soft and hard quota, which are commonly used this way in general storage administration:
- Soft quota (checkbox unchecked): usage is tracked and can trigger logging, but nothing is ever blocked. A user can exceed their limit freely and keep writing data — the limit exists on paper only.
- Hard quota (checkbox checked): the limit is actually enforced. The moment a user reaches it, Windows gives them a genuine “insufficient disk space” error — the same error you’d get from a completely full drive — and blocks any further writes until they free up space.
In short: this setting is the switch that decides whether you’re just monitoring usage or actually restricting it.
#3 Quota Logging Options
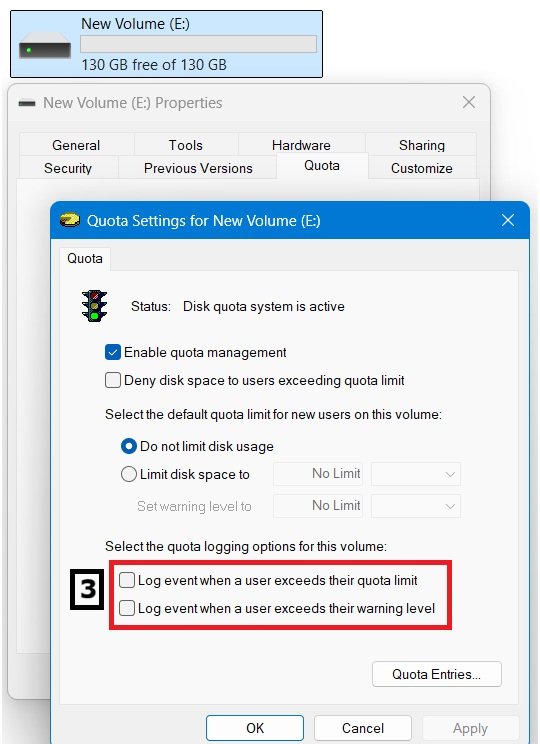
This group is about event logging — whether Windows should record an entry when a user crosses a quota threshold. There are two separate checkboxes:
- One logs an event when a user exceeds their quota limit.
- The other logs an event when a user exceeds their warning level.
You can enable either option, both, or neither. Logging is independent of quota enforcement, so you can enforce a storage limit without logging events, or enable logging without enforcing a limit.
When enabled, these events are recorded in Windows Event Viewer, which we’ll examine during the practical testing later in this lesson.
#4 Quota Entries (Individual User Quotas)
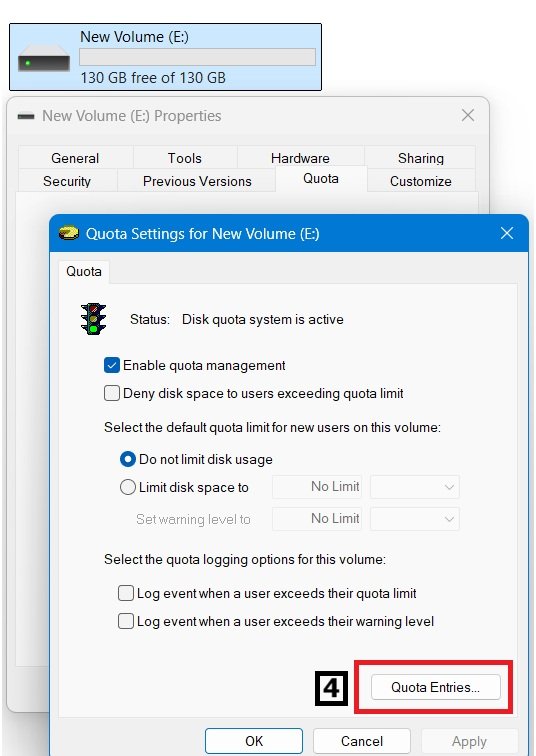
Unlike #3, this isn’t an optional setting you switch on — it’s built into the quota system itself. Quota Entries is the per-user view of the Disk Quota system. It shows the quota information Windows maintains for users on the volume, including their current usage, quota limit, warning level, and status. A user can appear here even when their quota is set to Unlimited.
This makes it fundamentally different from the logging options in #3 — it isn’t a log of events, it’s a live, ongoing record that exists automatically for anyone using the volume, not something you choose to enable. You can delete an individual entry, which we’ll cover later in the lesson.
This is also where individual quotas come from. Rather than every user sharing the same default limit set in #1, Quota Entries lets you assign a specific, different limit to a single user — exactly what we’ll do when we configure individual quotas in a later part.
Important: The four-part division used in this section is only a way to make the Disk Quota settings easier to understand. It does not mean that you must configure these settings in this order, or that every setting must be used. Depending on your requirements, you may use only some of them—for example, you can configure individual user quotas without relying on a default quota, or choose not to enable event logging.
With the settings understood, we’re finally ready to set a real quota and see all of this in action.
Part 4: Setting a Default Quota
For this practical, I’m using a 130 GB NTFS volume with quota management already enabled, exactly as covered in Part 3. It currently holds about 20 GB of data, leaving roughly 110 GB free — this same drive and configuration will carry us through the rest of this part, so the numbers stay consistent and easy to visualize as we go. Let’s start by setting the default limit.
4.1 Setting the Default Limit (Soft Quota)
As covered in 3.4, selecting “Limit disk space to” activates the limit and warning fields. For this demonstration, I’m deliberately using a very small limit — 1 GB, with a warning level of 500 MB — so we can reach it quickly without needing to fill the drive with real data. Since we’re testing the soft quota behavior first, the “Deny disk space” checkbox stays unchecked. Click Apply, then OK.
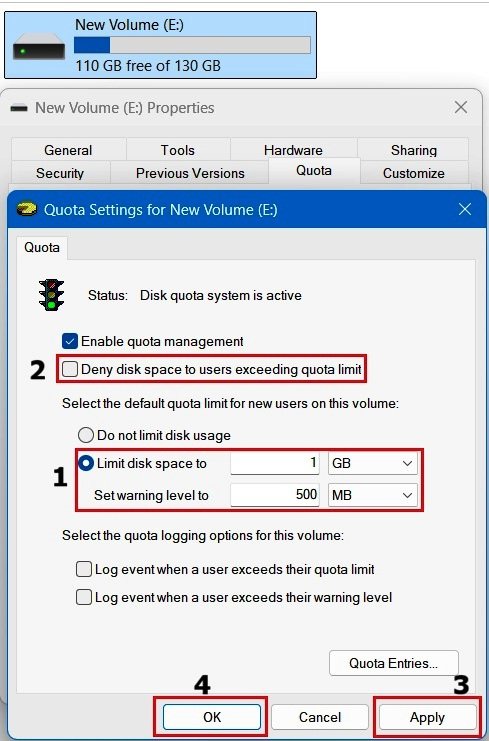
This default limit is now applied. For this demonstration, I’ve created two standard accounts, User A and User B. Before logging into either one, here’s how the drive currently looks from my own account, for reference:
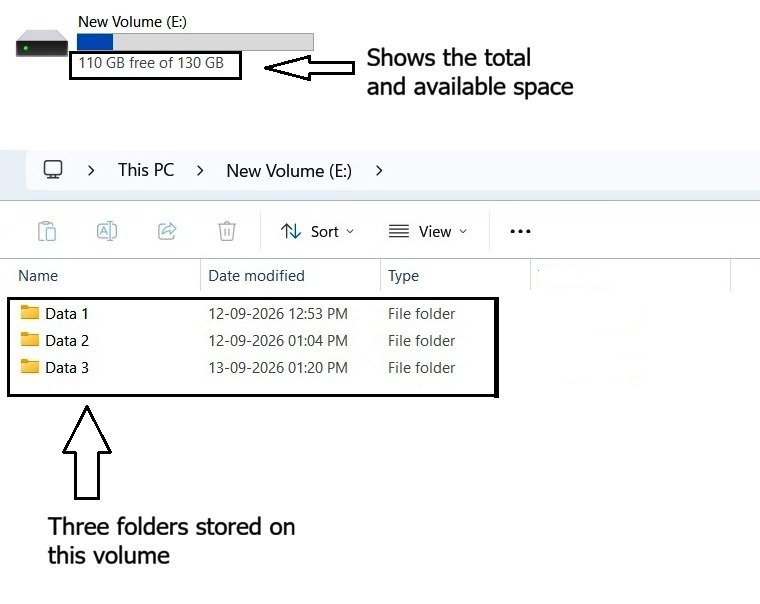
With that as our baseline, let’s log into one of the standard accounts and verify the quota is actually working.
4.2 Verifying the Soft Quota
Logged in as User A, You’ll notice that User A sees exactly the same disk space and contents as I (the administrator) see—110 GB free, with Data 1, Data 2 and Data 3 folders visible. The quota limit is 1 GB, but User A sees the full 110 GB.
Now here’s the real test: I will create a folder containing more than 1 GB of data.
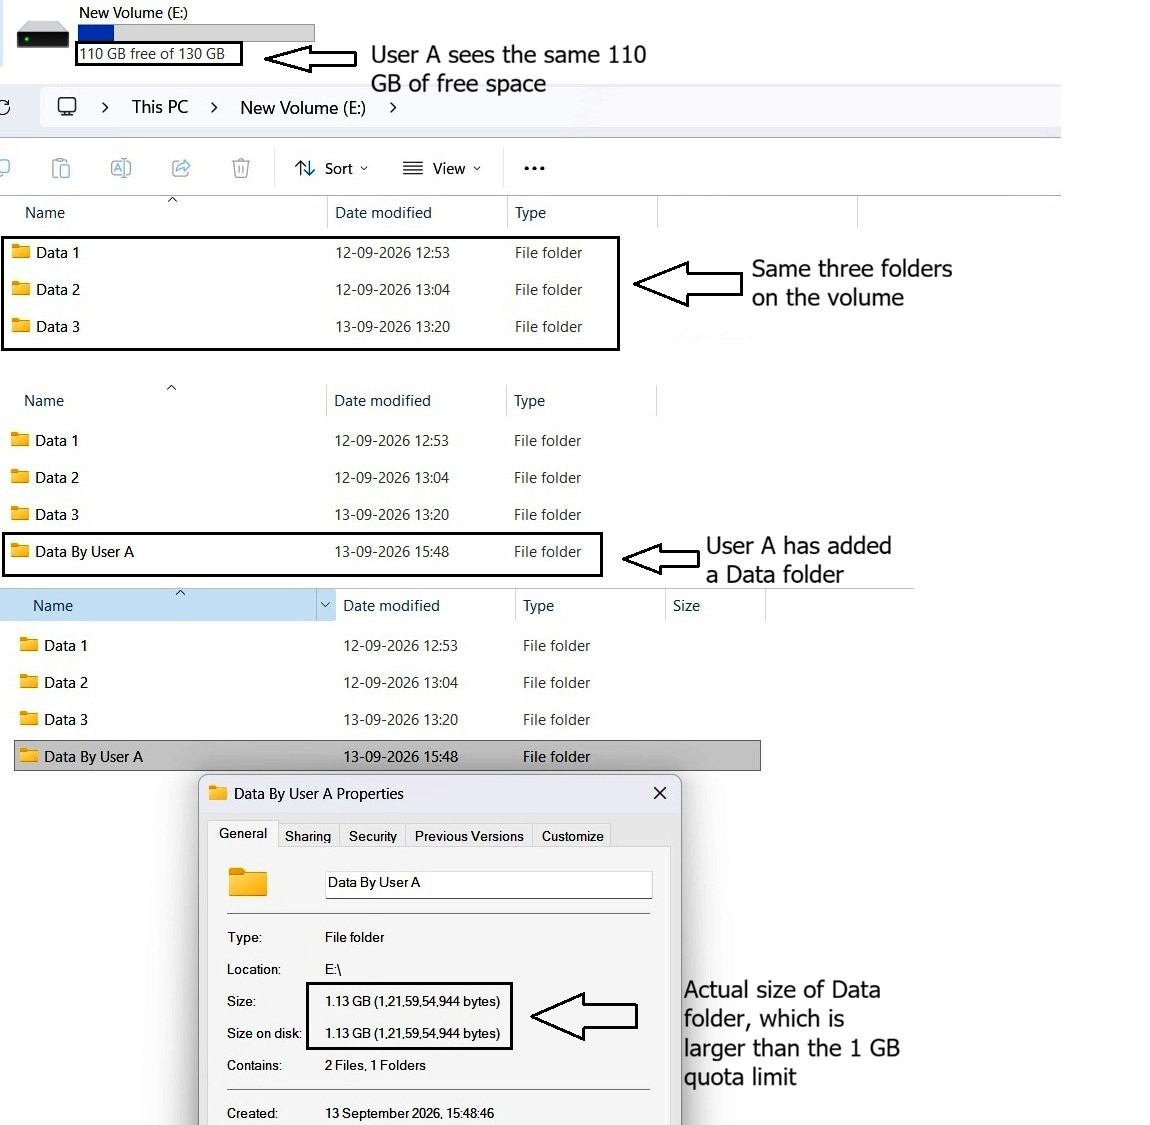
No warning appeared. No restriction stopped the save. User A crossed the 1 GB limit without any resistance at all. It might look at first like the quota simply isn’t working — but this is exactly what a soft quota is supposed to look like: the limit is being tracked, but nothing enforces it. Let’s go back to the admin account and check Quota Entries to confirm that tracking really is happening behind the scenes.
Quota Entries for User A
If you remember, while setting the quota limit, we didn’t enable event logging for this user, so no log entry was created. But Quota Entries don’t require event logging to be enabled; they are built into the quota system itself.
A quota entry created automatically when the user logs on. Windows handles this in the background, so the user doesn’t have to create a file or deliberately use the quota-enabled drive first. The entry is associated with the user and their quota settings even before they start storing data on the volume.
Back in Quota Settings, click Quota Entries.
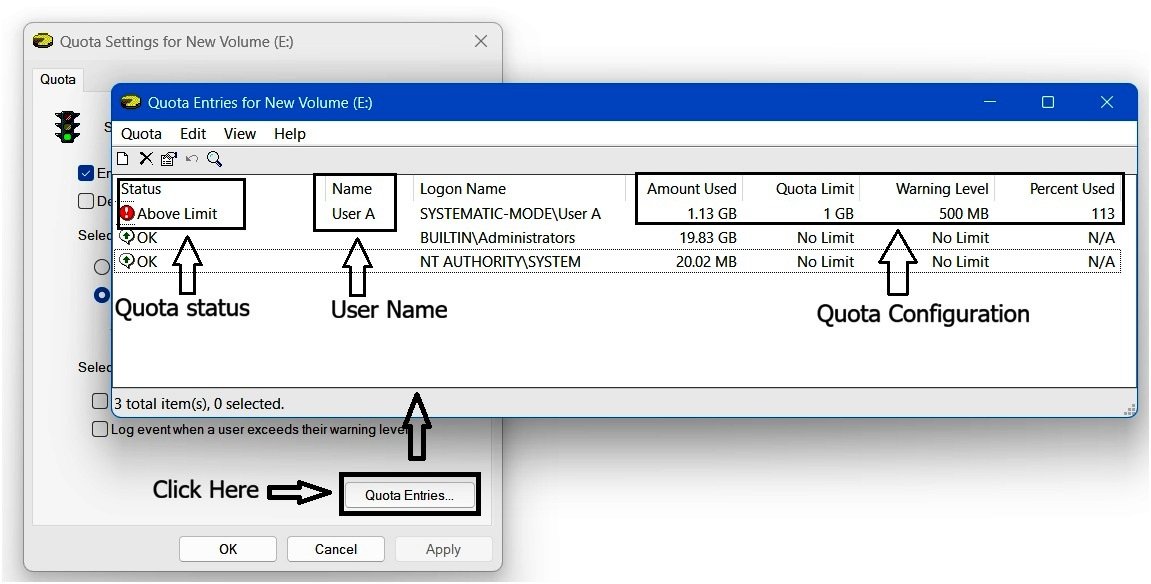
User A’s status now reads “Above Limit,” alongside the configured limit, warning level, and actual space used. The soft quota was applied successfully; because we didn’t enable “Deny disk space,” Windows allowed the user to continue storing data even after exceeding the limit.
Now let’s enable “Deny disk space” and see what changes when the quota becomes a hard limit.
4.3 Enforcing the Default Quota (Hard Quota)
We’re keeping the same configuration — 1 GB quota limit, 500 MB warning level — the only change this time is checking “Deny disk space to users exceeding quota limit”, since we want the limit actually enforced now.
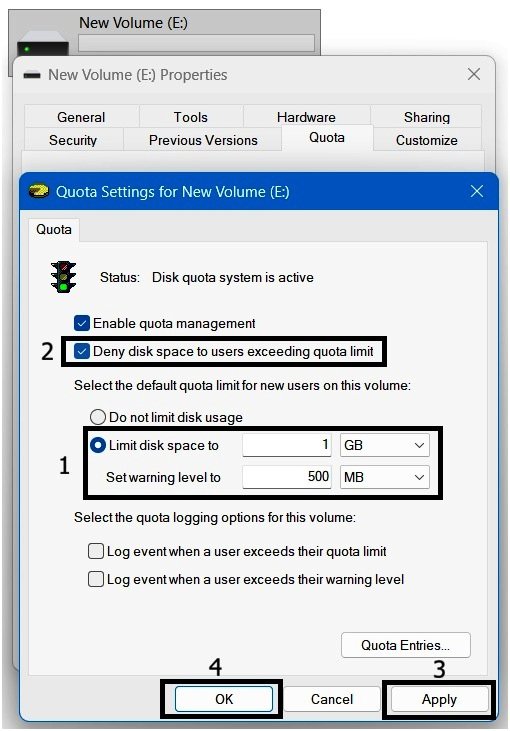
Before testing the hard quota, however, I want to show you the current state of the volume from the administrator account.
Remember, User A already stored more than 1 GB of data during our soft-quota test. As a result, the volume now contains an additional folder created by User A, and some of the physical storage has been consumed.
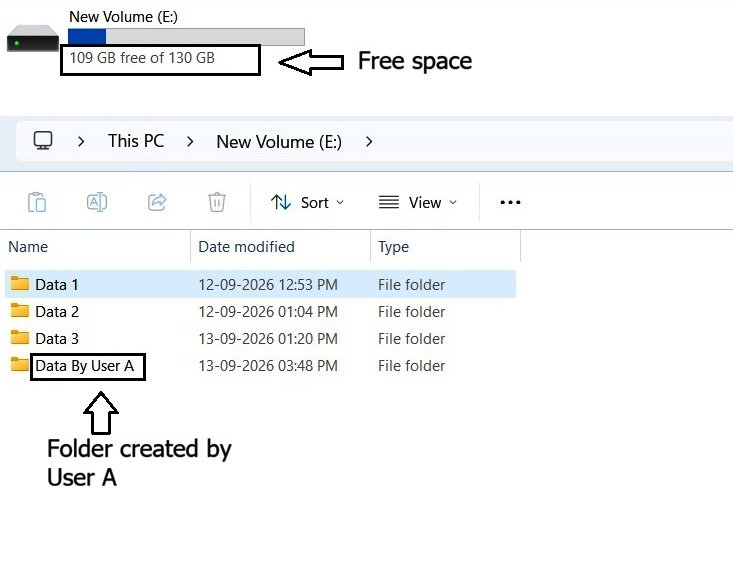
This time, let’s verify using User B. You might be wondering why I’m not using User A again — just wait, and it’ll make perfect sense.
4.4 Verifying the Hard Quota
Logged in as User B, the first thing that stands out: my own admin account shows 109 GB free on this drive, but here it shows only 1 GB free — exactly the limit we set.
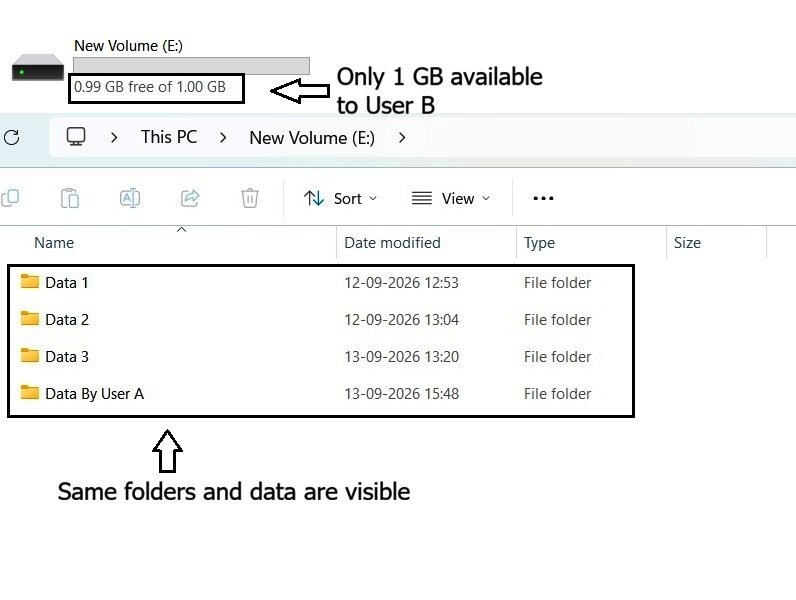
That number alone already confirms the quota is active, but let’s push further and try copying a folder larger than 1 GB to see what Windows actually does.
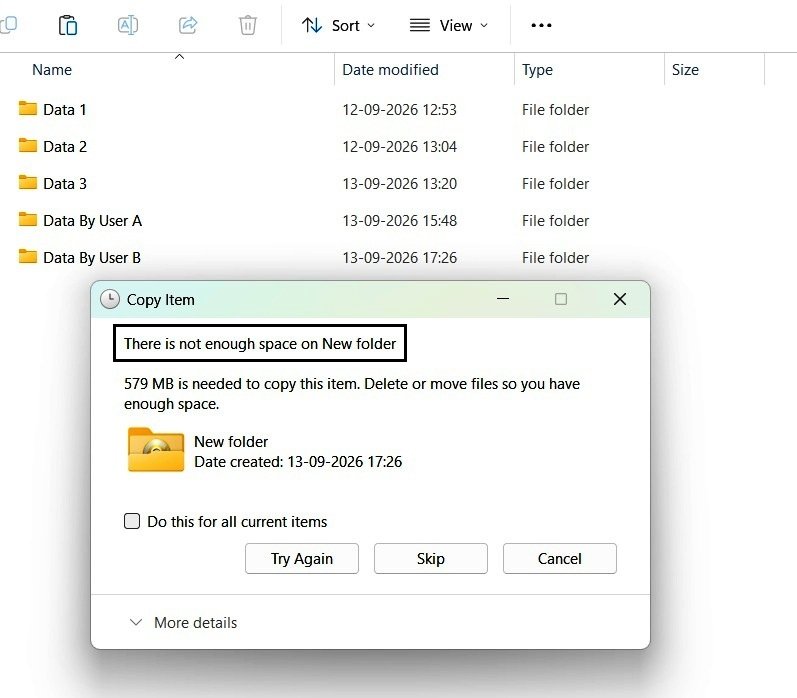
The error appears because the folder being copied is 1.13 GB, exceeding our 1 GB limit.
Now let’s test the warning level. Recall it’s set to 500 MB — if I copy something around 700 MB, will Windows show any warning this time?
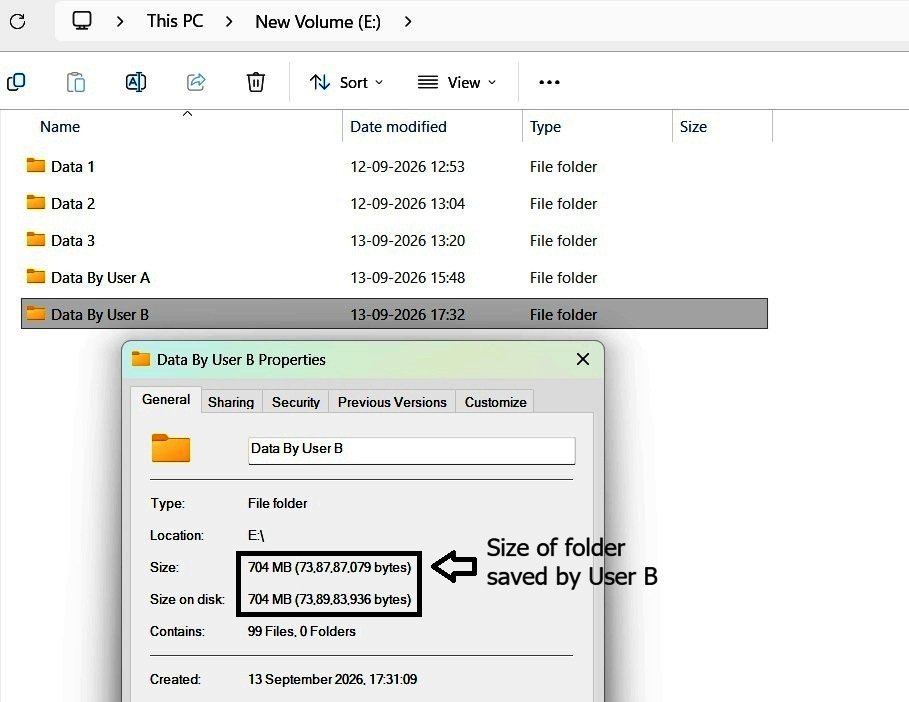
It copies without any issue and without any warning — warning-level notifications are for the administrator’s visibility only, never shown to the user.
Now let’s return to the administrator account and see what Windows recorded for User B.
Note: When a hard quota is applied, the restricted user does not just hit a writing limit — the drive itself appears smaller to them.
In File Explorer, the free space and even the total size of the drive are shown according to the quota limit. In our test, User B saw the drive as a 1 GB drive, even though the real volume was 130 GB. A standard user has no way of knowing the actual physical size of the drive from the normal interface.
Quota Entries for User B
From the administrator account, open Quota Entries for the volume.
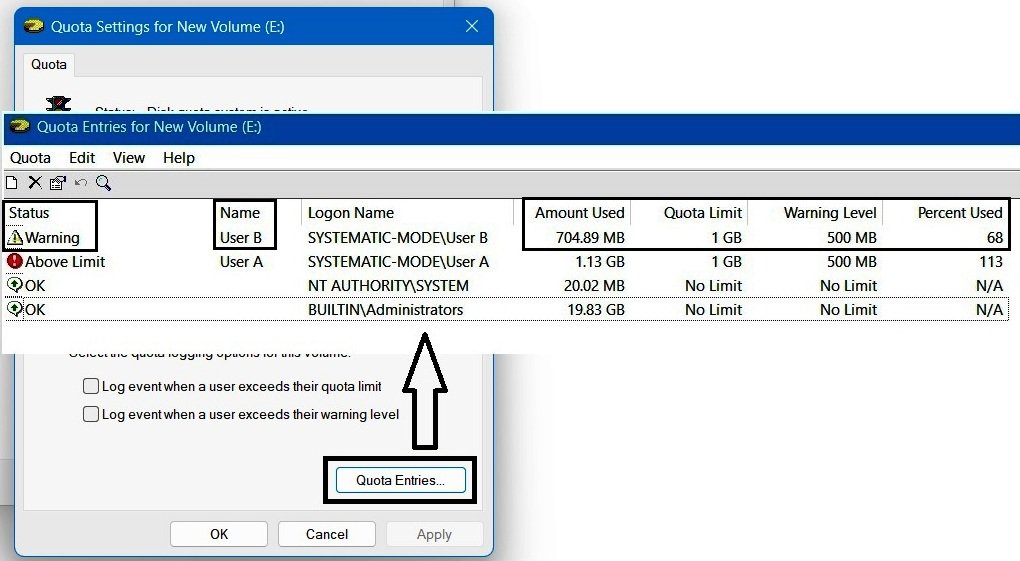
The status here reads “Warning,” since User B crossed the warning level, alongside the usual details — quota limit, warning level, and percentage used. The hard quota test is confirmed working as expected.
Before moving on, here’s an interesting question worth answering: what happens to User A, who was already “Above Limit” under the soft quota? Does switching to a hard quota suddenly give them 1 GB of free space again, or does it immediately lock them out, since they’d already used more than the new limit allows? Let’s find out.
User A After Applying the Hard Quota
Log in as User A, File Explorer immediately shows “0 bytes free of 1 GB.” User A can still open, read, or delete their existing files.
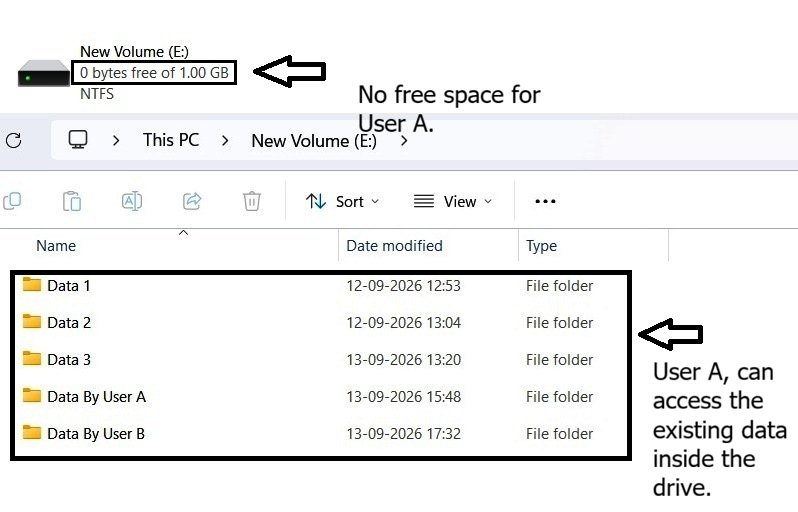
No further explanation needed — the hard quota applies retroactively, counting all the space User A already used under the earlier soft quota. If User A tries to save even a tiny 1 MB text file, Windows blocks the write instantly with an out-of-space error.
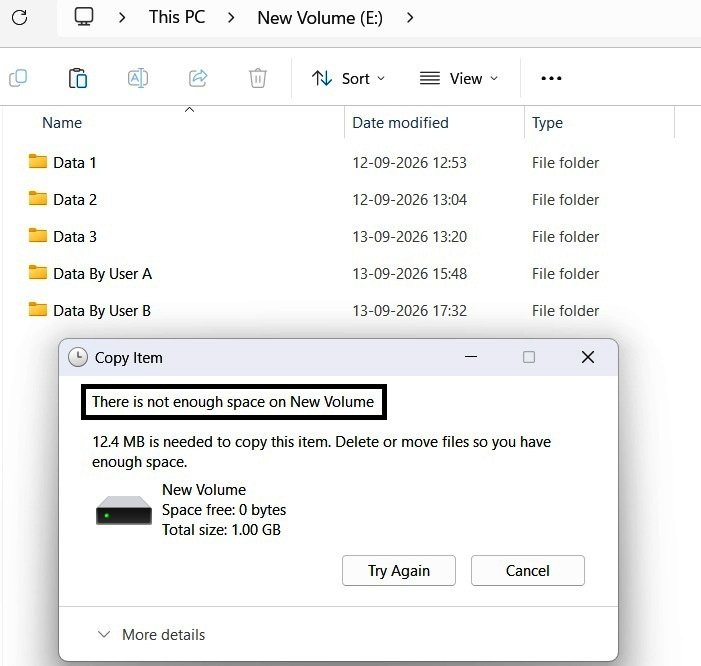
4.5 Warning Level Higher Than the Quota Limit
Earlier in the pervious part, we mentioned that Windows won’t allow the warning level to be set higher than the quota limit. Let’s see exactly what that looks like in practice, using the same 1 GB limit from our earlier tests.
Suppose we try to set a warning level of 2 GB, exceeding the 1 GB limit. Attempting to apply this shows a warning dialog:
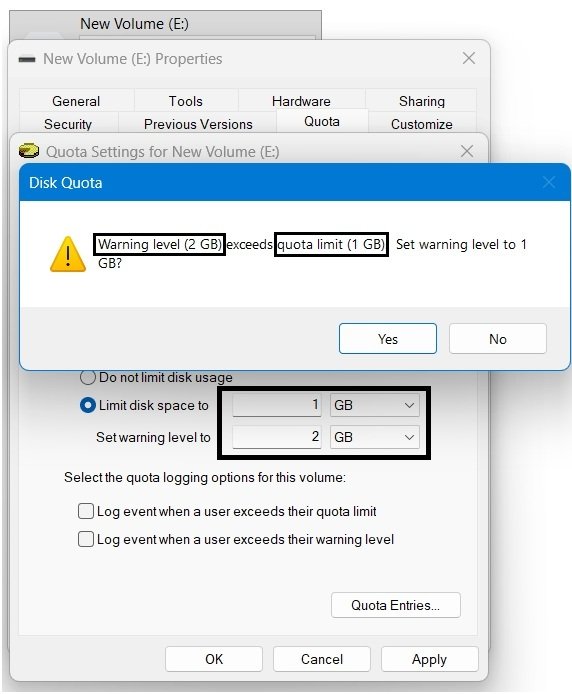
Windows won’t silently reject the value or let it through — it offers a choice. Selecting No discards the invalid warning level entirely, leaving the quota limit in place with no warning level set. Selecting Yes automatically adjusts the warning level down to match the quota limit exactly — in this case, 1 GB.
This confirms something worth remembering precisely: the warning level can be set equal to the quota limit, but never higher than it — which makes sense, since a warning meant to alert you before you’re blocked would be pointless if it only triggered after you’d already hit the limit.
Now that we’ve set the default limits for both soft and hard quotas, let’s see how to set individual limits for each user.
Part 5: Setting Individual User Quotas
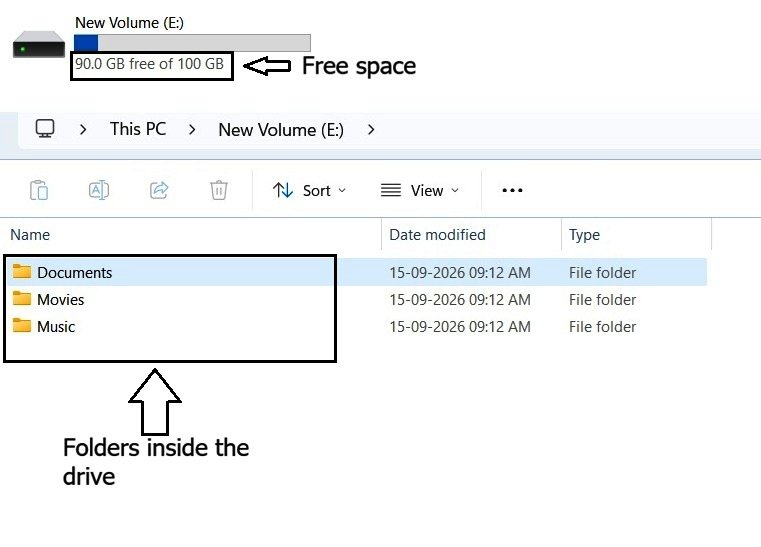
For this practical, I’m using a fresh drive: 100 GB total, with about 10 GB already in use across three folders — Documents, Movies, and Music — leaving roughly 90 GB free. We’ll continue using the same User A and User B accounts from before.
5.1 Creating an Individual Quota
The goal here is to assign User A and User B two genuinely different limits, rather than one shared default. Start in Quota Settings as usual: check Enable quota management and Deny disk space to users exceeding quota limit. This time, since we’re not setting a default quota, leave “Do not limit disk usage” selected, click on Apply and go straight to Quota Entries.
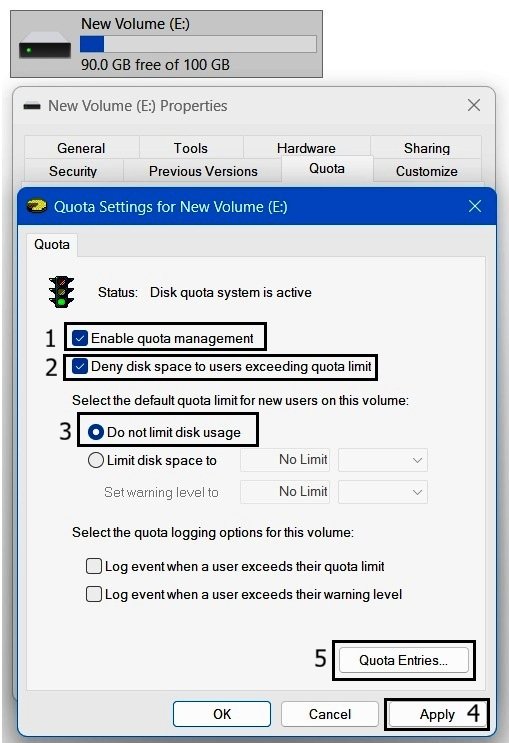
This opens the Quota Entries window we’ve already seen.
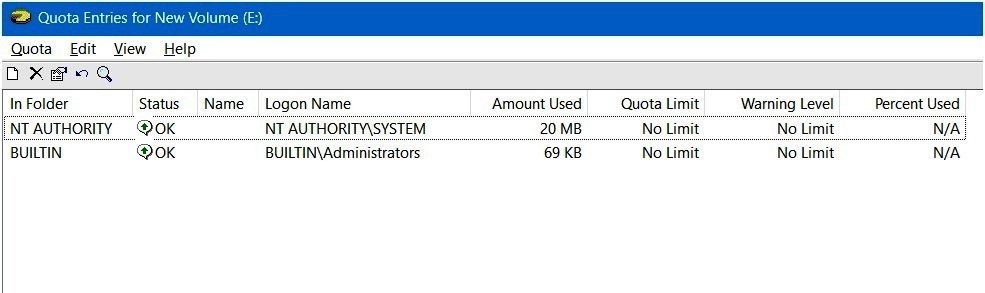
As a quick reminder: enabling quotas on any drive automatically creates two default entries — one for the built-in Administrator, one for the System authority — both set to “No Limit.” You may see more than two depending on your configuration, but these two are always present. We’ll cover them in detail later.
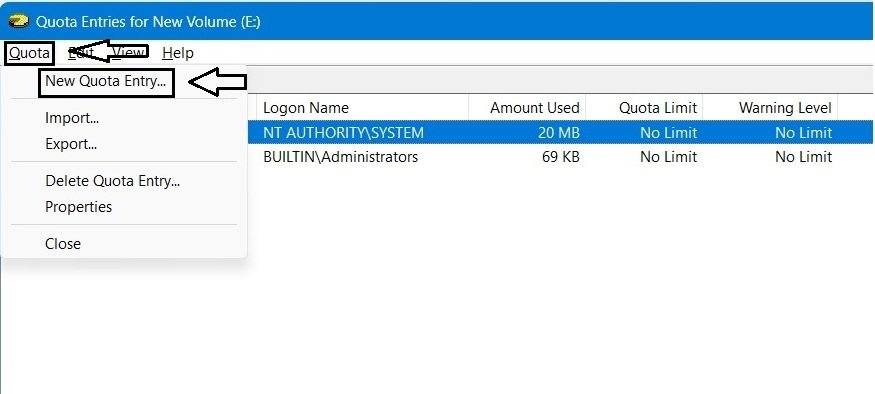
To add an individual entry, click Quota in the menu bar, then New Quota Entry.
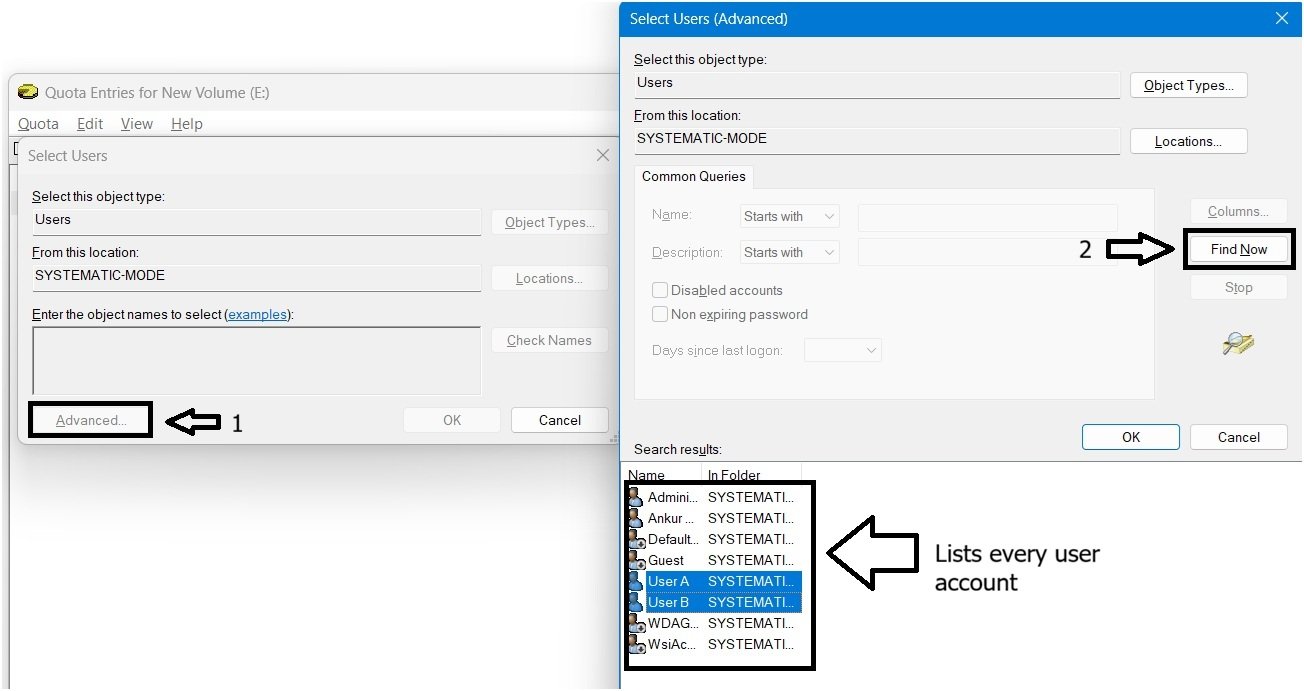
A Select Users window opens. Click Advanced, then Find Now in the window that follows — this lists every user account on the computer.
Select the account you want to configure — starting with User A.
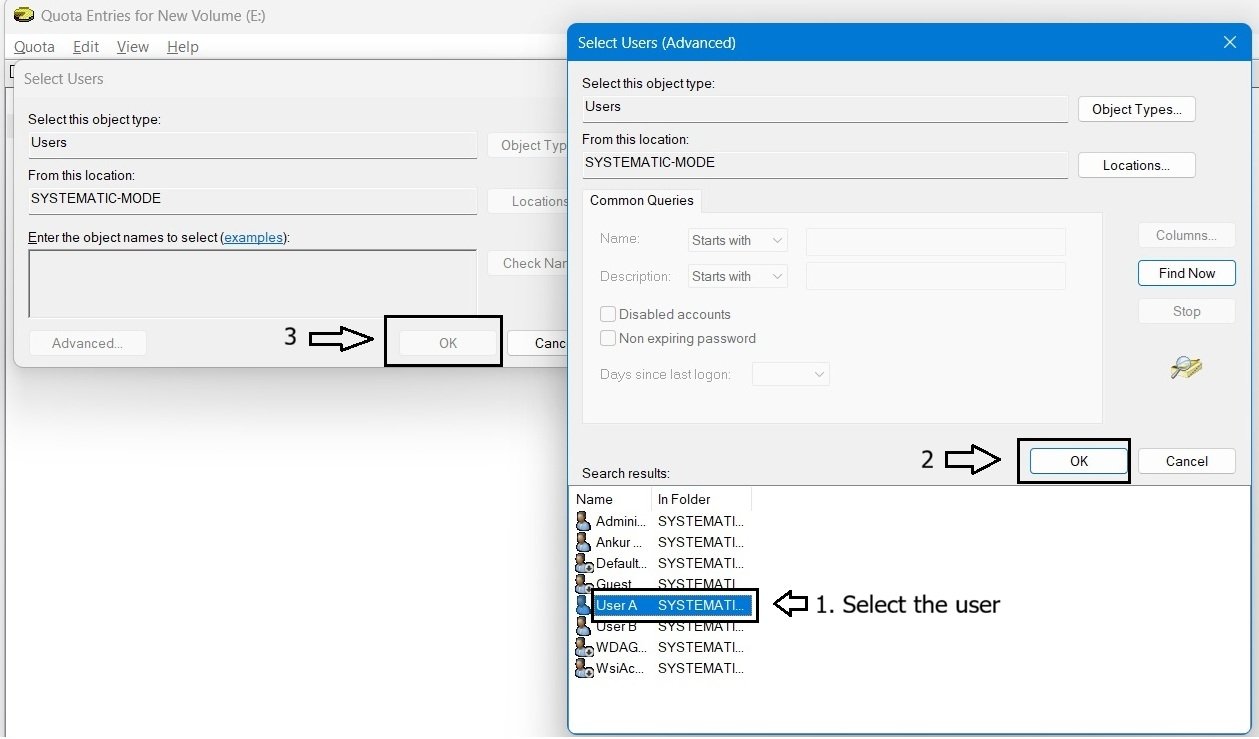
Click OK, and this window closes automatically. Click OK again on the Select Users window, and a new Add New Quota Entry window opens.
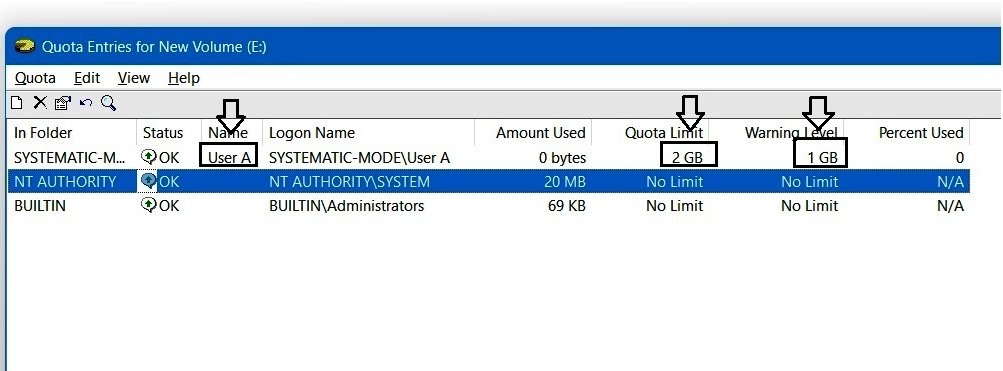
This window shows the same two options as the default quota screen: “Do not limit disk space” (selected by default) and “Limit disk space to,” which activates the warning-level field once selected. Since this limit is unique to User A, let’s set it to 2 GB, with a 1 GB warning level.
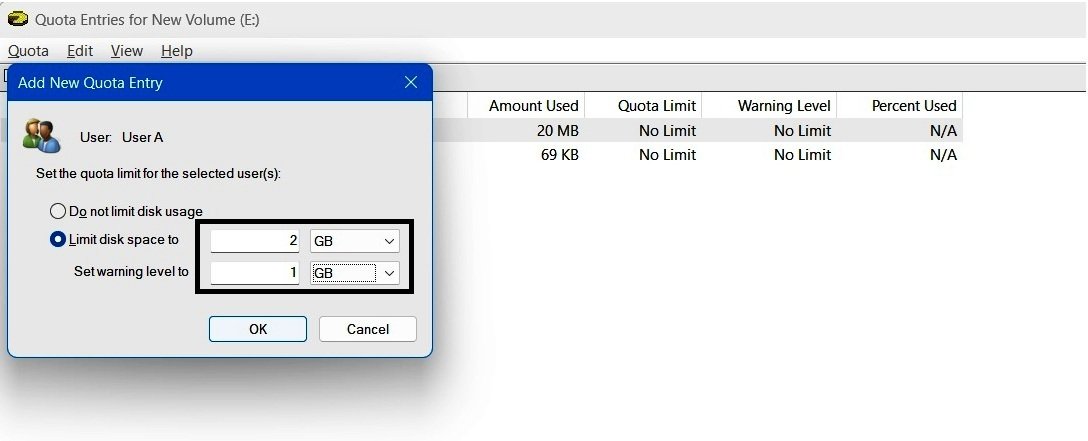
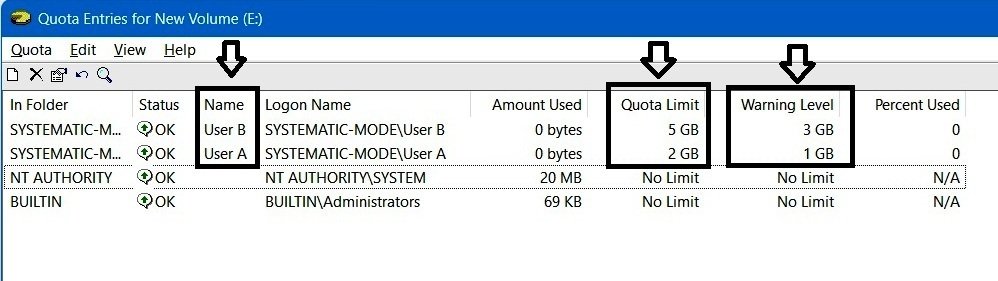
Click OK, and the window closes automatically, revealing a new entry for User A in the Quota Entries table — showing the same columns as before: name, quota limit, warning level, and percent used.
Repeat the exact same process for User B — Quota → New Quota Entry — this time setting a 5 GB limit with a 3 GB warning level.
Before verifying these on each account, here’s how the drive looks from the admin account, for reference:
Let’s log into User A first.
5.2 Verifying Individual Quotas
Logged in as User A:
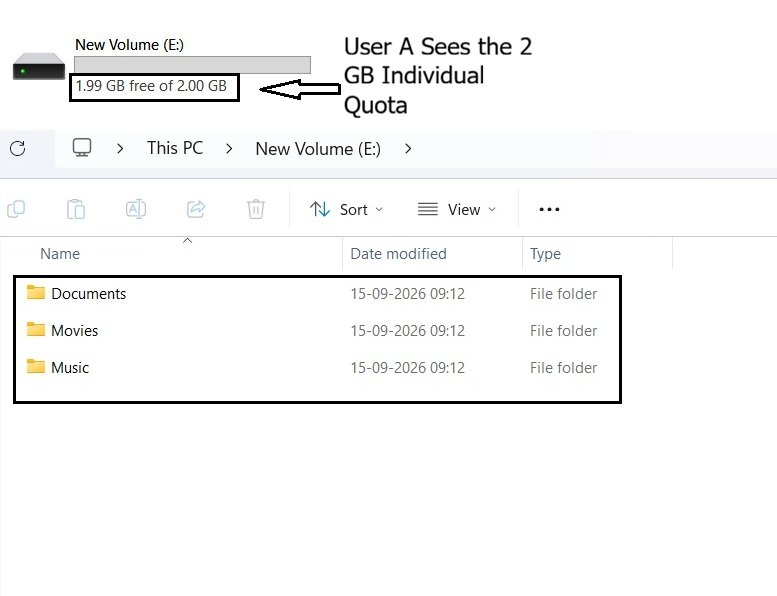
The individual quota applied successfully. We won’t repeat the copy/exceed-limit testing here since it behaves identically to what we already demonstrated with the default quota — no need to prove the same mechanism twice. Let’s check User B.
Logged in as User B:
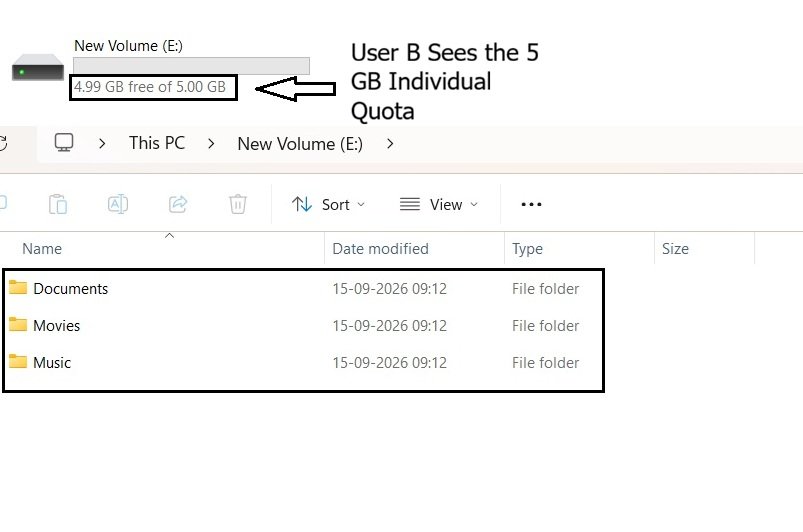
No further explanation needed — individual quotas are working exactly as intended, with each user carrying their own distinct limit.
Now that we’ve set individual limits for users, what happens if we enable a default quota as well? Let’s find out.
5.3 Individual Quotas vs. Default Quotas
Here’s a scenario worth testing directly: suppose two more accounts, User C and User D, need access to this drive, and we want to give them a shared default limit — without disturbing the individual limits already set for User A and User B. Does applying a default quota override existing individual entries, or does it only affect users who don’t already have one?
Back in Quota Settings, everything stays the same as before — Enable quota management and Deny disk space both checked — except this time, select “Limit disk space to” and set a default of 1 GB, with a 500 MB warning level. Click Apply, then OK.
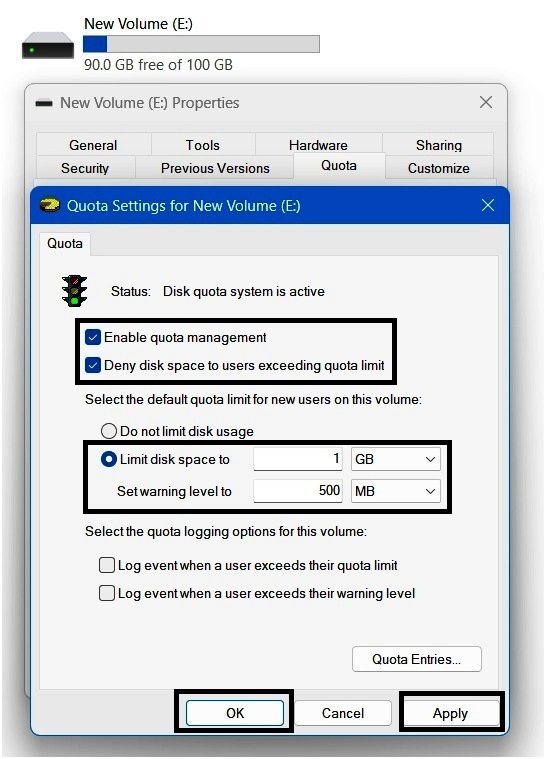
Before doing anything else, let’s check Quota Entries to see whether User A and User B’s limits changed at all.
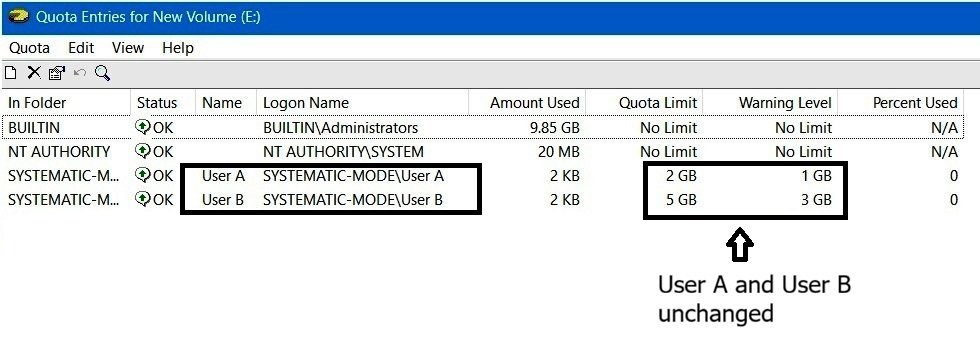
They haven’t. User A still shows a 2 GB limit, User B still shows 5 GB. This confirms the answer: individual quotas take priority over the default — applying a new default never overrides an entry that already exists.
Notice that User C and User D do not appear in the Quota Entries table yet. That’s because we have not logged in to either account or written any data to the volume.
Let’s test User C. Logging in as User C:
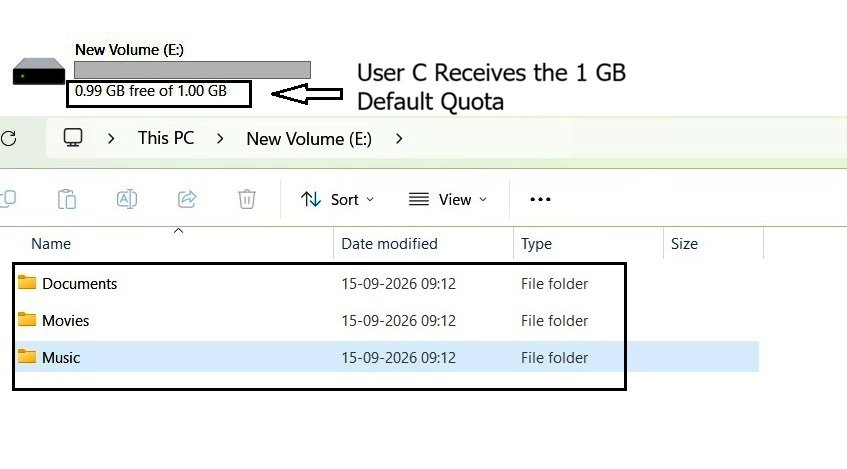
The default limit applies successfully, and User D behaves identically.
Back in the admin account, Quota Entries now reflects all four users:
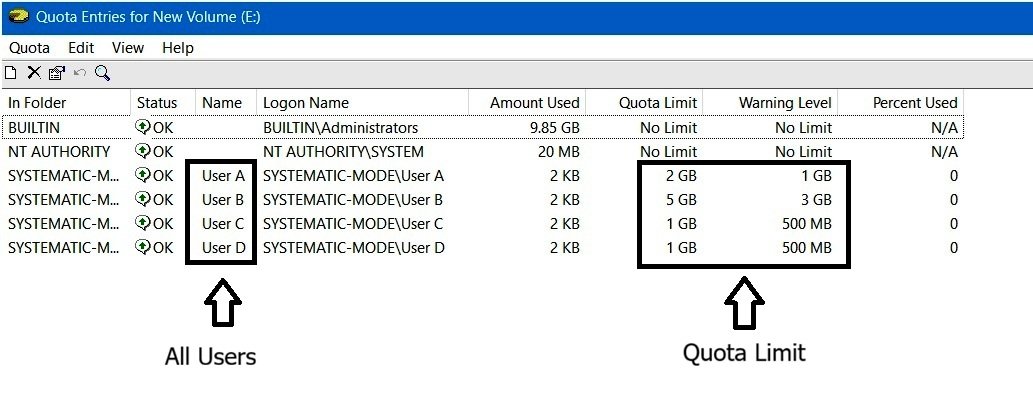
Every user is accounted for, each carrying the correct limit — individual where one was explicitly set, default where it wasn’t.
One more useful scenario before moving on: suppose we later decide User C actually needs their own individual limit instead of the shared default — say, 8 GB with a 5 GB warning level. Since User C already has an entry in the table, there’s no need to go through the full “Find Now” user-selection process again. Simply right-click User C’s existing entry and select Properties.
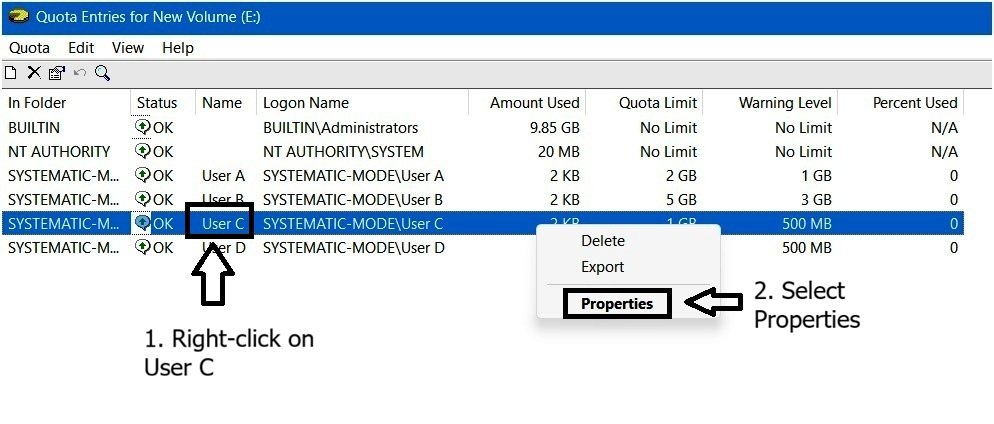
This opens the same quota-limit configuration window as before, currently showing the inherited default of 1 GB / 500 MB.
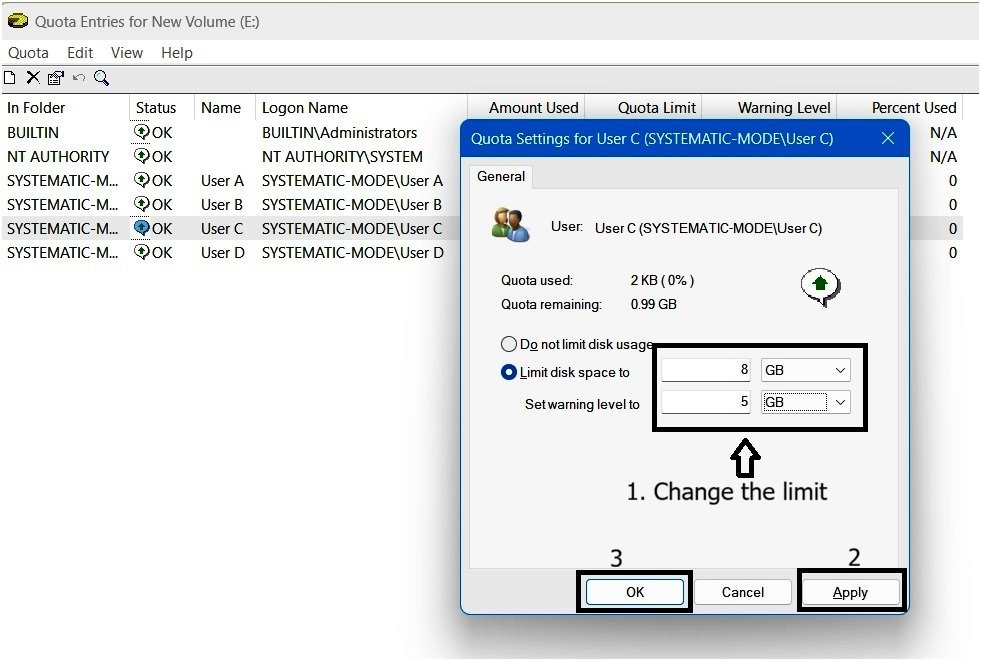
Change the values to 8 GB and 5 GB, click Apply, then OK. The entry updates immediately, and logging in as User C confirms it:
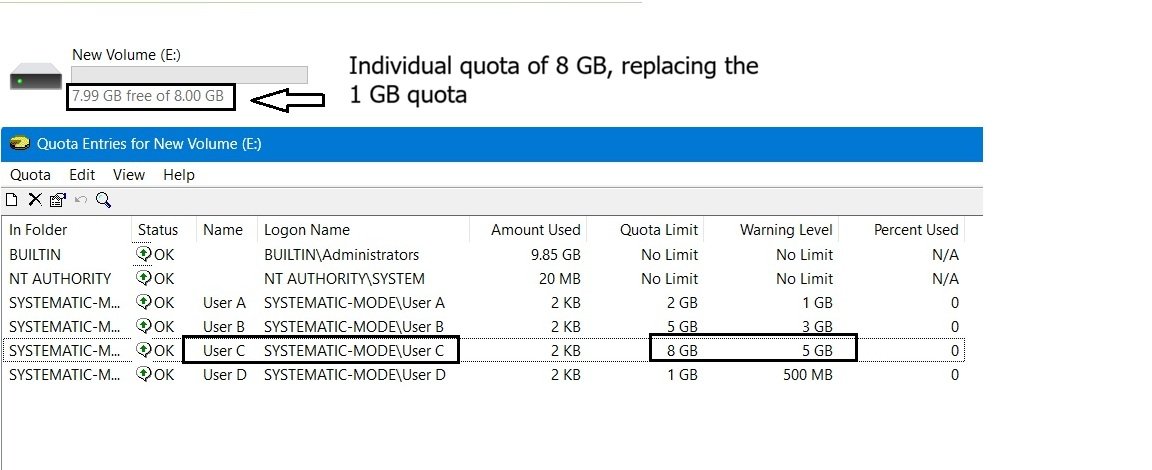
With that, individual quotas are fully covered — creating them from scratch, verifying them, understanding how they interact with a default, and converting an existing default entry into a custom one.
We’ve seen the Quota Entries area and used it to manage the quota settings for a user. But that’s only one part of what Quota Entries can do. There are several other options available for managing users and their quota settings.
Now let’s take a closer look at everything Quota Entries can do.
Part 6: Managing Quota Entries — Options, Deletion, and Event Logging
With individual and default quotas both covered, there’s still more the Quota Entries window can do beyond just creating limits. This part covers the remaining options available from here, the process (and logic) behind deleting an entry, and how to actually see quota events once logging is turned on.
6.1 The Quota Menu Options
Let’s open Quota Entries again and look at the Quota menu specifically — this is where every available action lives.
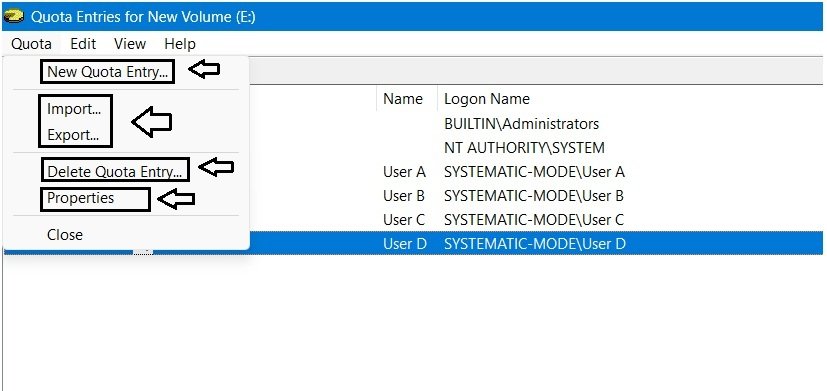
- The first option, New Quota Entry, needs no further explanation — we already covered it in 5.1.
- Next are Import and Export, which work exactly like import/export anywhere else in Windows: Export saves a volume’s current quota configuration to a file, and Import applies a saved configuration to another volume — useful if you want to replicate the same setup elsewhere without manually recreating every entry.
- Delete is the option that actually needs real explanation, which we’ll cover in the next subsection.
- Last is Properties, which opens the same limit-configuration window — from here you can adjust an existing user’s limit, or select “Do not limit disk usage” to remove their individual restriction entirely.
Note that several of these options are also available faster by simply right-clicking a specific entry directly.
That leaves the one option worth walking through properly: how deletion actually works.
6.2 How to Delete a Quota Entry
Before deleting anything, there’s a rule worth understanding first. In Microsoft’s own terminology, when a user stores files on a quota-enabled volume, that space is “charged” to them. An entry can only be deleted once nothing is charged to that user anymore — meaning their files must either be deleted, or ownership must be transferred to someone else, such as the administrator performing the deletion.
Here’s what makes this trickier than it sounds: the moment any user logs on to a system with quotas enabled, Windows automatically creates two small files under that user’s ownership — a $Recycle.Bin folder (their personal recycle bin space on that volume) and a desktop.ini file inside it (used for folder display customization). These are created silently, just from logging in, whether or not the user ever touches the drive. Until both are dealt with, an entry can’t be deleted at all.
Let’s make this concrete with a practical. I’ll create a new user, User E, and assign it an individual quota — 4 GB limit, 2 GB warning level.
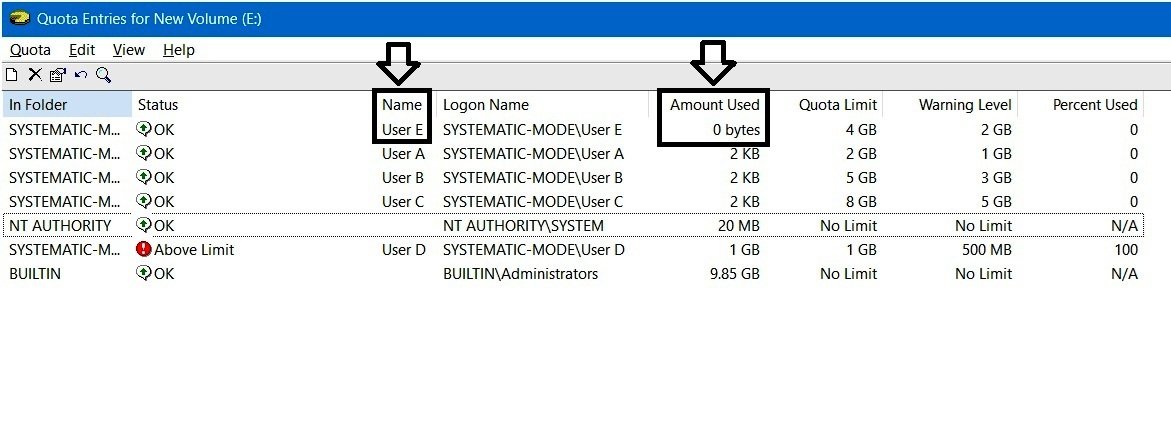
Notice Amount Used shows 0 bytes — because User E hasn’t logged in yet, so neither of those default files exists. Since nothing is charged to this user, deletion works immediately. Right-click User E and select Delete.
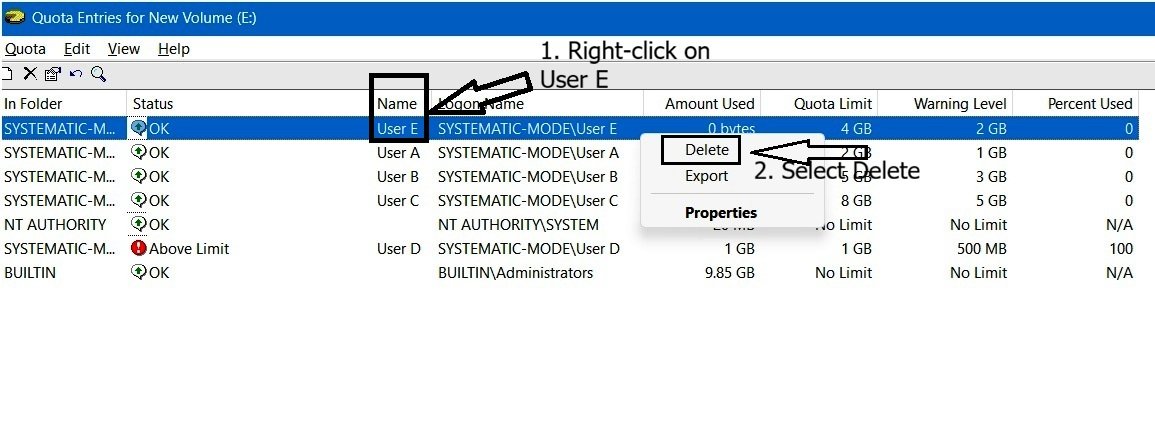
A confirmation dialog appears.
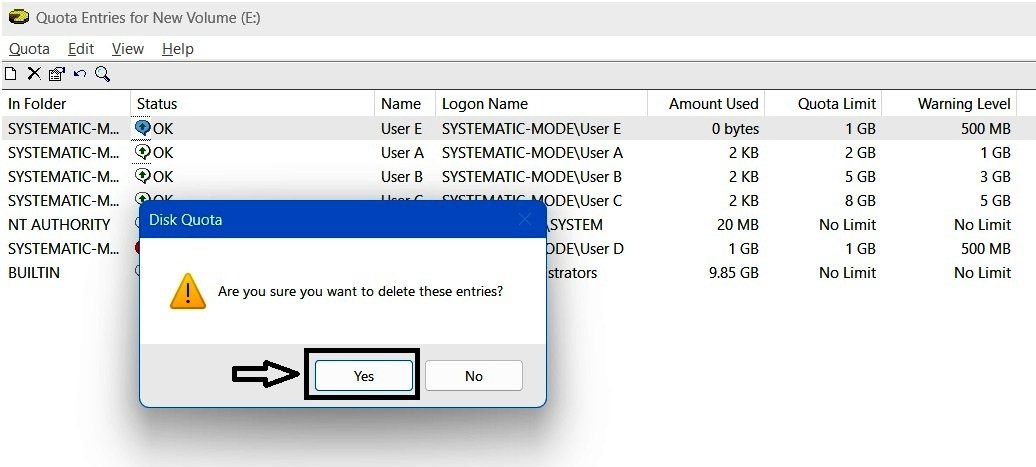
Click Yes, and the entry is removed instantly — because there was nothing charged to it in the first place.
Now let’s see the more common case. I’ll recreate User E’s entry with the same 4 GB / 2 GB configuration, but this time actually log into the account before returning here.
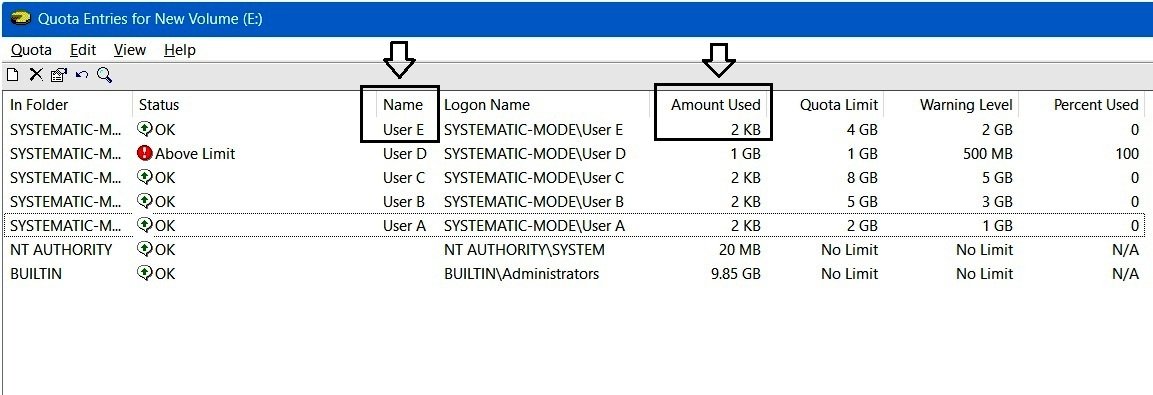
Exactly as expected — logging in alone generated that small charge. Now, attempting the same deletion — right-click, Delete, confirm Yes — behaves differently this time. Instead of deleting immediately, Windows opens a new window listing the specific files owned by User E.
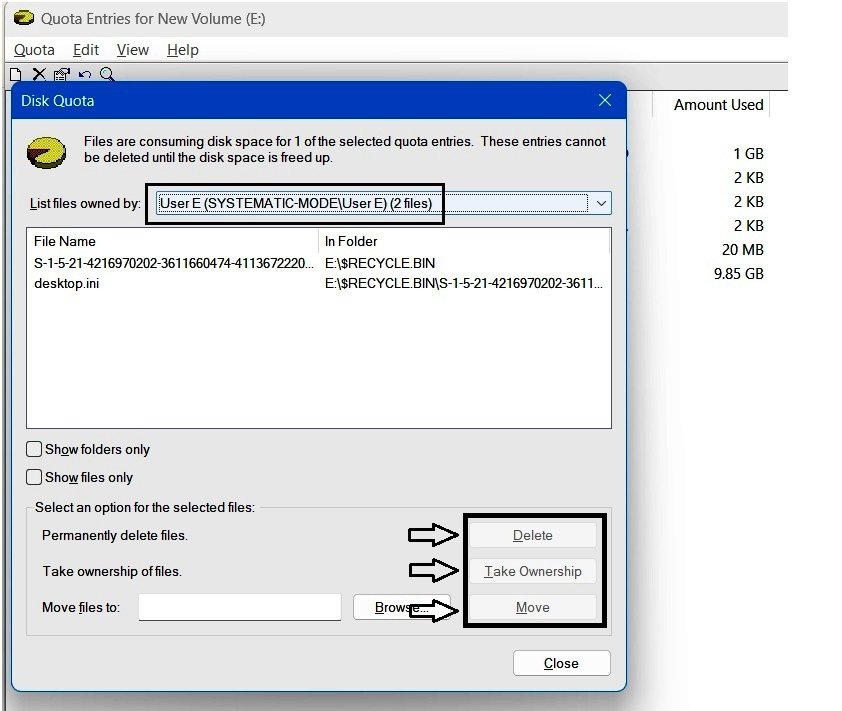
Both files we just discussed are right there. Three options are available per file: Delete, Take Ownership, or Move. Let’s start with desktop.ini — select it and click Delete.
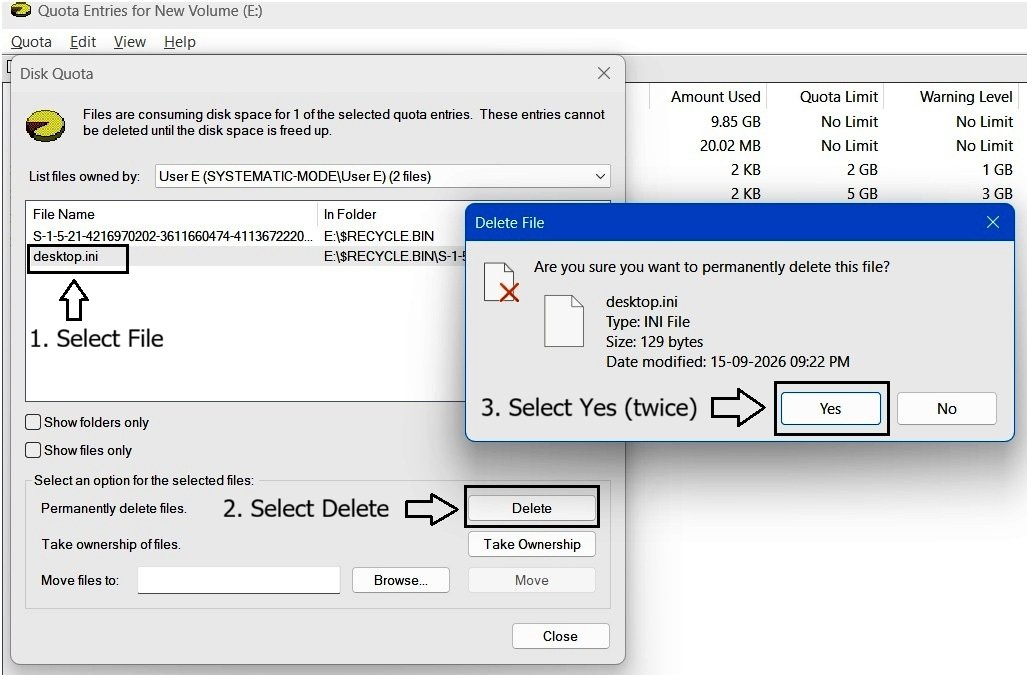
A confirmation dialog appears (twice, for permanent deletion) — confirm both, and the file is removed. That leaves $Recycle.Bin. Selecting it shows something different: Delete and Move are both unavailable, leaving only Take Ownership selectable.
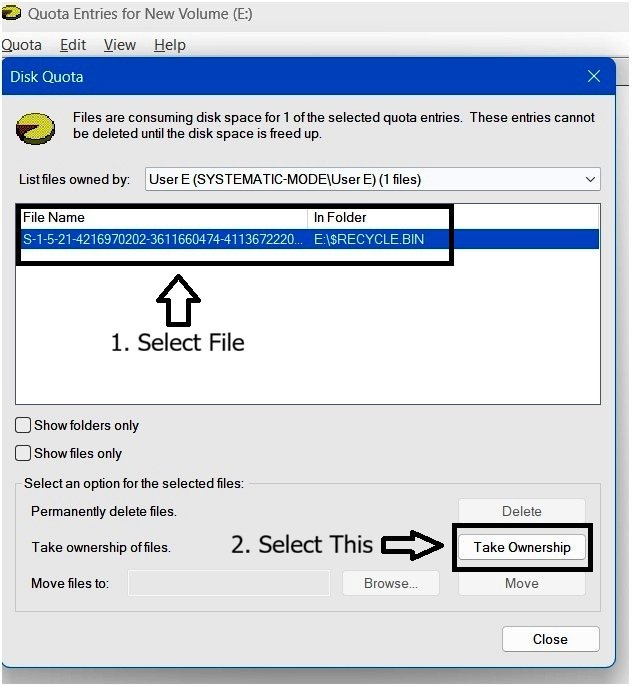
Click Take Ownership, and the file disappears from the list. With the list now empty, click Close — and User E’s entry is finally removed from Quota Entries.
What Does Deleting an Entry Actually Mean?
Here’s a question worth answering directly: If we remove a user’s individual quota entry, does that mean the user is completely outside the quota system? Let’s find out. First, confirming User E is gone from the list:
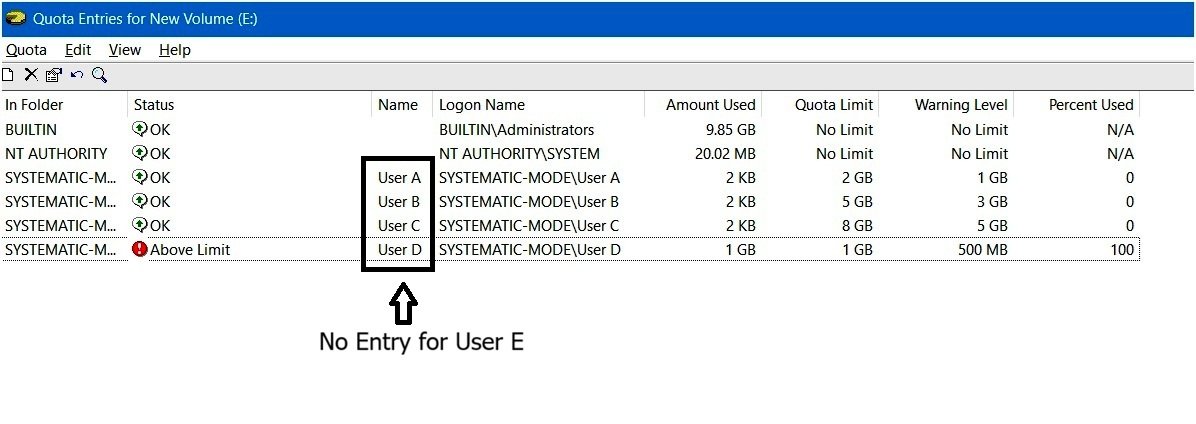
Now, logging into User E’s account:
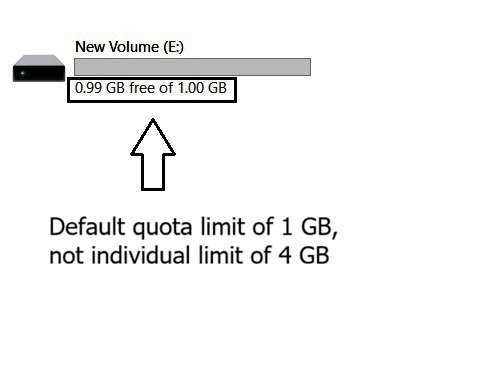
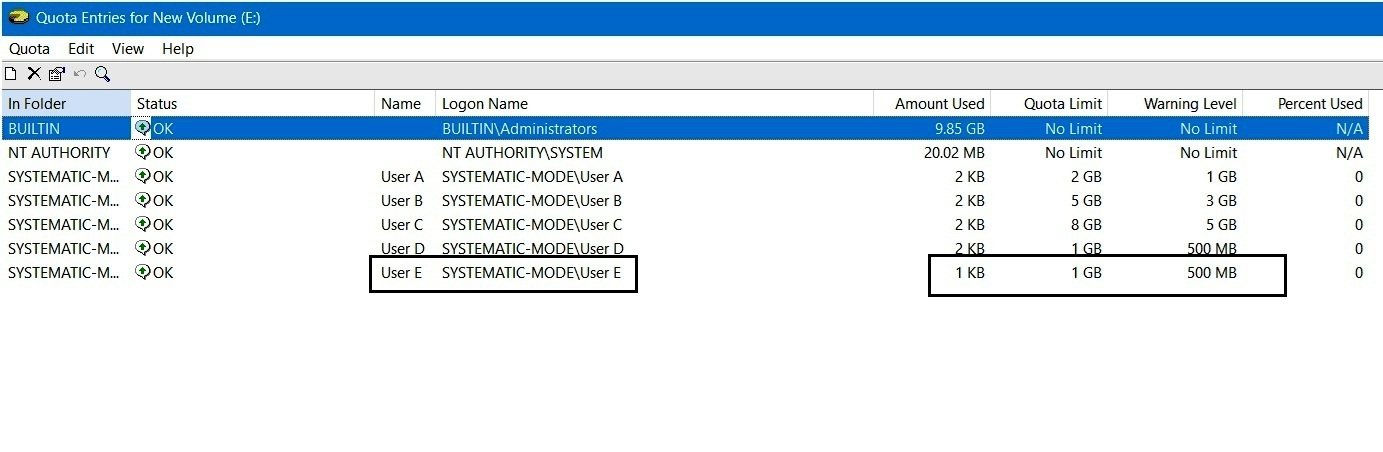
The individual 4 GB limit is gone, since we deleted that entry — but the drive’s default quota (1 GB, from earlier in this lesson) takes over automatically, and a fresh entry is generated for User E under that default.
One more test: this time, I’ll delete User E’s entry again, but also disable the default quota on this drive — leaving quota management itself active, with no default limit and no individual entries at all. Logging in as User E again:
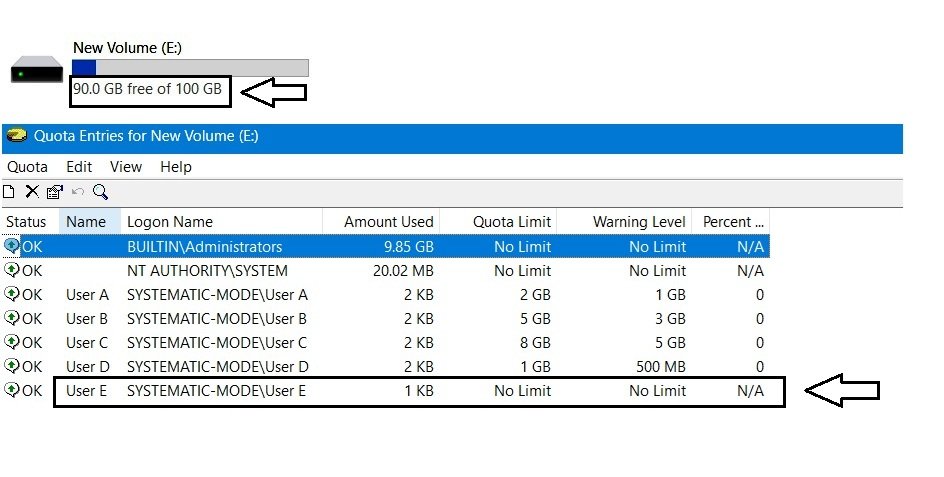
With no default and no individual limit in place, User E simply gets unrestricted space — but still receives an entry, showing “No Limit,” since quota management itself is still enabled on the volume.
With deletion and its logic fully covered, that leaves one more thing to explore before wrapping up this part: quota logging options.
6.3 Quota Logging Options (Event Logging)
Throughout this lesson, we’ve deliberately left the quota logging checkboxes unchecked. logging and Quota Entries are two separate systems — Quota Entries updates live regardless of logging, while these checkboxes control whether Windows writes a permanent record to the Event Log. It’s time to see that side of things directly.
The setup is the same as before: in Quota Settings, check both “Log event when a user exceeds their quota limit” and “Log event when a user exceeds their warning level,” with a default limit of 1 GB and a warning level of 500 MB.
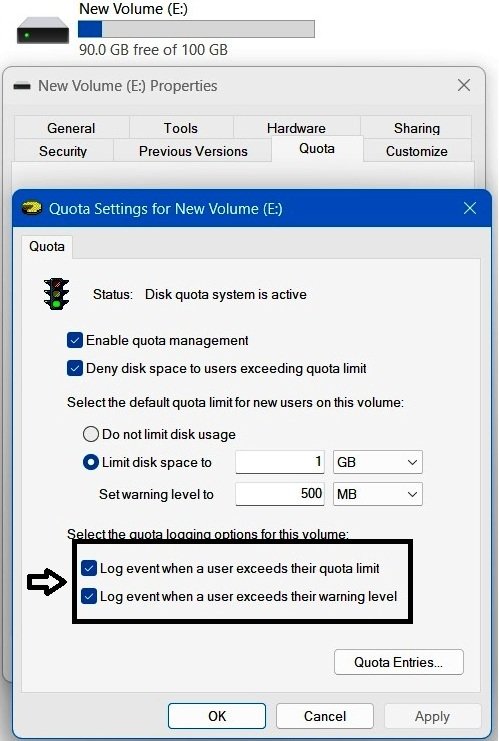
For this test, we’ll use User D and push past the full limit the same way we did earlier — no need to repeat that process in detail. Here’s the resulting Quota Entries status:
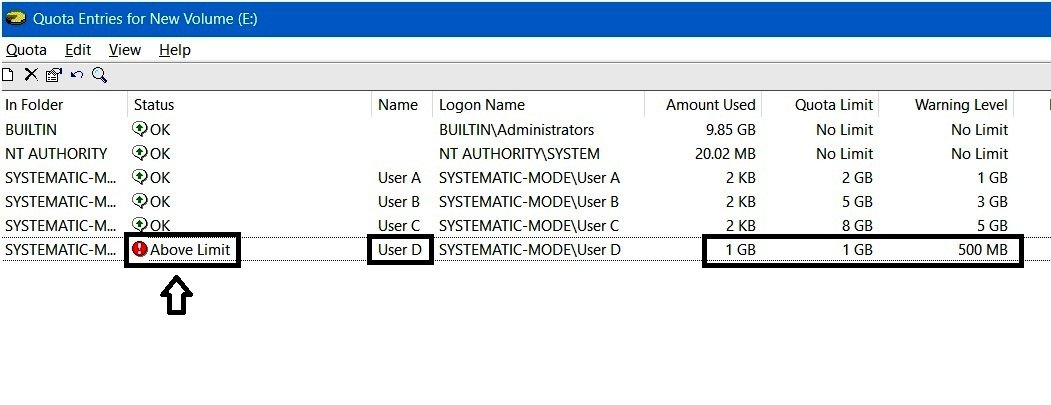
With the status confirmed, let’s open Event Viewer to see the actual log entry. You can reach it either through the Start menu search (typing “Event Viewer“), or via Run:
- Press Win + R
- Type
eventvwr(oreventvwr.msc) - Press Enter
In the left pane, expand Windows Logs, then click System.
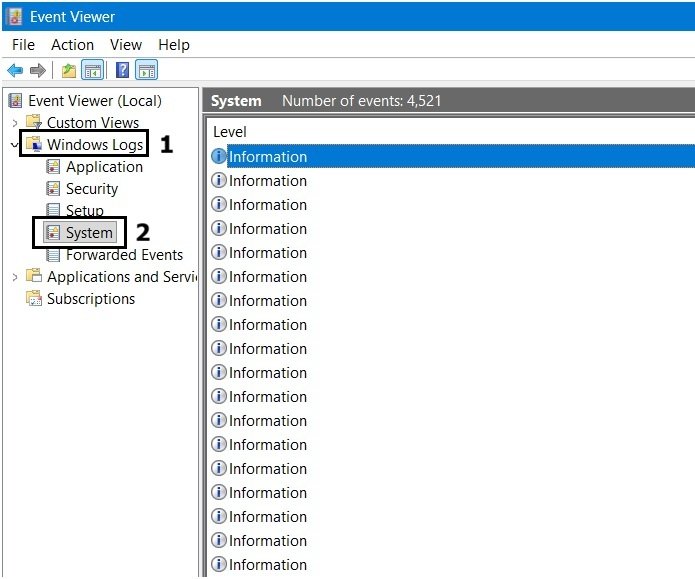
The center pane shows every system event, not just quota-related ones — so we need to search specifically. The fastest way is the Find option in the right-hand panel, or simply Ctrl+F.
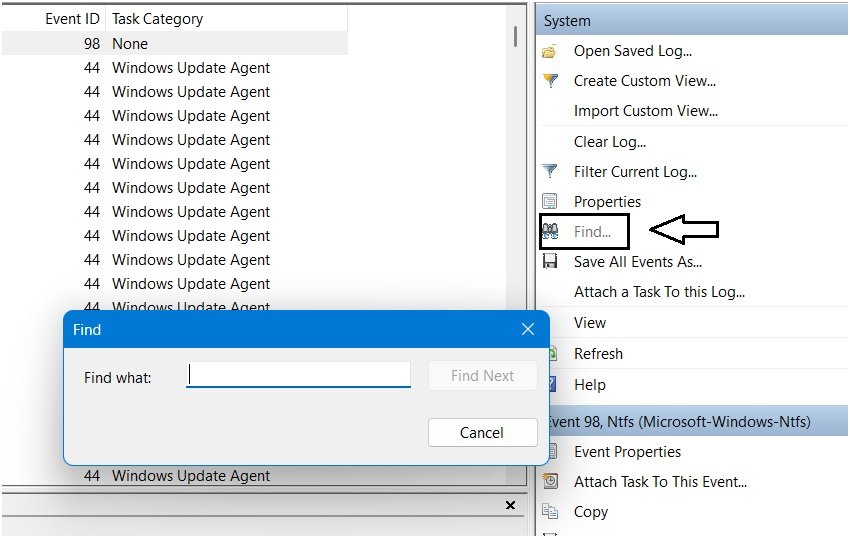
Type “Ntfs” into the search box and click Find Next repeatedly until an entry like this appears:
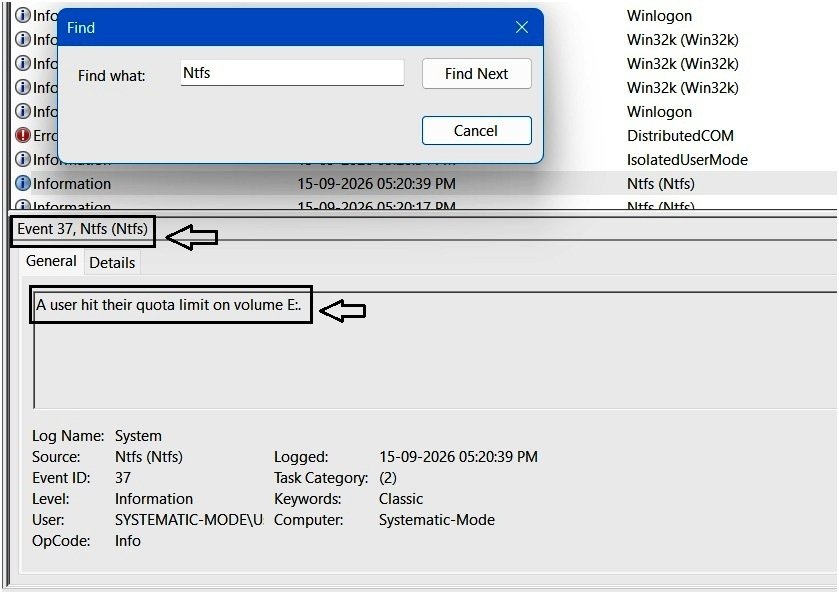
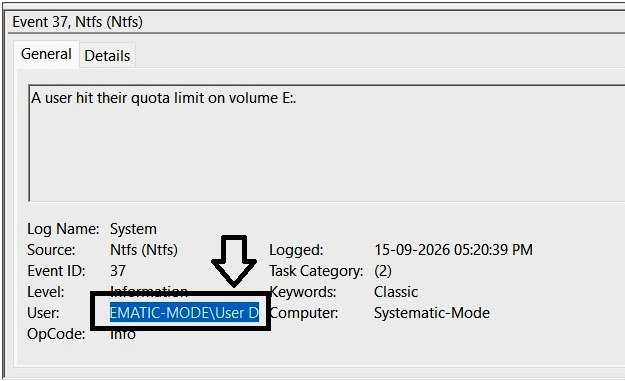
The message itself is fairly generic — it confirms a user hit their limit, but doesn’t show the username directly in the summary line. To see exactly who, look at the User field further down in the event details; since the full account name is often too long to display fully, click into it and use the arrow keys to reveal the complete name.
Using the same Find process again turns up the warning-level counterpart as well:
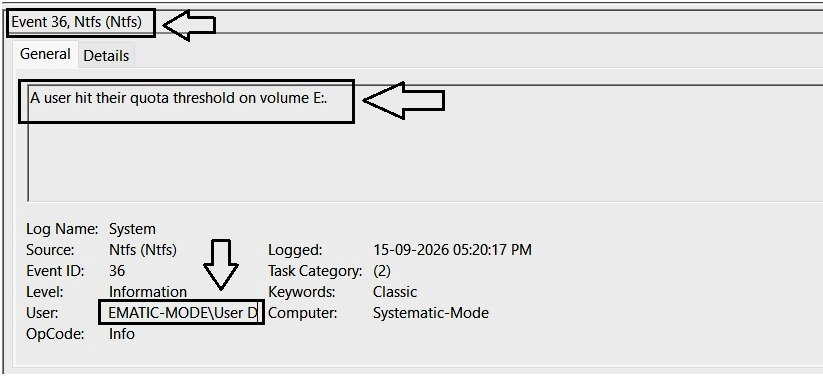
Event 36 corresponds to crossing the warning level, while Event 37 corresponds to hitting the actual quota limit.
One important thing to keep in mind while testing this yourself: unlike Quota Entries, which updates instantly the moment a user’s usage changes, Event Viewer does not log quota events immediately. By default, Windows batches these events and writes them to the log roughly once per hour — so if you check Event Viewer right after crossing a limit and see nothing yet, that’s expected behavior, not a sign that logging failed.
With that, Quota Entries and event logging are both fully covered — and it’s time for the final piece of this lesson: uncovering the “Administrator Mystery.”
Part 7: The Administrator Mystery — How Disk Quotas Behave for Administrators
This is the final and most important part of this lesson, and before going further, it’s worth being upfront: everything in this section comes from my own hands-on testing and discovery — not directly from official documentation. There’s a real chance some of what follows differs slightly from what Microsoft’s own documentation states, and there’s also a chance your own system could behave a little differently. With that understood, let’s dig into this administrator mystery.
Back at the start of this lesson, we established Disk Quotas as fundamentally an administrator’s tool — something an admin sets up to manage standard users sharing a computer. Yet Microsoft’s own documentation states plainly: “The system administrator can set quotas for specific users on a volume… A new user on the volume receives the default quota unless the administrator established a quota specifically for that user.”
Nowhere in that description is there any distinction between a standard account and an administrator account. That’s a real gap worth resolving. We’ve already confirmed default and individual quotas work exactly as expected on standard accounts — so the obvious next question is: what happens if we try to apply a quota to an administrator account itself?
7.1 Can a Quota Be Applied to an Administrator Account?
Before running this test, it helps to understand that Windows actually treats administrator accounts as two distinct categories. The built-in Administrator account is created automatically during Windows installation — it’s the original, most privileged account type going back to early versions of Windows, and it’s disabled by default on a fresh Windows 10/11 install (you may have needed to enable it yourself for this kind of testing).
Separately, any regular account — including the one you set up during initial setup, or one created afterward — can be added to the local Administrators group, gaining admin privileges without being that specific built-in account. Windows treats these two categories differently in several ways, though this isn’t the place to go deep into that — the important thing for now is simply knowing they aren’t the same thing.
Worth noting: every test throughout this entire lesson so far has actually been performed from the built-in Administrator account. For this practical, we’ll continue using that same account.
For a fresh test, I’ve set up a 50 GB NTFS volume — 10 GB in use, 40 GB free. I’ll create a new account, User F, and add it to the Administrators group.
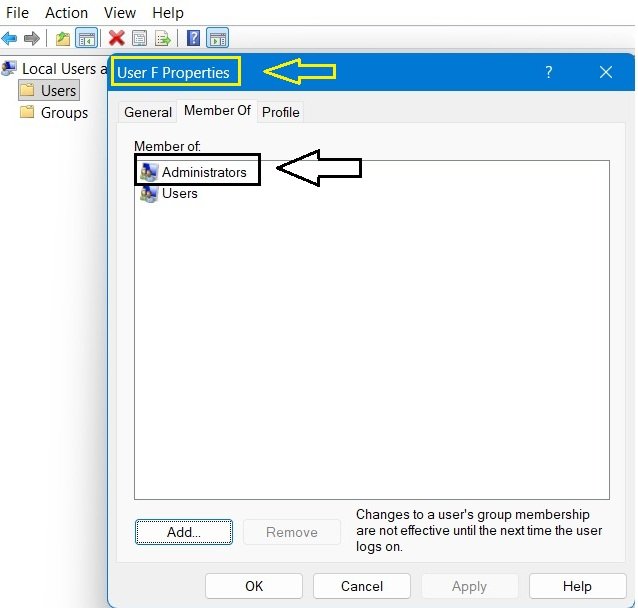
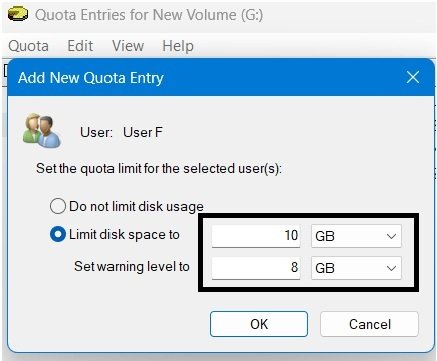
With User F now an administrator, let’s apply an individual quota — a 10 GB limit with an 8 GB warning level, using the same steps covered in Part 5.
Before logging in, here’s how the volume looks at this point:
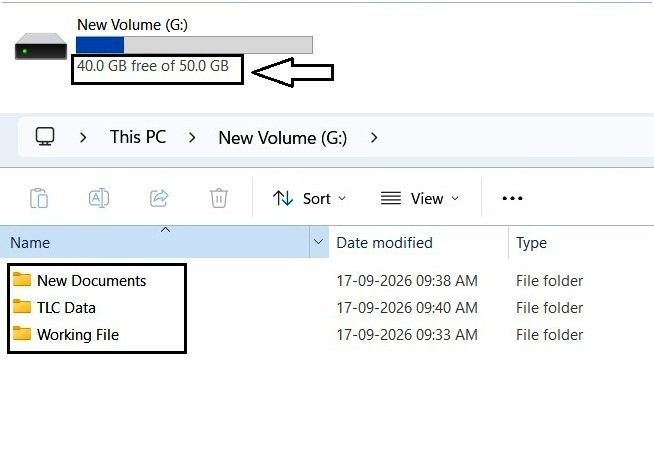
Keep in mind, User F isn’t a standard user this time — it’s a member of the Administrators group. Let’s log in as User F and find out whether the quota actually applies.
7.2 Verifying the Quota on an Administrator Account
Logged in as User F:
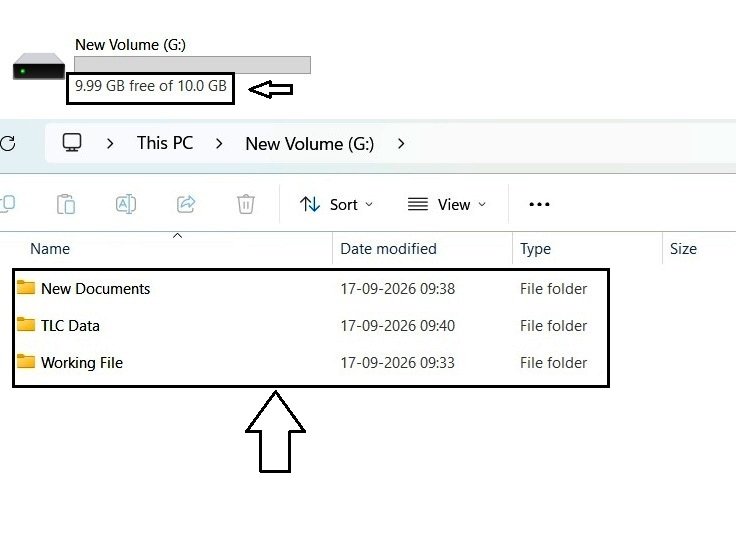
The 10 GB individual quota limit has been applied successfully to the account, even though it belongs to the Administrators group. Remember, this is an individual quota, so the 10 GB limit applies only to this specific user. If we had configured a default quota limit instead, the same limit would apply to User F and every other user account on this system.
We won’t repeat that specific test here, since it would simply demonstrate something we’ve already seen. But it illustrates exactly why we made an important point at the beginning of this lesson: applying a quota to an administrator account is, practically speaking, meaningless.
Here’s why. The quota itself applies identically, whether the account is standard or administrator — that much is confirmed. The difference is what happens next: because User F holds administrator privileges, nothing stops that same account from simply going into Quota Settings and changing or removing its own restriction. Let’s demonstrate this directly.
Still logged in as User F, open Quota Entries, right-click User F’s own entry, and select Properties — this opens the same quota configuration window we’ve used throughout this lesson.
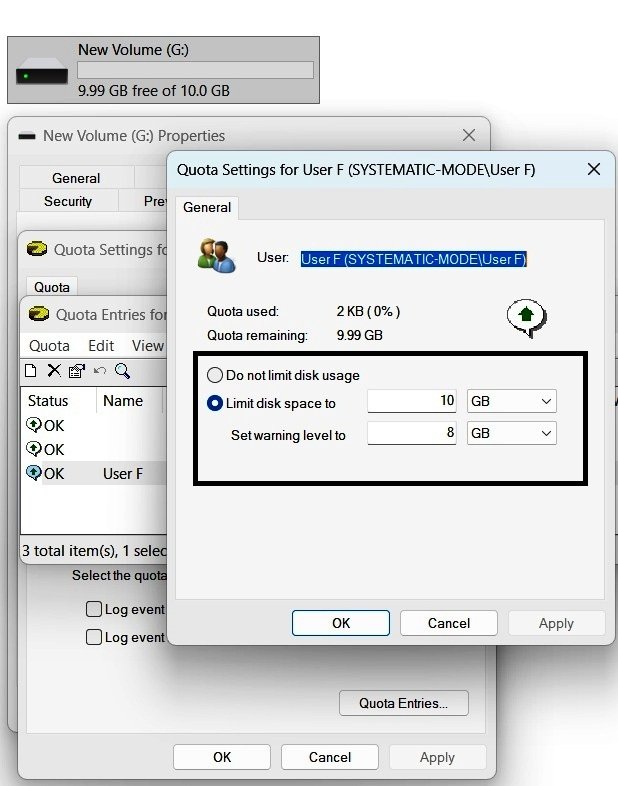
User F can change the quota limit or simply select “Do not limit disk usage.”
After selecting that option and clicking Apply and OK, the quota entry immediately changes to “No Limit.” File Explorer then shows the full 40 GB free out of 50 GB again.
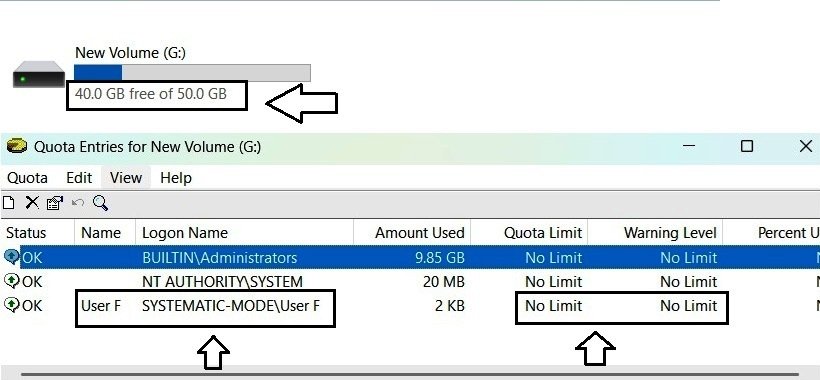
This confirms it: an administrator-privileged account can simply undo whatever restriction was placed on it, which is exactly why this kind of quota carries no real enforcement value against someone with admin rights.
That leaves one final, more interesting question. We’ve now tested quotas on a standard user and on an administrator-grouped account — but what about the literal built-in Administrator account itself?
7.3 Can a Quota Be Applied to the Built-in Administrator Account?
This is the final and most interesting test in this lesson. Still working from User F, let’s set up a fresh 10 GB NTFS volume — completely empty — and enable quota management on it.
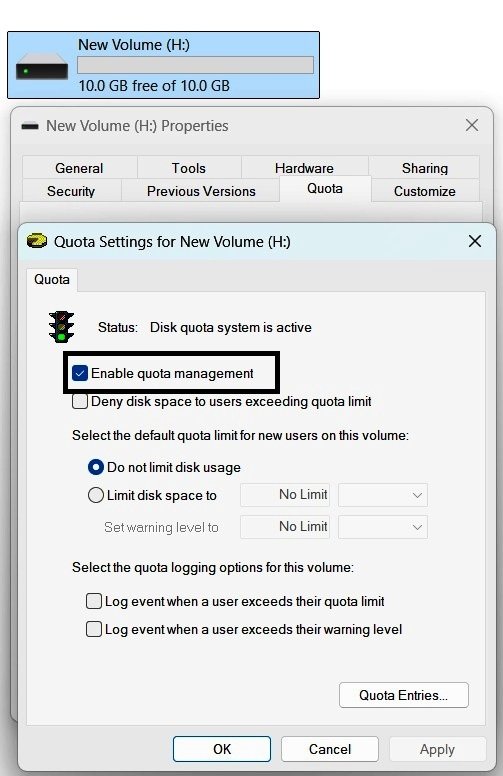
As established earlier in this lesson, enabling quota management always creates two default entries automatically — and one of them belongs to the built-in Administrator, listed with “No Limit.”
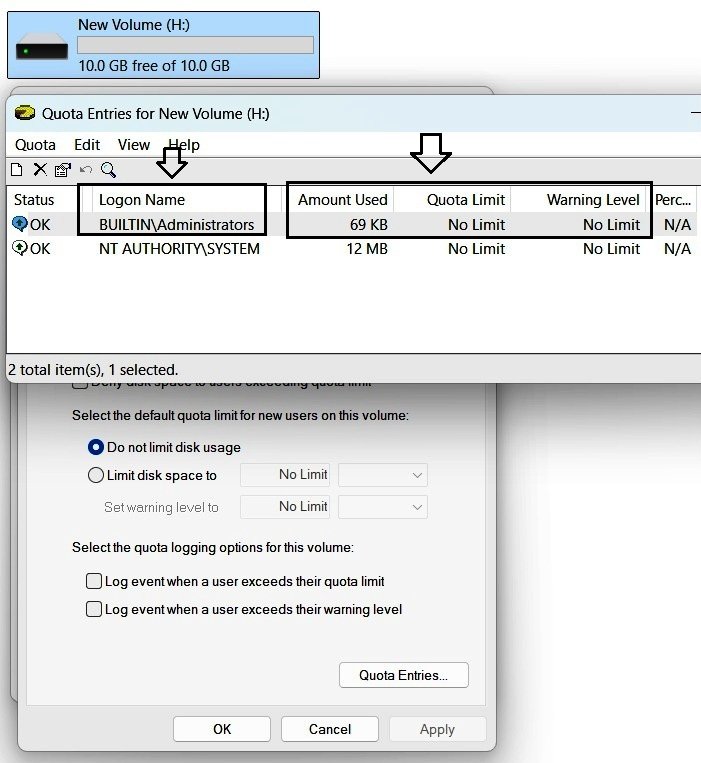
You might reasonably ask how we can be certain this entry actually corresponds to the built-in Administrator account, since the name alone doesn’t prove it. Let’s confirm this directly. At this point, the entry shows just 69 KB used. I’ll log into the actual built-in Administrator account and copy 1 GB of data onto this drive, then come back and check whether that entry updates.
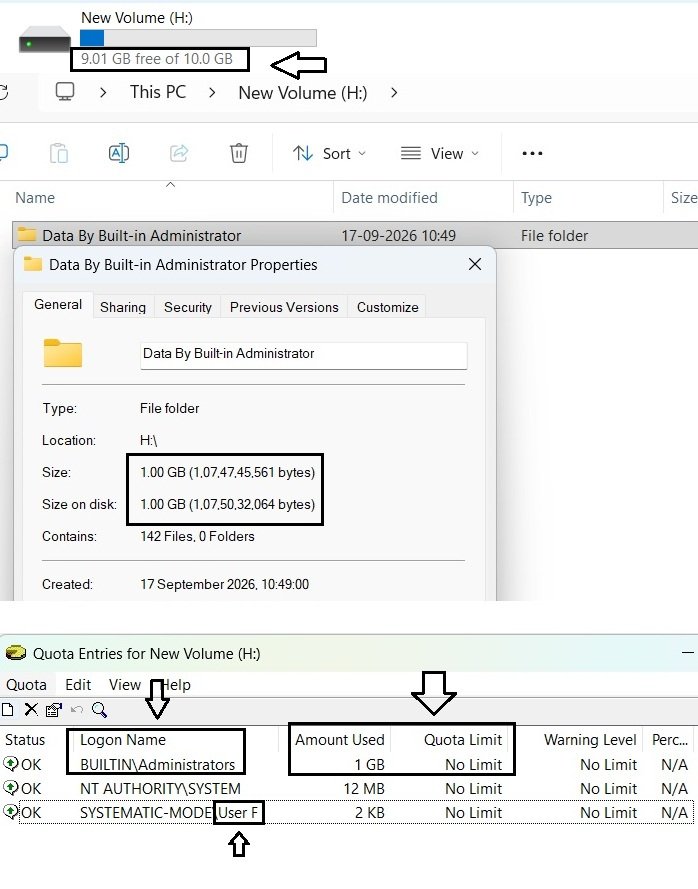
That confirms it — the entry’s usage jumped from 69 KB to 1 GB, exactly matching the data copied while logged in as the built-in Administrator. There’s also something else worth noting here: User F’s own entry now appears in the list too — it wasn’t there when the volume was first created, but logging out and back in generated it.
This reinforces something we already established earlier in this lesson: an entry is created for any account the moment it logs on, including the very administrator account that configured the quota in the first place — no special exception just for being the one managing it.
With the Administrator entry confirmed, let’s try applying an actual limit to it. Right-click the Administrator entry and open Properties, which brings up the same quota configuration window used throughout this lesson — except this time, something looks different from everything we’ve seen so far.
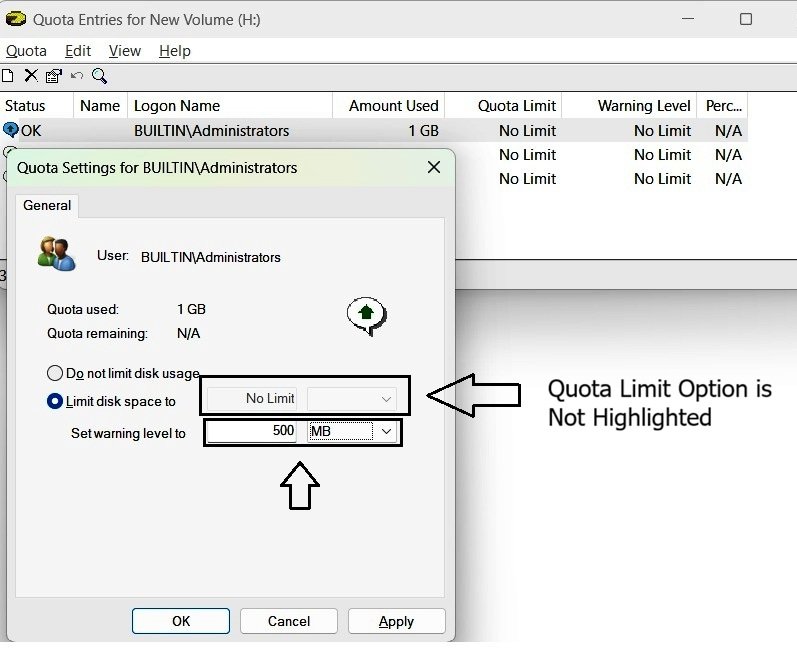
Selecting “Limit disk space to” shows the field itself is greyed out entirely — it cannot be set. The warning level, however, remains fully editable. Let’s set that to 500 MB. Click Apply, then OK.
Quota Entries refreshes automatically, and the Administrator’s status changes to “Warning” — since it already holds 1 GB of data, well past the 500 MB threshold we just set.
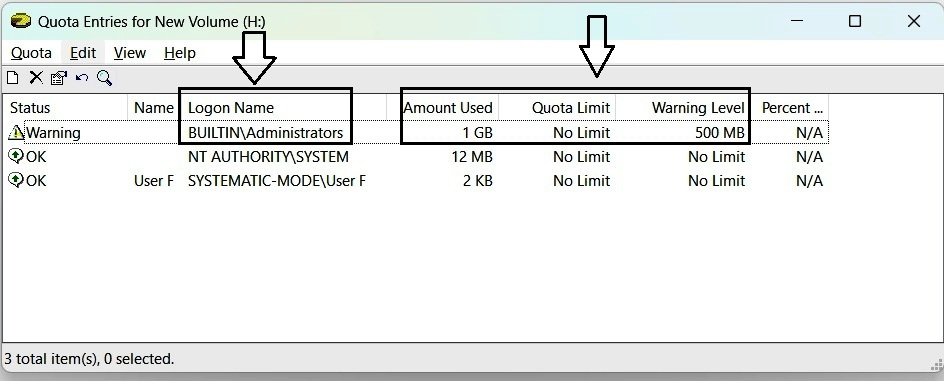
That gives us the final, conclusive answer this lesson set out to find: a fixed amount of storage cannot be enforced on the built-in Administrator account — Windows structurally prevents it — but a warning level can be set and does function normally, tracking and flagging usage without ever restricting it.
With that, the practical portion of this lesson is complete. Let’s wrap up with the summary and insights.
Summary: Key Takeaway
- Disk Quotas is a built-in NTFS feature that lets an administrator limit how much storage each user consumes on a volume — tracked by file ownership, not folder location, and applied per volume rather than per folder
- It requires an NTFS-formatted drive and administrator privileges to configure — by design, it’s an administration tool, not something a standard user sets up for themselves
- Enabling it opens a settings screen with four independent controls: a quota limit and warning level, an enforcement switch (soft vs. hard, informally), event logging, and Quota Entries — the live, per-user record of usage and status
- A soft quota (Deny unchecked) tracks usage but never blocks anything; a hard quota (Deny checked) genuinely enforces the limit, giving users a real “not enough space” error once they hit it
- Default quotas apply to every user without an individual entry; individual quotas always take priority and are never overridden by a later-applied default
- An entry can’t be deleted while any data is still “charged” to that user — including the small
$Recycle.Bin/desktop.inifiles Windows creates automatically the moment someone simply logs on - Quota events are logged separately in Event Viewer (Event ID 36 for warnings, 37 for limit violations), and — unlike Quota Entries, which updates instantly — these events can take up to an hour to actually appear
- Quotas apply to every account type, including administrator-grouped accounts — but since an admin-privileged account can simply undo its own restriction, this offers no real enforcement against them
- The only account structurally excluded from ever having a hard limit is the literal built-in Administrator account — Windows greys out the limit option entirely for it, though even it can still be assigned a warning level
Note: everything covered in this lesson was done entirely through the graphical interface. Windows also allows managing disk quotas from the command line using
fsutil quota, including scripting and batch-based configuration — but that’s a deeper topic in its own right, and one we’ll cover properly in a future, dedicated lesson.One More Note: all the practicals in this lesson were performed on Windows 11, but based on my own research, the path to Disk Quotas settings — enabling, disabling, the deny option, warning levels, and Quota Entries — appears to have remained the same all the way from Windows XP through Windows 11. I haven’t personally run deep hands-on practicals on each individual older version, but everything I’ve found while researching this points to the same settings and process throughout.
Systematic Mode Insight
Before wrapping up, I want to share a few personal takeaways and observations from working through this lesson. Honestly, I didn’t expect Disk Quotas to have this much depth going in. The administrator behavior in particular was surprising. Writing this lesson wasn’t just a matter of recalling what I already knew; it genuinely taught me new things about a feature I thought I understood.
If you followed this lesson all the way through, one question probably surfaced on its own:
Should you actually enable the built-in Administrator account just to apply a quota to it?
My honest opinion — it’s not necessary. As we saw throughout this lesson, Windows treats the built-in Administrator very differently from any other account, carrying far more inherent power and permission than a typical admin-grouped user. Unless you already understand exactly what that account can do and why it behaves the way it does, there’s no real practical reason to go out of your way to enable it just for quota purposes. The choice is yours, but it’s worth going in with your eyes open.
The second, more common question is simpler:
Should you use a default quota or individual quotas?
In my opinion, it comes down to your environment.
- If you’re managing a small, relatively stable group of users — say, a family or a small office where the same people use the machine day to day — individual quotas make more sense. You get precise control over who gets how much, and you can easily adjust someone’s limit up or down without touching anyone else’s.
- On the other hand, if your environment sees people coming and going regularly — a public lab, internet cafe, library, or shared computer room — a default quota is more practical, since every new user is automatically covered without needing manual setup each time.
And, also, you’re not locked into choosing one or the other — both can run together, with individual entries overriding the default exactly where you need them to.
One last thing worth repeating clearly, since it’s easy to lose sight of after this much detail:
Disk Quotas is a storage management tool, not an access-control or data-protection feature. It controls how much space a user can consume, but it does not restrict their access to files or protect those files from being changed or deleted. A quota controls storage usage, not what a user can do with the data.
What’s Next
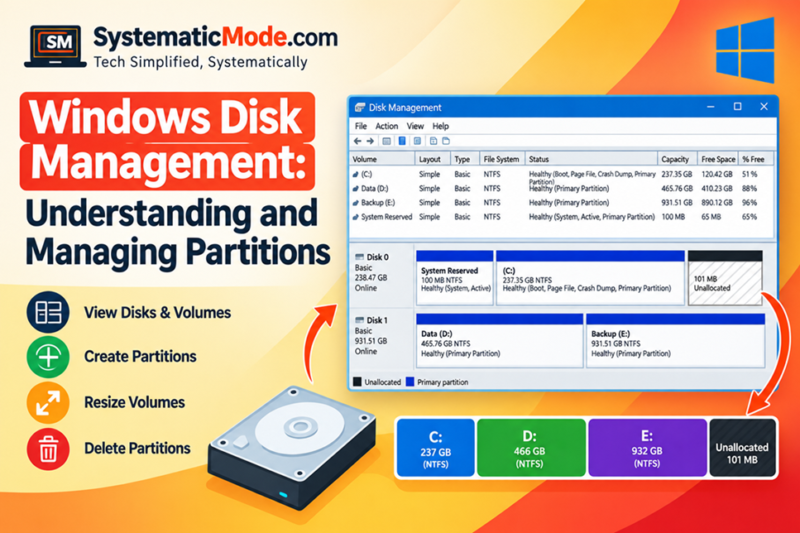
Throughout this lesson, we focused on managing space within an existing drive — deciding how much of it each user gets to use. But we never really looked at where a drive itself comes from in the first place: how partitions are created, resized, or managed to begin with.
That’s exactly where we’re headed next — into Windows Disk Management, the tool behind creating and shaping the very drives and partitions we’ve been applying quotas to throughout this lesson.
Stay tuned and we’ll see you in the next lesson on SystematicMode.com!

2 thoughts on “Windows Disk Quotas: What They Really Do and How to Limit Storage Per User”